CloudFront security part 1
By using CloudFront in front of our applications, we already took the first step towards better security. CloudFront offloads some of the burden on your servers, freeing up capacity that can be used to mitigate attacks. It also enables some DDOS protection, but not all.
In previous posts we focussed on getting our setup working. We can now run a Ghost blog or WordPress website behind CloudFront. Honest visitors of our site type in the domain name of our website and are routed to our CloudFront distribution. CloudFront will then either serve files from cache or contact the origin server. A major problem is that not everyone is honest and we left the door open for these dishonest people to come in.
Problems
The first problem is the fact that we have to open a port to our server to allow CloudFront to request files. This is inevitable, but we actually only want CloudFront to be able to access this open port. So can we somehow create a fence that only CloudFront can open?
The second problem was introduced by allowing CloudFront to offload SSL decryption and encryption from the EC2 instance. This means that not only did we open a port, it is also unencrypted. This makes it even more urgent to limit access to that port.
Solution 1
For the first problem we want to create a "fence" that only CloudFront can open. We do this by generating a key. I created a long random string (without spaces and special characters as those gave me problems) with my password manager. Now in CloudFront go to the distribution and select the Origin tab. Click Edit and then Add header. Give it a name like X-From-CloudFront or whatever you like and add the random string as value. Save the changes. CloudFront now has the key to open the fence.
Now we have to create the fence itself. This is different in each server package.
HAProxy
Create an ACL in the Frontend. In pfSense first name the ACL From_CloudFront select Custom acl as Expression and enter the Value: hdr(X-From-CloudFront) -i "your-long-random-string". This results in this rule:
acl From_CloudFront hdr(X-From-CloudFront) -i "your-long-random-string"The second step is to tell HAProxy what to do with this ACL. Create an Action http-request deny. As deny-status set 403. The Condition acl name will be From_CloudFront. This results in rule:
http-request deny deny_status 403 if !From_CloudFront ! aclcrt_CloudFront_HTTPS_jodibooks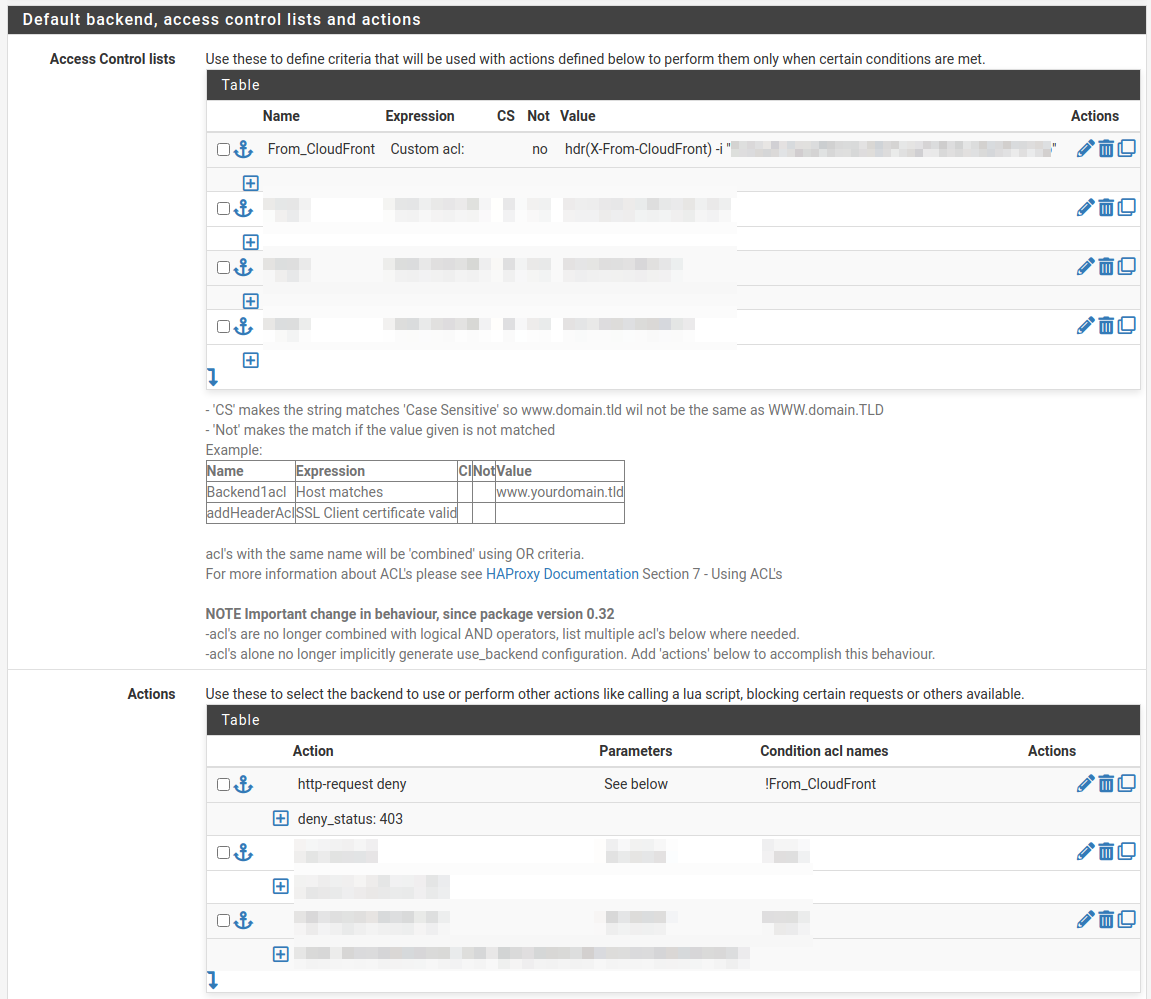

Nginx
In Nginx open the site config file and add the code below inside the server block.
if ($http_x_from_cloudfront != "your-long-random-string") {
	return 403;
}
IIS
In IIS make sure the "URL Rewrite" package is installed. Go to your website and open it. On the right click Add Rule(s).... Give the rule a Name Block-Non-CloudFront-Traffic.
- Requested URL:
Matches the Pattern - Using:
Regular Expressions - Pattern:
.* - Ignore case selected
- Logical grouping:
Match All
Click Add:
- Condition input:
{HTTP_x_from_cloudfront} - Check if input string:
Does Not Match the Pattern - Pattern:
your-long-random-string - Ignore case not selected
Click Ok and proceed configuring the rule:
- Action type:
Custom Response - Status code:
403 - Substatus code:
0 - Reason:
Forbidden: Access is denied. - Error description:
You do not have permission to view this directory or page using the credentials that you supplied.
This adds a rewrite rule to the web.config of your application. You can also paste the following snippet yourself:
<rewrite>
    <rules>
        <!-- Only allow access from CloudFront: header "X-From-CloudFront" is required -->
        <rule name="Block-Non-CloudFront-Traffic" stopProcessing="true">
            <match url=".*" />
            <conditions>
                <add input="{HTTP_x_from_cloudfront}" matchType="Pattern" pattern="your-long-random-string" ignoreCase="false" negate="true" />
            </conditions>
            <action type="CustomResponse" statusCode="403" statusReason="Forbidden: Access is denied." statusDescription="You do not have permission to view this directory or page using the credentials that you supplied." />
        </rule>
    </rules>
</rewrite>
Rate limiting
Now, people without the key cannot reach our application data. This still leaves us vulnerable to brute force attacks. Somebody can start guessing your random string by continually trying to login until he finds the right key. This can overload your server, so we will limit the amount of tries anyone can do. This will be described in a future post.
Solution 2
The second problem, of using an unencrypted connection to the server, will be "solved" by only allowing CloudFront IP address to connect to this port. Anyone else who tries to access the application through this port, will be prevented from doing so by an AWS security group.
A security group acts as a virtual firewall. By using these groups, traffic is blocked at the AWS network level instead of on our server. We have one problem though. Which IP addresses do we have to allow?
Follow this guide to create a Lambda function that creates and updates the security groups for you. After implementing you will have 3 security groups that you can now attach to your EC2 instance running your application. Now only CloudFront can access your server. Combined with solution one, only your CloudFront distribution can access your application.
WAF
Again people without a key cannot reach the application. To improve this, we want to prevent people without a key from reaching our server. We want them to be stopped at the network layer, not the application. That is where we'll need to move the rate limiting and header check to a firewall. In AWS that's the WAF (web application firewall). More on that in a future post.