CloudFront in front of your application
Disclaimer: this guide is written in March of 2022 and confirmed to work with Ghost 4.37.0, Umami 1.27.0 and Wiki.js 2.5.276. The services will be self-hosted on an on-premise (homelab) server behind a pfSense 2.7.0 / 22.01 firewall with HAProxy 2.4.9. We'll make use of the following AWS services: Certificate Manager, Route53 and CloudFront. If you want an easier implementation using AWS Lightsail only, check out this blog: How to Set Up a Ghost Blog in AWS including a CDN ($6/month).
March 11 2022: add specific CloudFront policy for
/api/collectJanuary 29 2025: in Umami v2
/api/collect has been renamed to /api/sendWhat's a CDN
When you have a homelab you are going to host some applications. Most of them will be used internally only, but you might also want to host your own website or blog. Maybe you will even host the website of your business or even someone elses. In those cases you might want to consider using a CDN.
I initially learned about CDN's (content delivery networks) for there main function: hosting static data like images and downloads nearer to your website visitors. There are multiple reasons why you would want this. Your server has to send less data, saving bandwidth and your website loads faster, possibly getting you a higher spot in Google.
But (some) CDN's like CloudFlare and AWS CloudFront do more. They make it easier to secure your website traffic with SSL certificates, they have build-in layer 3 & 4 DDOS protection and they scale virtually endlessly, no matter how many visitors your site gets. Sounds great right?
What about dynamic websites
Traditionally a CDN was used to store static data. That means data that doesn't change (between users or sessions). Think of images, .css or .js files and downloads. That meant that if you were running a blog like WordPress of Ghost, you uploaded those files to a CDN, while the pages with your posts would still be directly hosted by you. So no protection there. That is what I initially did with this blog a few days ago.
An easier way would be to just place the whole server behind CloudFront or CloudFlare and have them figure out if it's an image that needs to be send or a post. I had been playing with it for a day and it looked to be possible. It turned into a 3 day wrestling match, but I can now proudly say that it indeed works!
The setup
My Ghost blog, Wiki.js wiki and Umami analytics are each running in their own Docker container, each inside an LXC container (long story: "Docker is cool → Docker volumes are annoying → Maybe Docker has its uses → I have to learn Kubernetes/Docker Swarm → Waiting to start learning..."). From my pfSense router each of these applications is made public to the internet using HAProxy. HAProxy is used as a reverse proxy that also does SSL offloading. So my applications are all accessible through https, while each application internally communicates over http.
Ok, so what is the route a request from a user/visitor is going to look like? When a somebody wants to open my blog, he enters the address in his browser: blog.joeplaa.com. Some browsers already automatically try to use https, but if not HAProxy will fix that. The browser now sends a request to CloudFront which checks if the requested file is in its cache. If it is, it will respond by sending that file. If not, CloudFront sends a modified request to the origin which in our case is pfSense.
# Route
Browser --> CloudFront --> pfSense --> HAProxy --> Application

# In CloudFront terminology
Viewer  -->   Cache    --> Origin
In pfSense I have forwarded ports 80 and 443 to HAProxy, so the CloudFront request is passed straight to HAProxy. The last step is for HAProxy to forward the request to the server which hosts the application.
The problems
This all sounds easy to do and it is if you know what to do exactly. For me however it wasn't clear what all the potential pitfalls could be and I couldn't find a complete guide on how to set this up. In the end I had three main problems:
- How to configure CloudFront (cache)
- How to configure HAProxy (set specific headers)
- How to configure CloudFront to allow CORS requests
1. Setup CloudFront part 1: Create distribution and cache behavior
I'm running three applications that I want to put behind CloudFront: Ghost, Umami and Wiki.js. As they are all hosted on a subdomain of joeplaa.com I can create a single CloudFront distribution. The main limitation is that you can only use a single SSL certificate that has to contain all domains you are using in the distribution. You can create a single certificate for multiple domains, but you have to update it when you add another application.
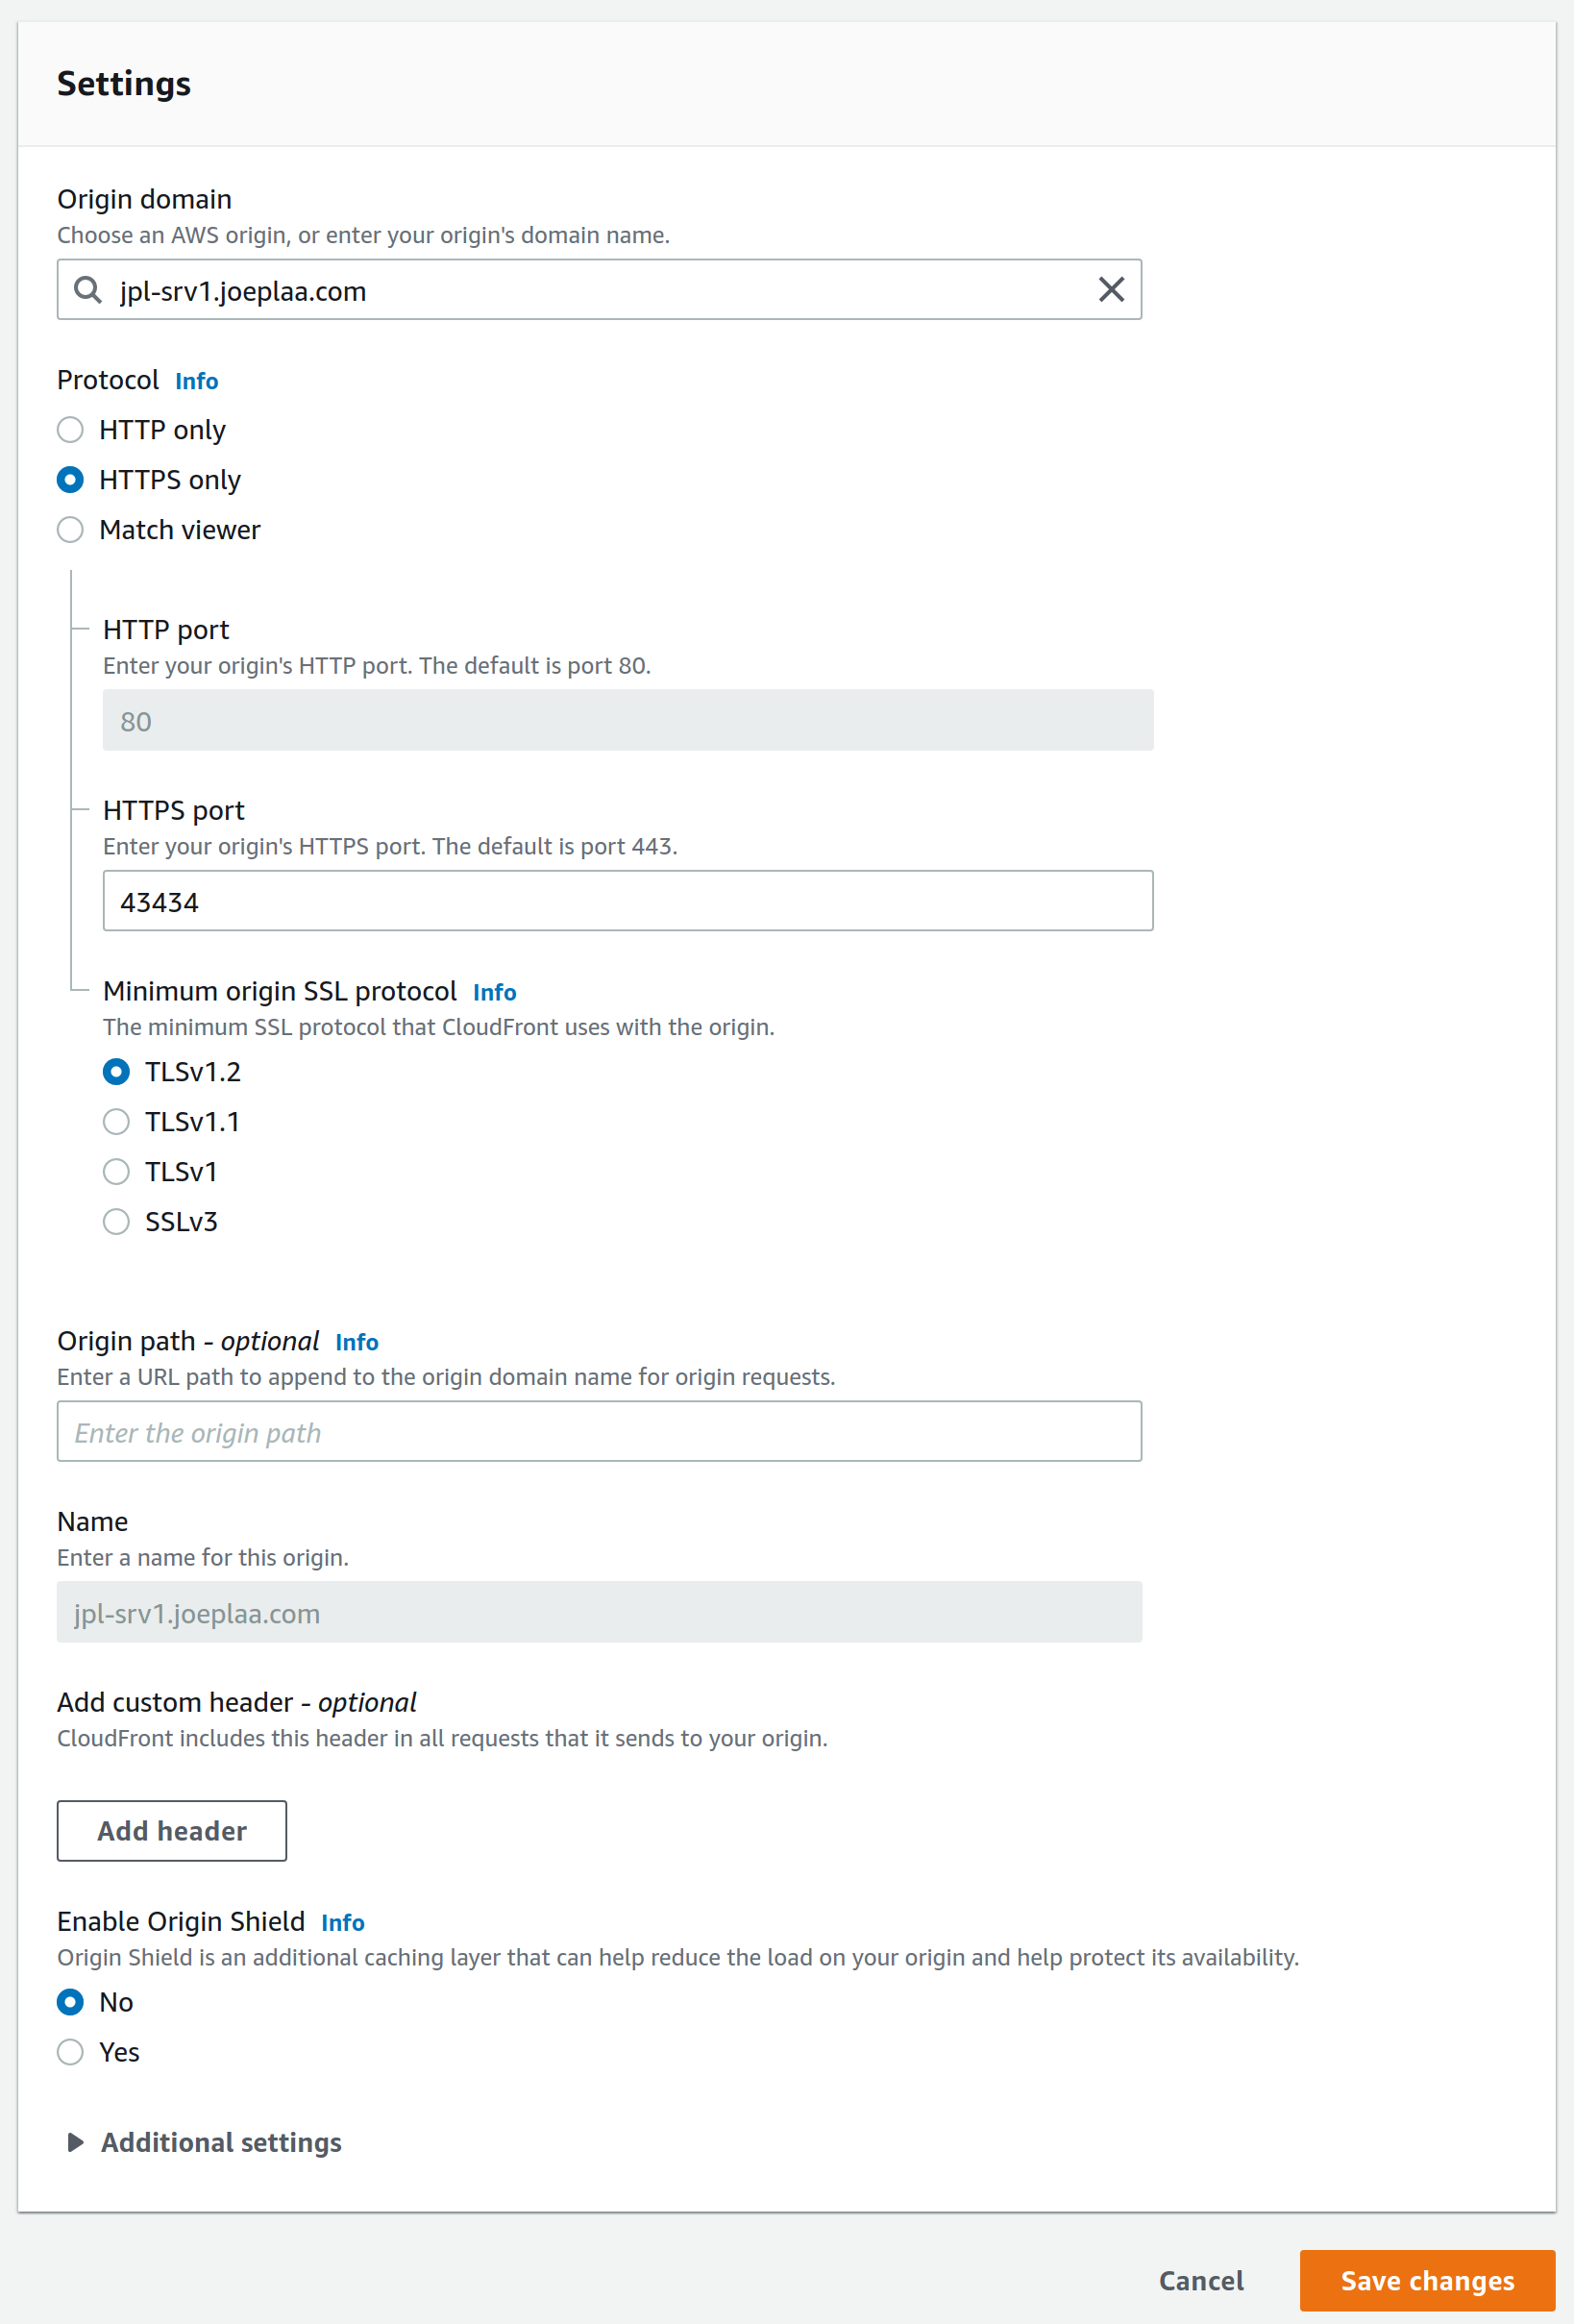
Configure origin
We start by configuring the origin. This is the origin of the data, our server. Because my HAProxy setup creates SSL certificates for my servers, I will use the HTTPS protocol with the highest SSL protocol. This is where the first fundamental issue arose. For some reason you cannot use port 443, you will get a 504 error. This seems to be an issue that not even AWS systems architects can solve. It took me almost a full day to debug, but if you specify a custom port (e.g. 43434) it works.
Configure default cache behavior
The next step is to configure the behavior. This means you tell CloudFront how to cache your content and what headers to add in the request to your server. You can define multiple behaviors; per subfolder, path, query, origin, etc. if you like. I'm not going to do that as the three applications are all hosted in the main folder and because it's not needed.
Now, I want to compress objects and redirect HTTP to HTTPS. I'm going to allow all HTTP methods so I can still login and post on my blog and wiki and so that analytics can be posted to Umami.
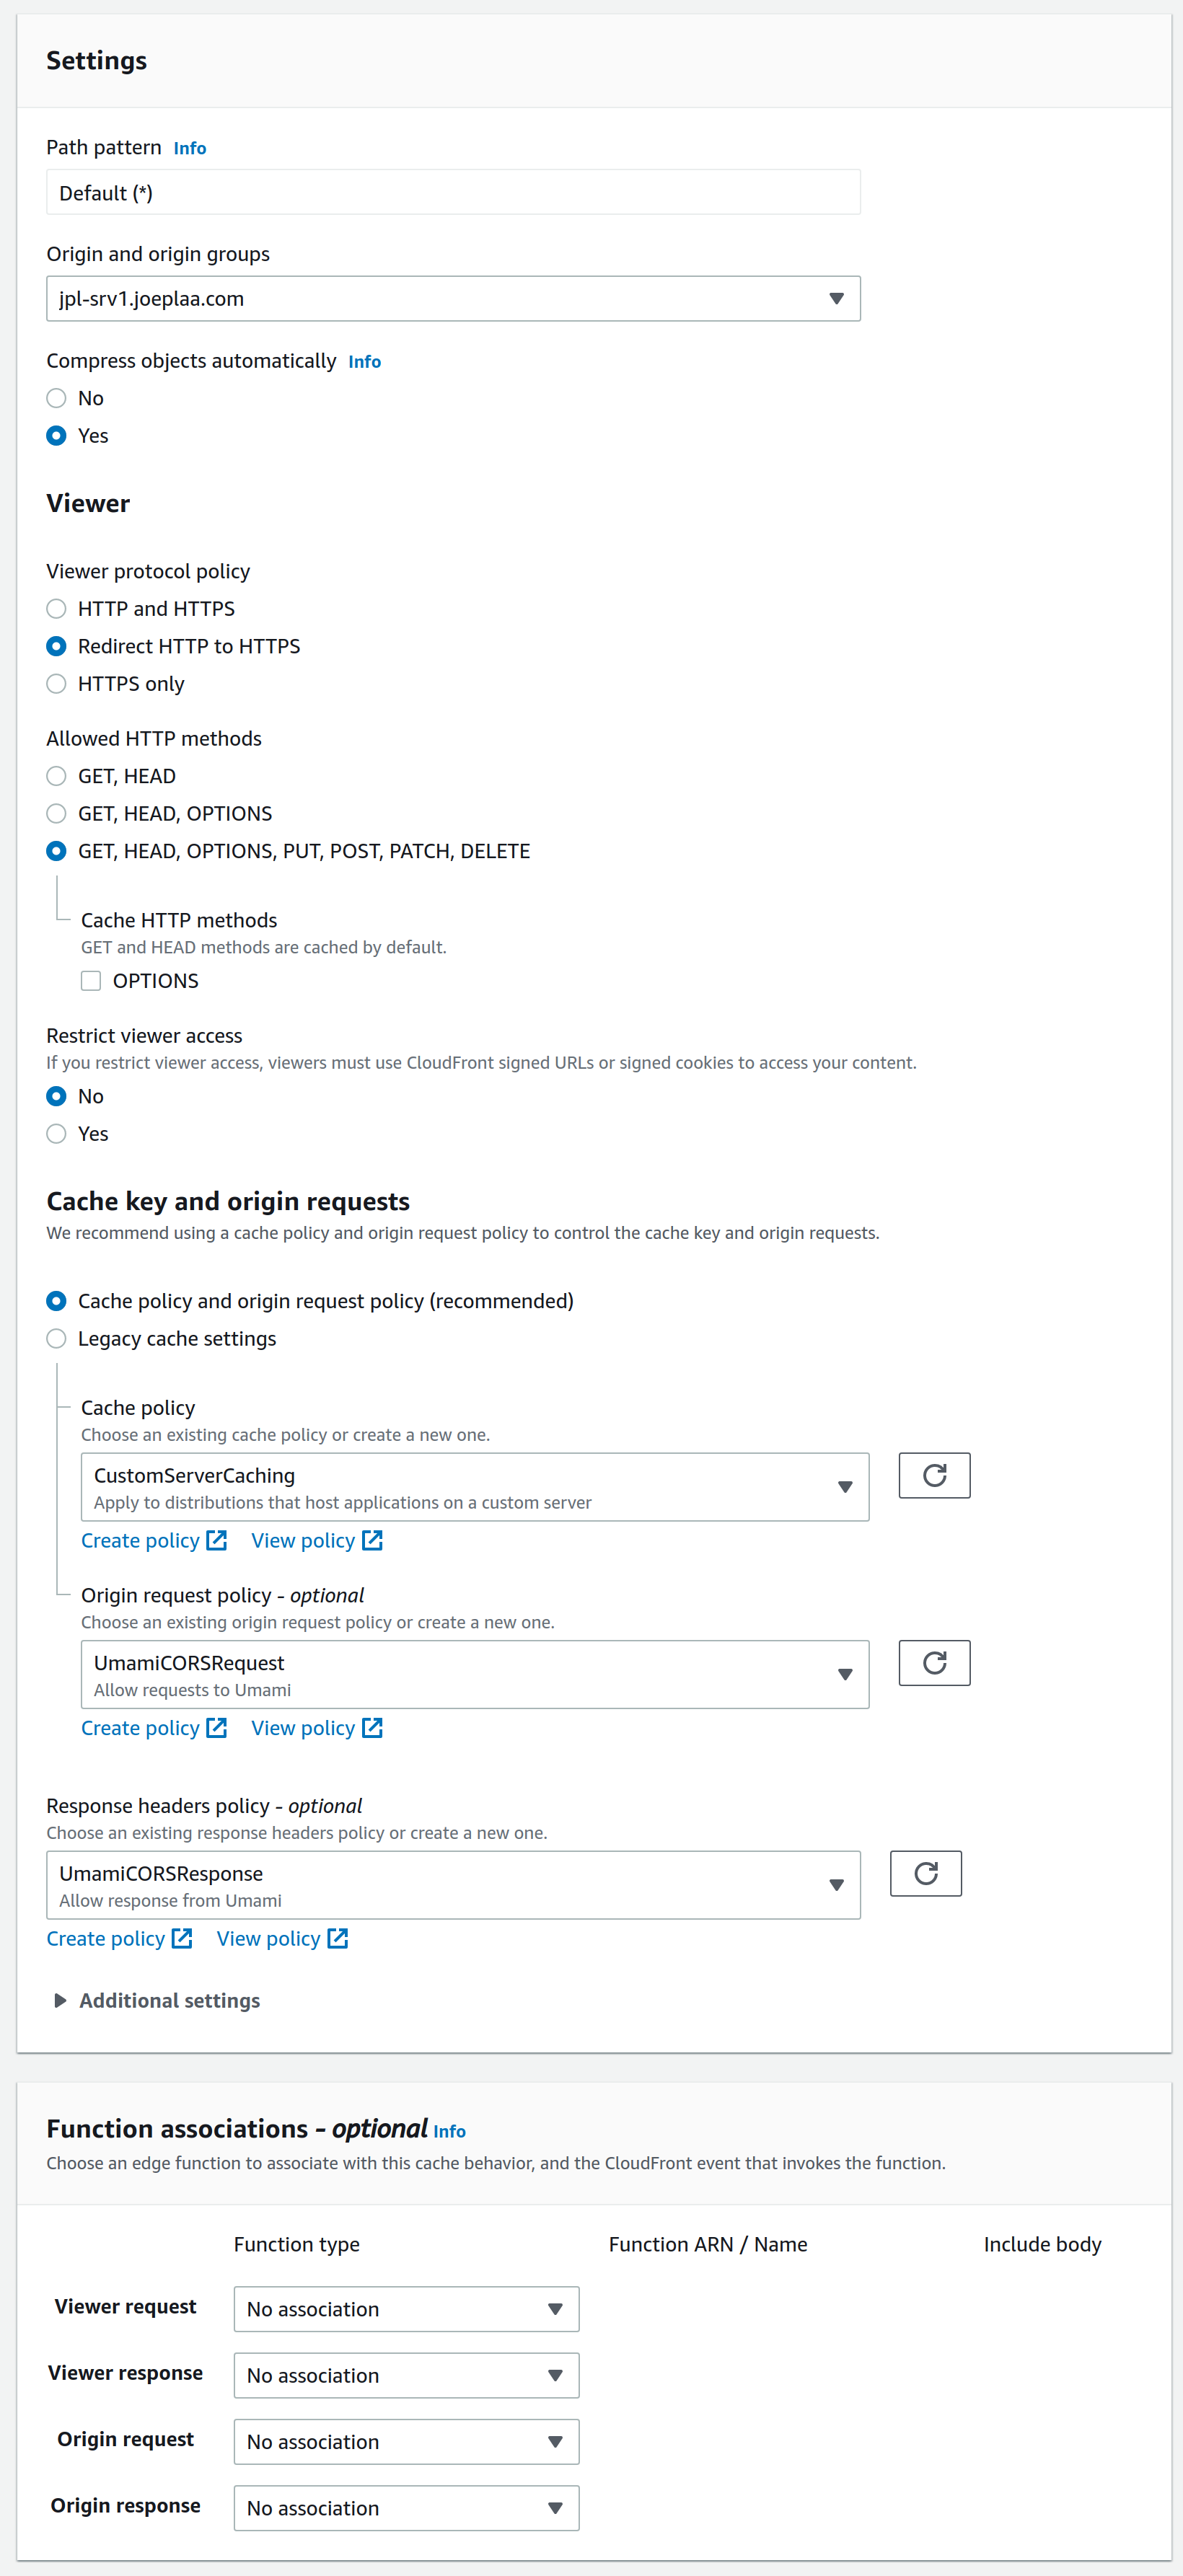
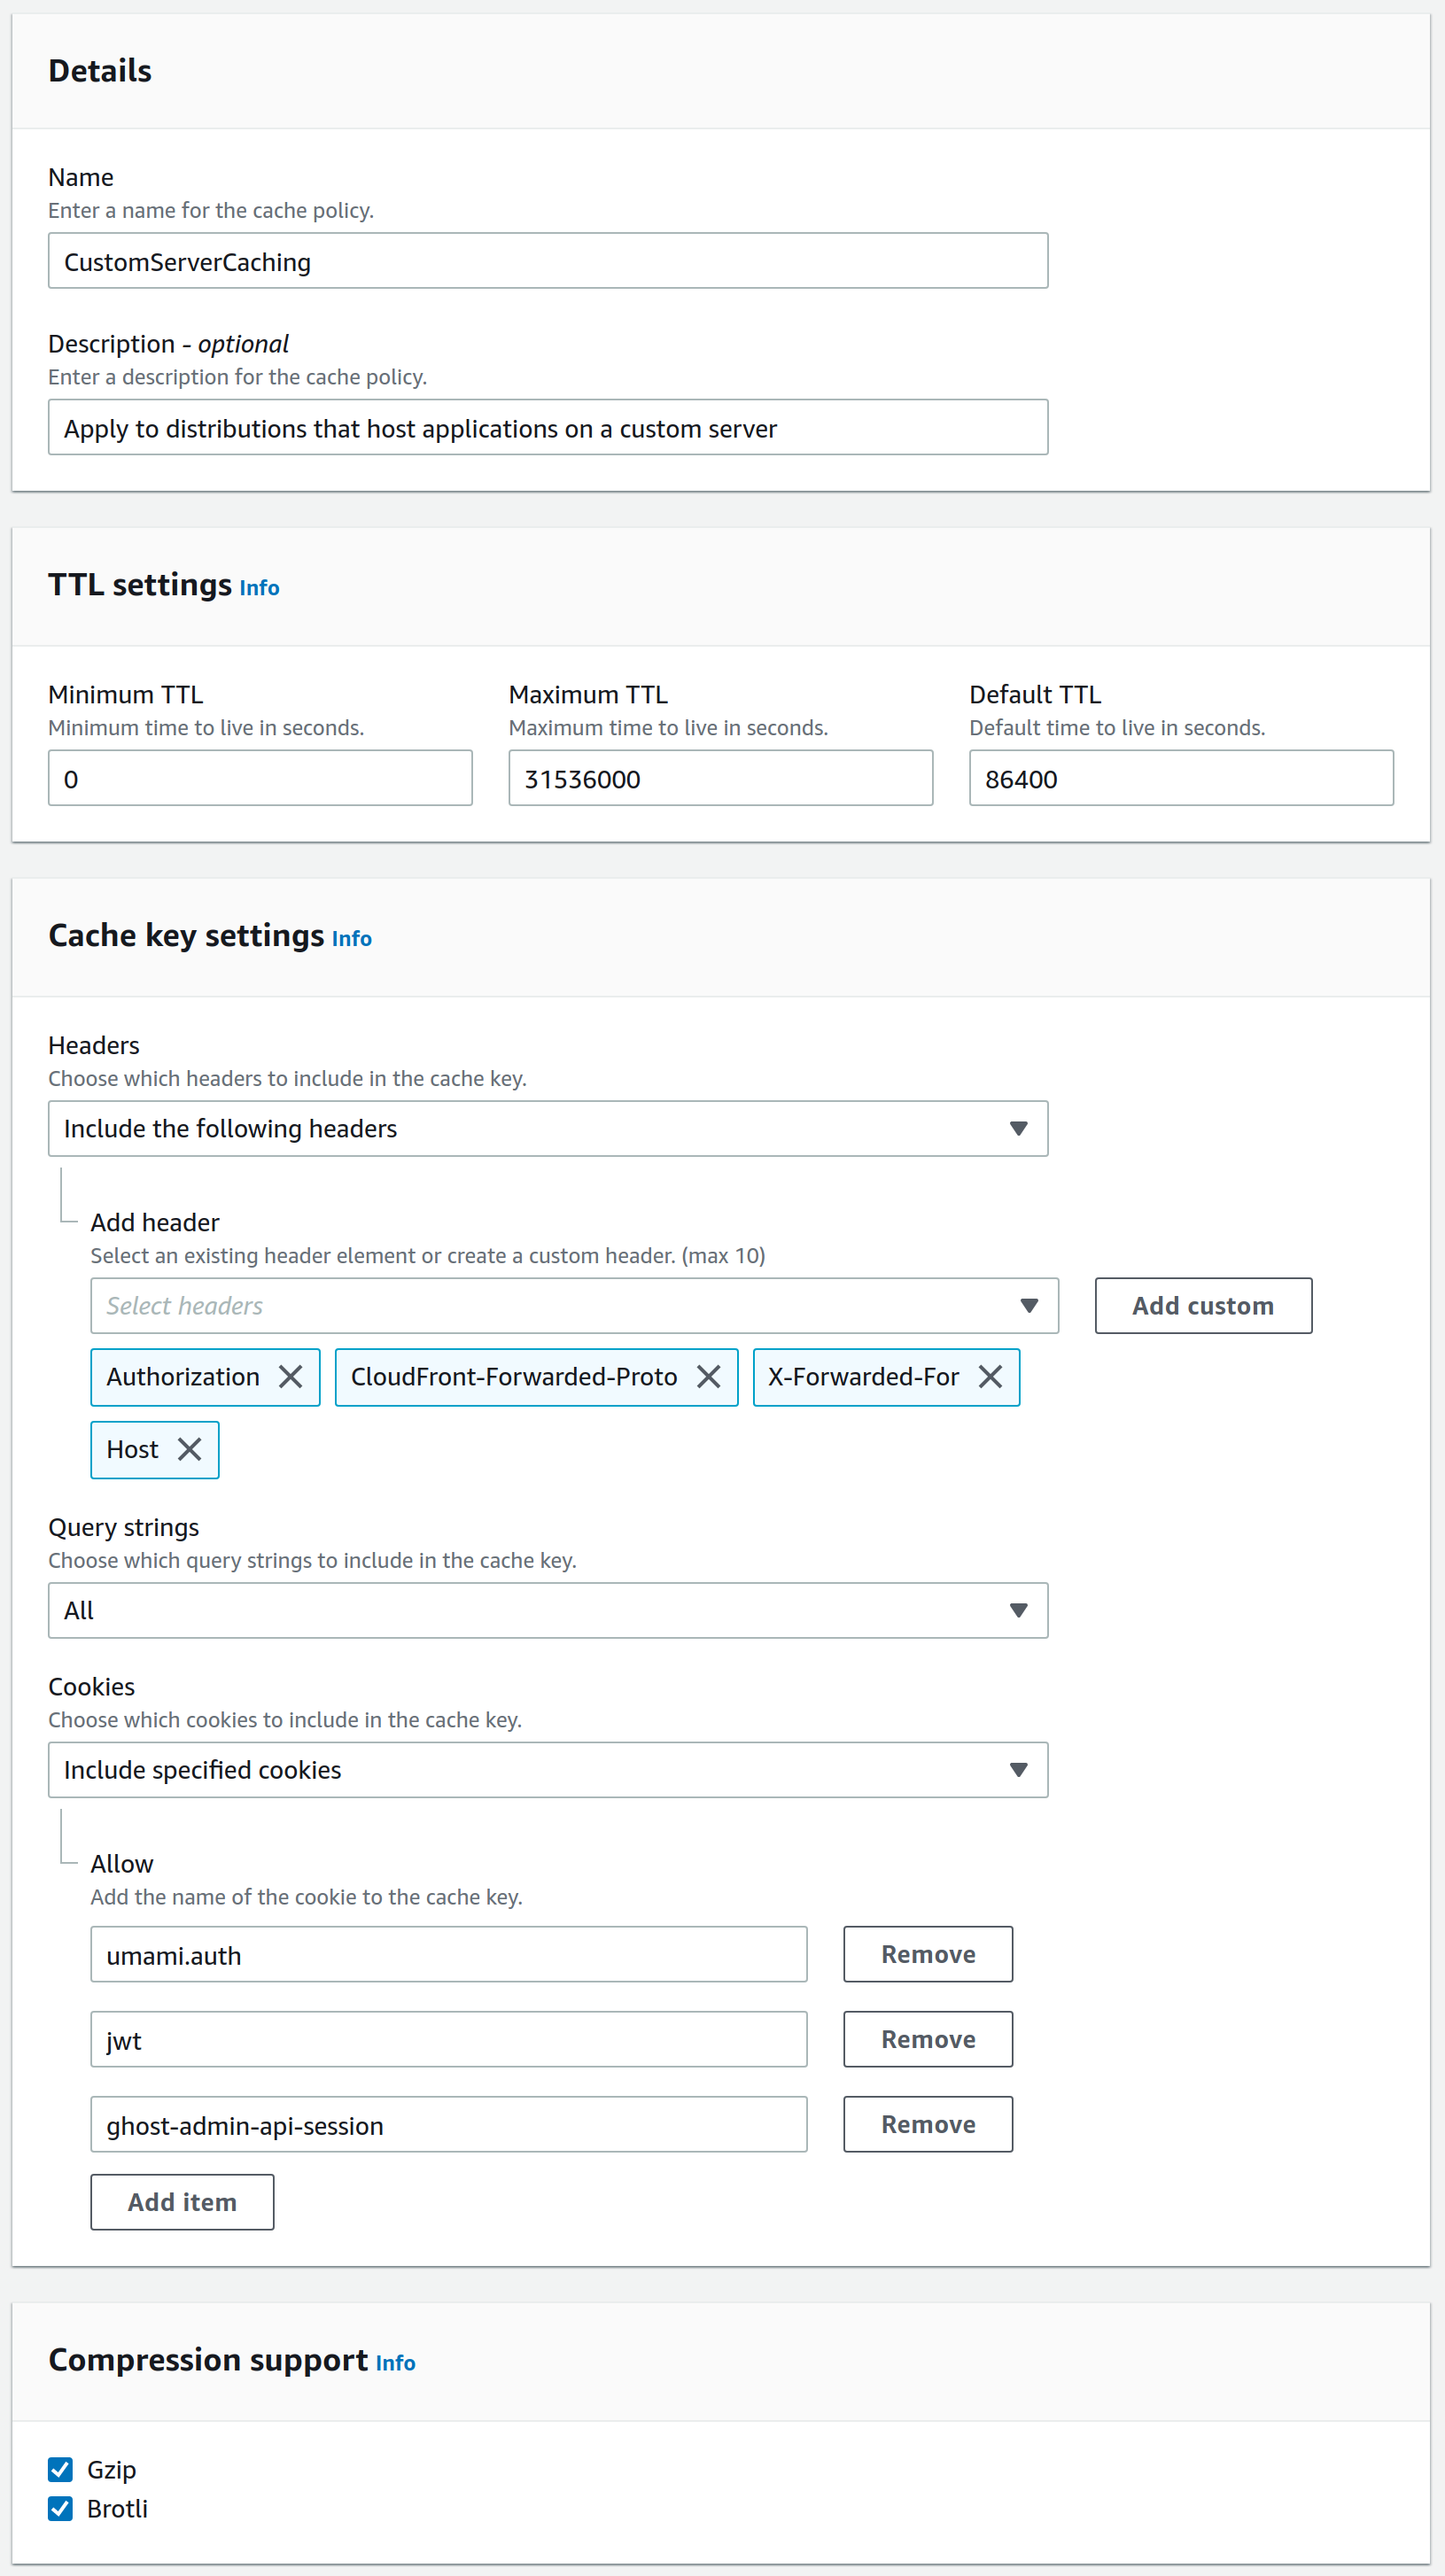
Next we create the actual Cache policy by clicking "Create policy" just below. This is where the next issue with CloudFront arose. I have little to no knowledge about html headers, so I don't know what they actually do (see the AWS documentation for more info). But with some trial and error I found that I needed to add Authorization, CloudFront-Forwarded-Proto, X-Forwarded-For (Add custom) and Host. I also needed to specify the Query strings, but I was lazy and selected All. This meant everything worked, except logging in. That required also adding the specific cookies: umami.auth for Umamijwt for Wiki.js and ghost-admin-api-session for Ghost.
Once the policy is created you can go back to the behavior tab, click the refresh button behind the dropdown field and select it. For now you can ignore the optional policies, we'll come back to those later.
Update March 11 2022
Just a day after I posted this blog, I saw that, although no errors occurred in my browser, no page visits were tracked. After searching for half a day, I found this Github issue, hinting that it might be related to the User-Agent header. When I dove into the Nginx logs of our jodiBooks Umami instance, I saw:
127.0.0.1 - - [11/Mar/2022:13:43:46 +0000] "POST /api/collect HTTP/1.1" 200 2 "-" "Amazon CloudFront"Hmmm, Amazon CloudFront is not my user-agent. It should be: Mozilla/5.0 (X11; Linux x86_64) AppleWebKit/537.36 (KHTML, like Gecko) Chrome/98.0.4758.102 Safari/537.36 Edg/98.0.1108.62.
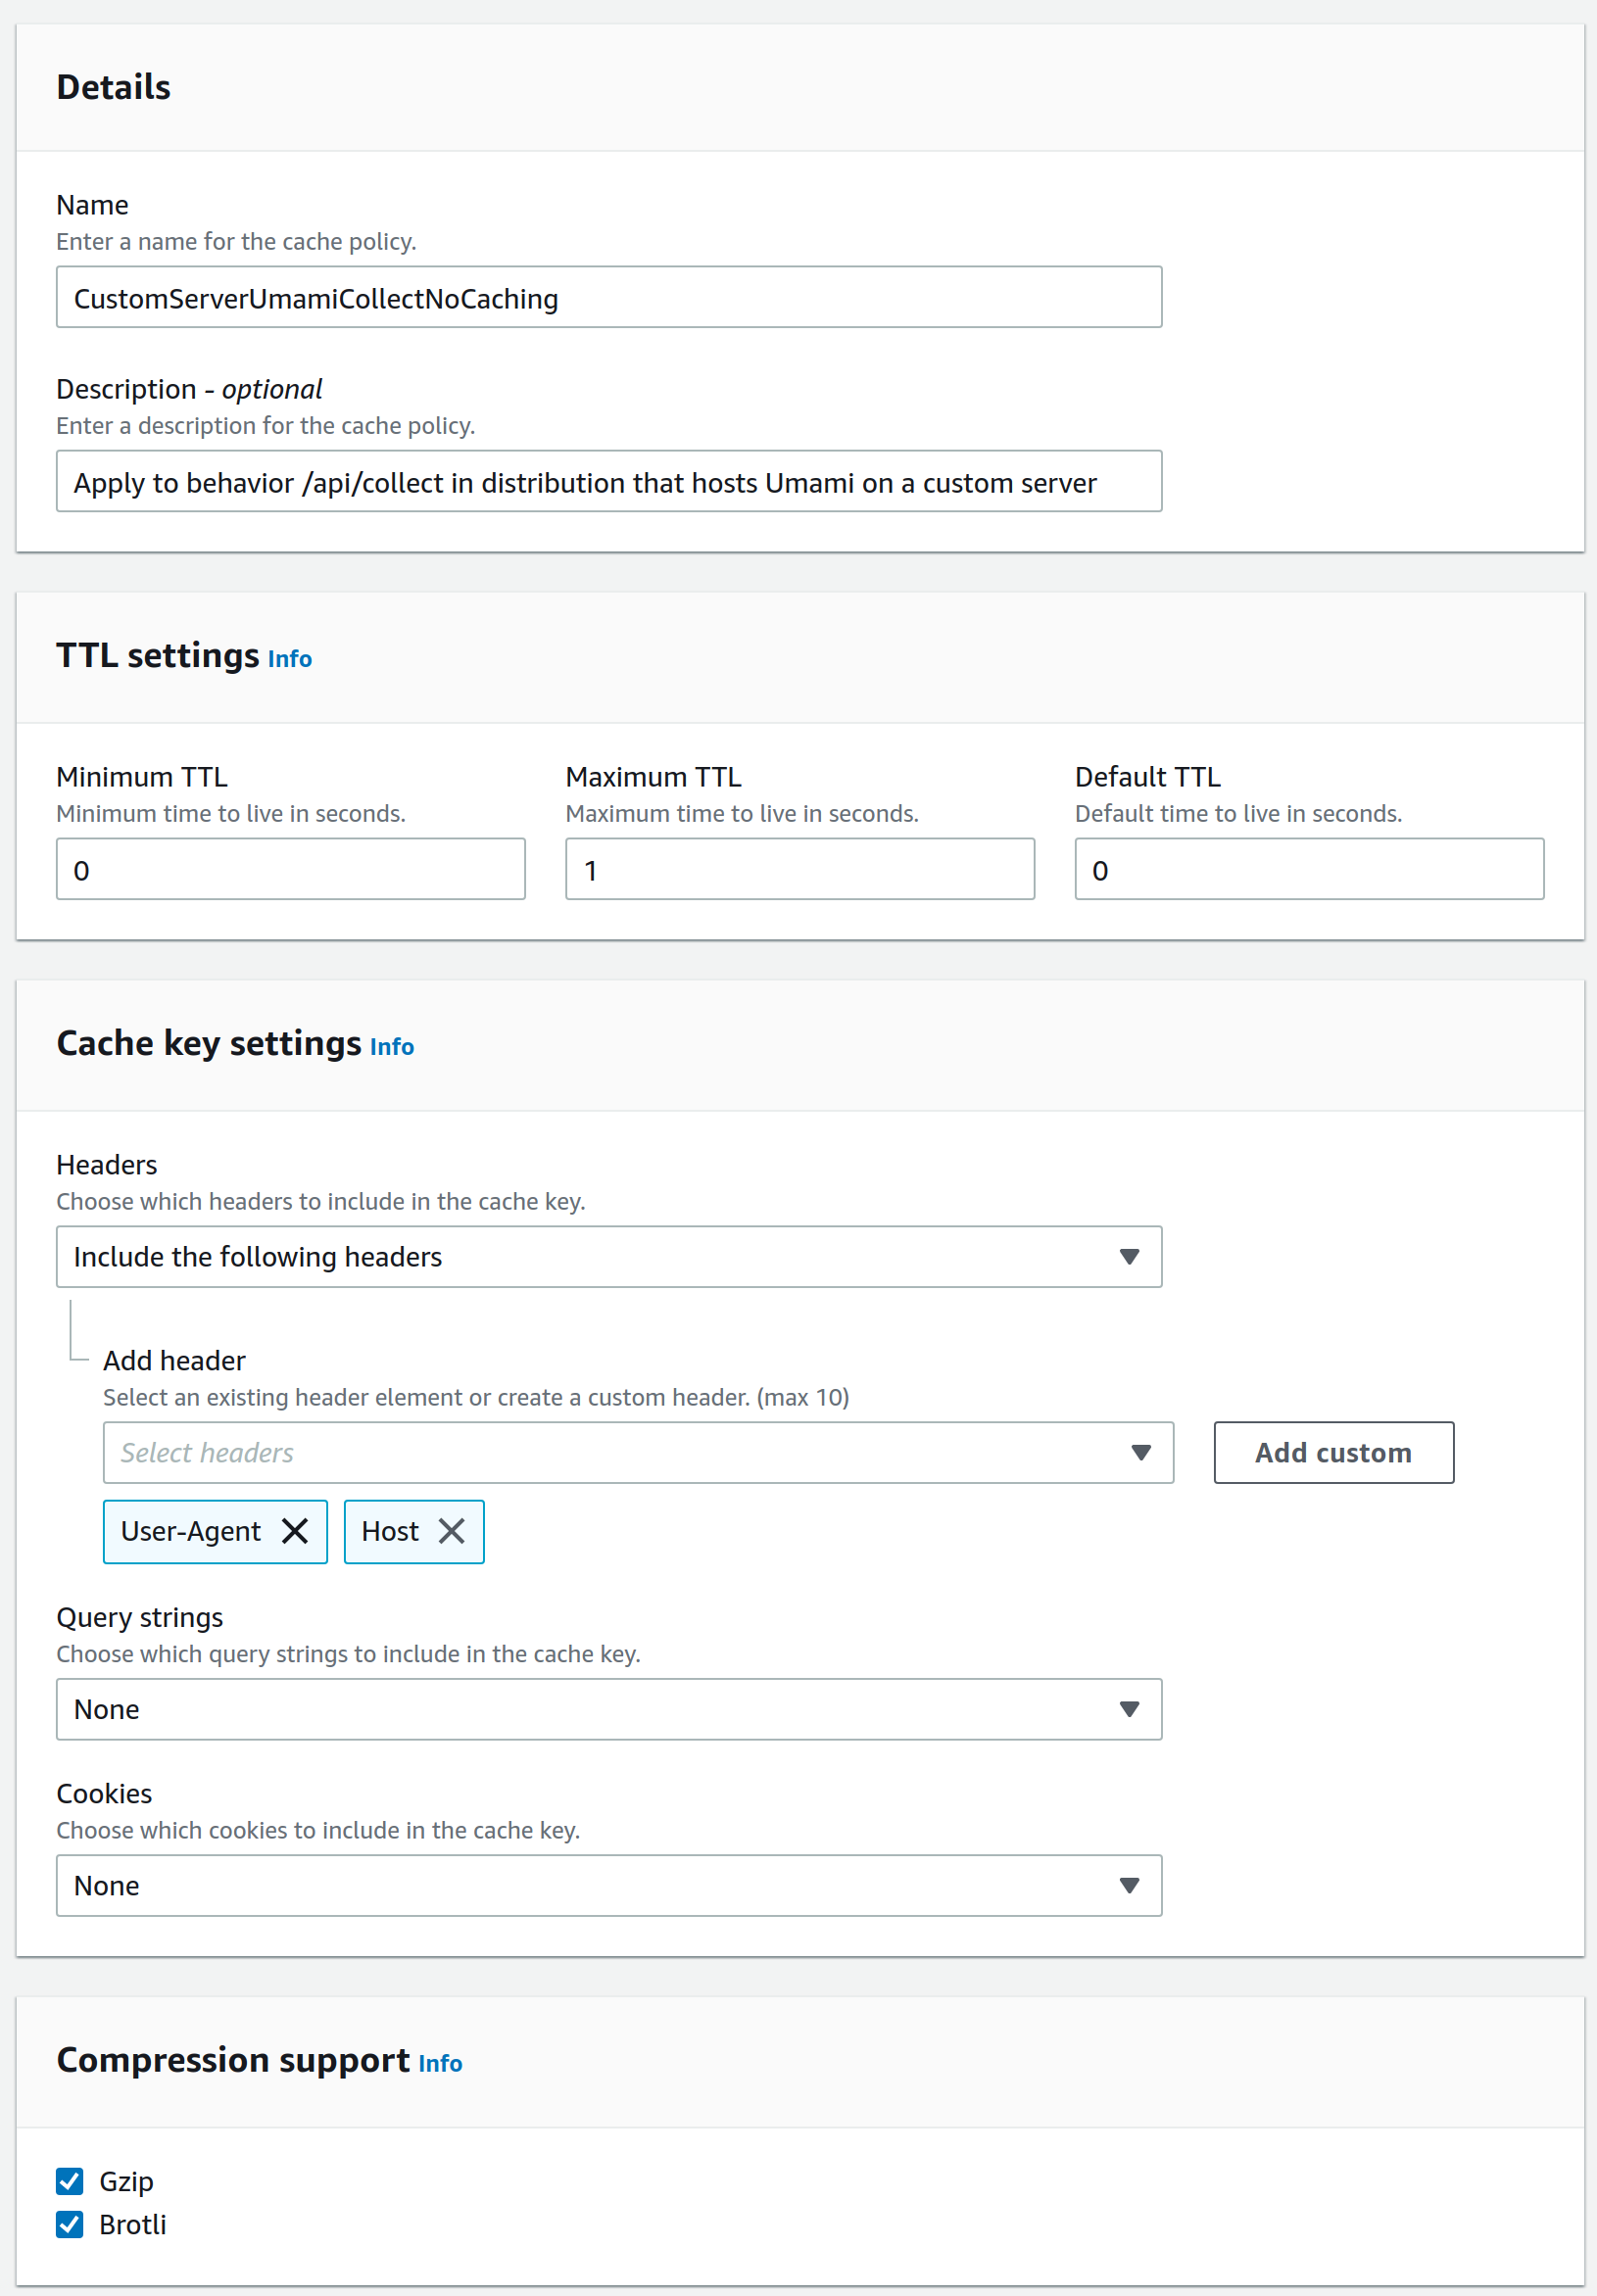
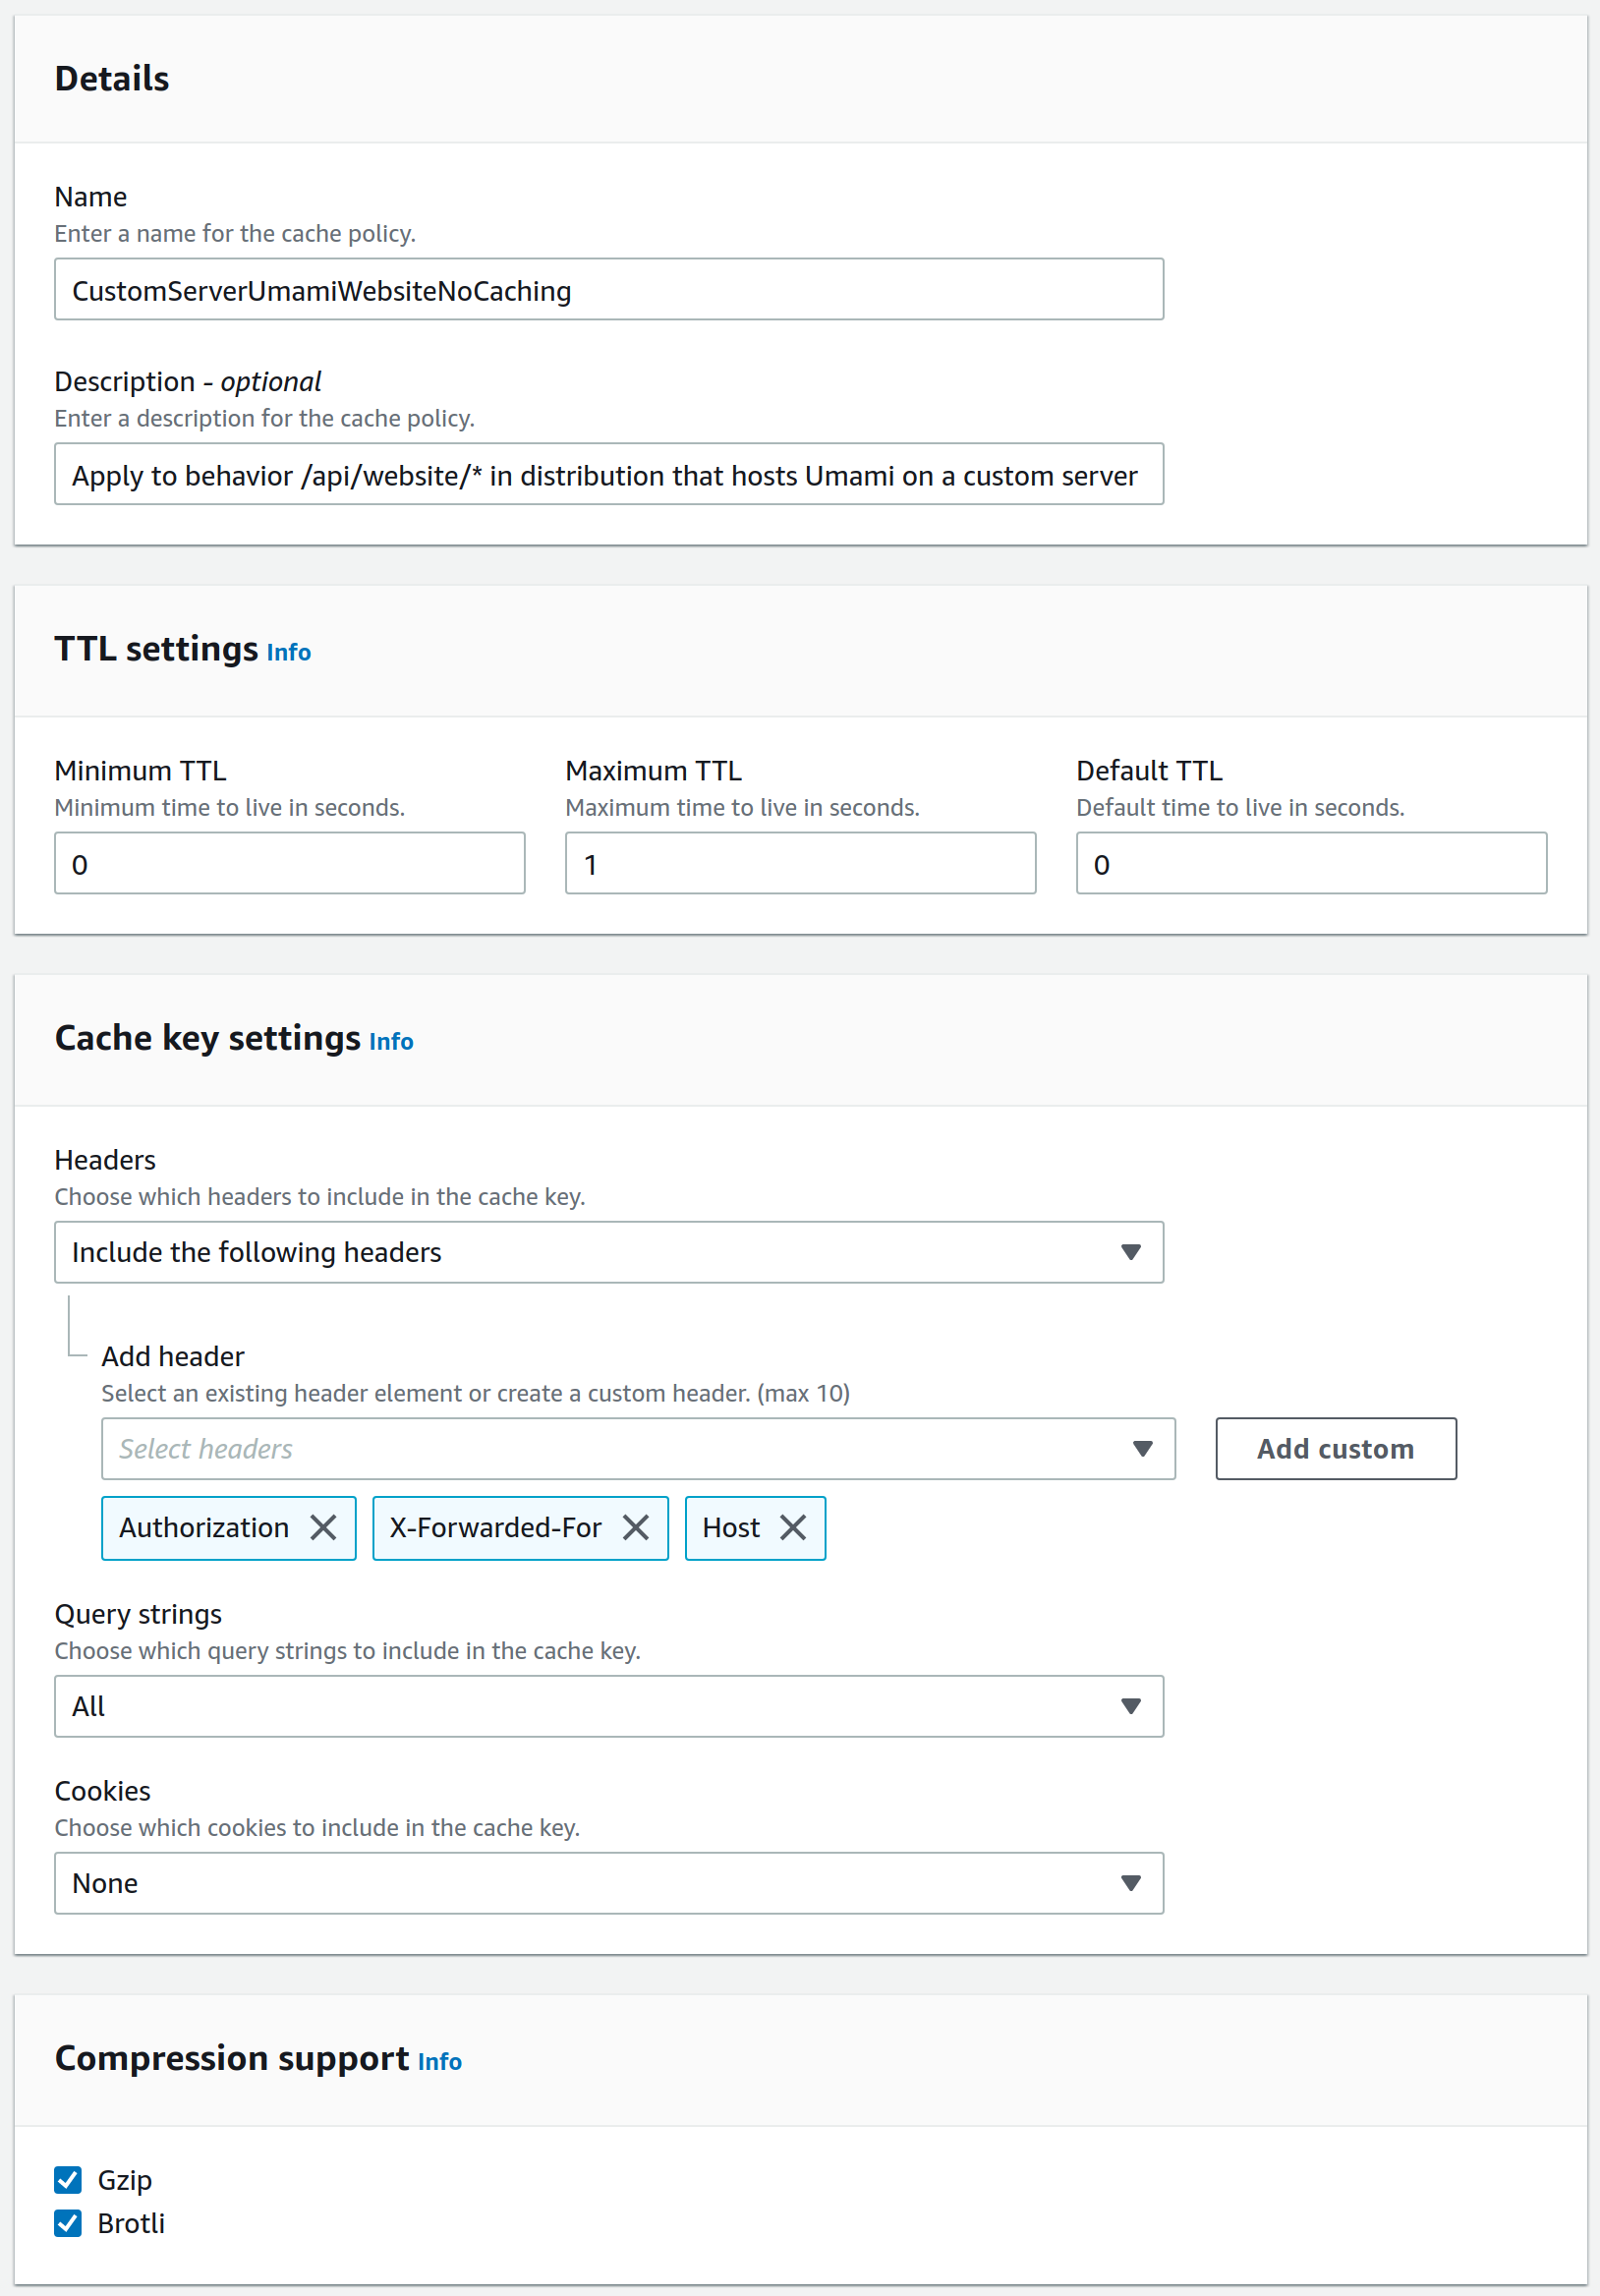
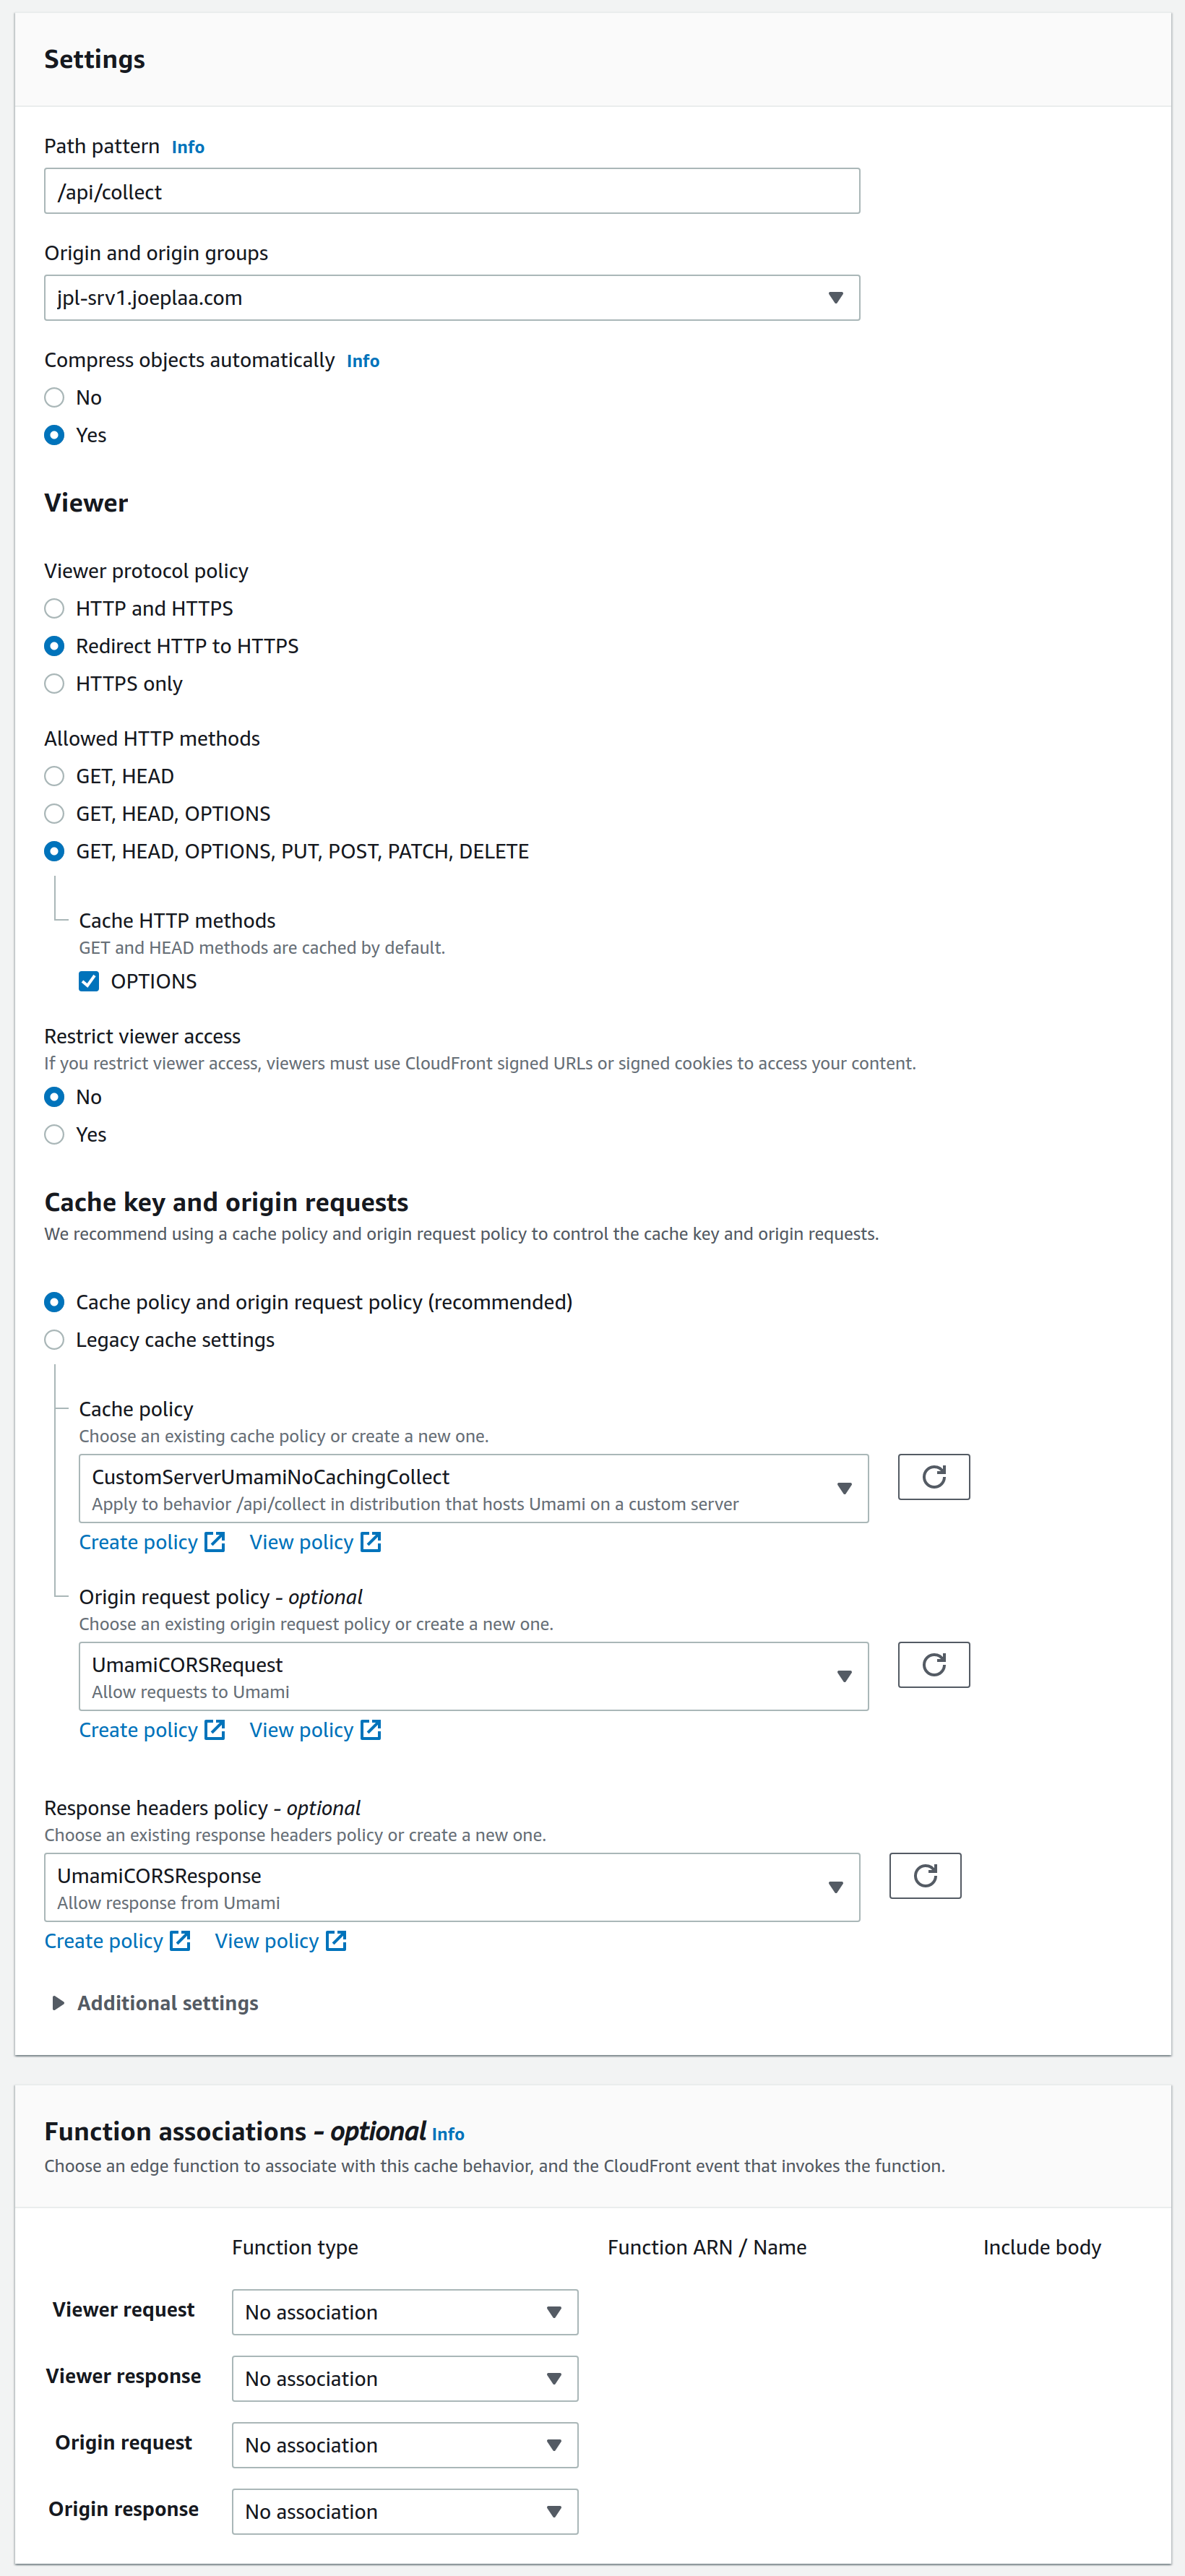
/api/collect has been renamed to /api/send.So, back to CloudFront → Policies and create another cache policy CustomServerUmamiNoCachingCollect. Set the TTL settings to minimum values (we don't want to cache these calls) and add User-Agent and Host headers.
Add another policy CustomServerUmamiNoCachingWebsiteData. This policy will disable caching on your Umami dashboard stats. We want interactive updating graphs and numbers, not static cached version. Again set the TTL settings to minimum values (we don't want to cache this data) and add Authorization, Host and X-Forwarded-For headers. Also set query-strings to All
Go to the distribution → Behaviors and create a new one. As Path pattern set /api/send, choose the existing origin, redirect HTTP to HTTPS, allow all HTTP methods and cache the options method. As Cache policy choose CustomServerUmamiNoCachingCollect. Ignore the other policies for now.
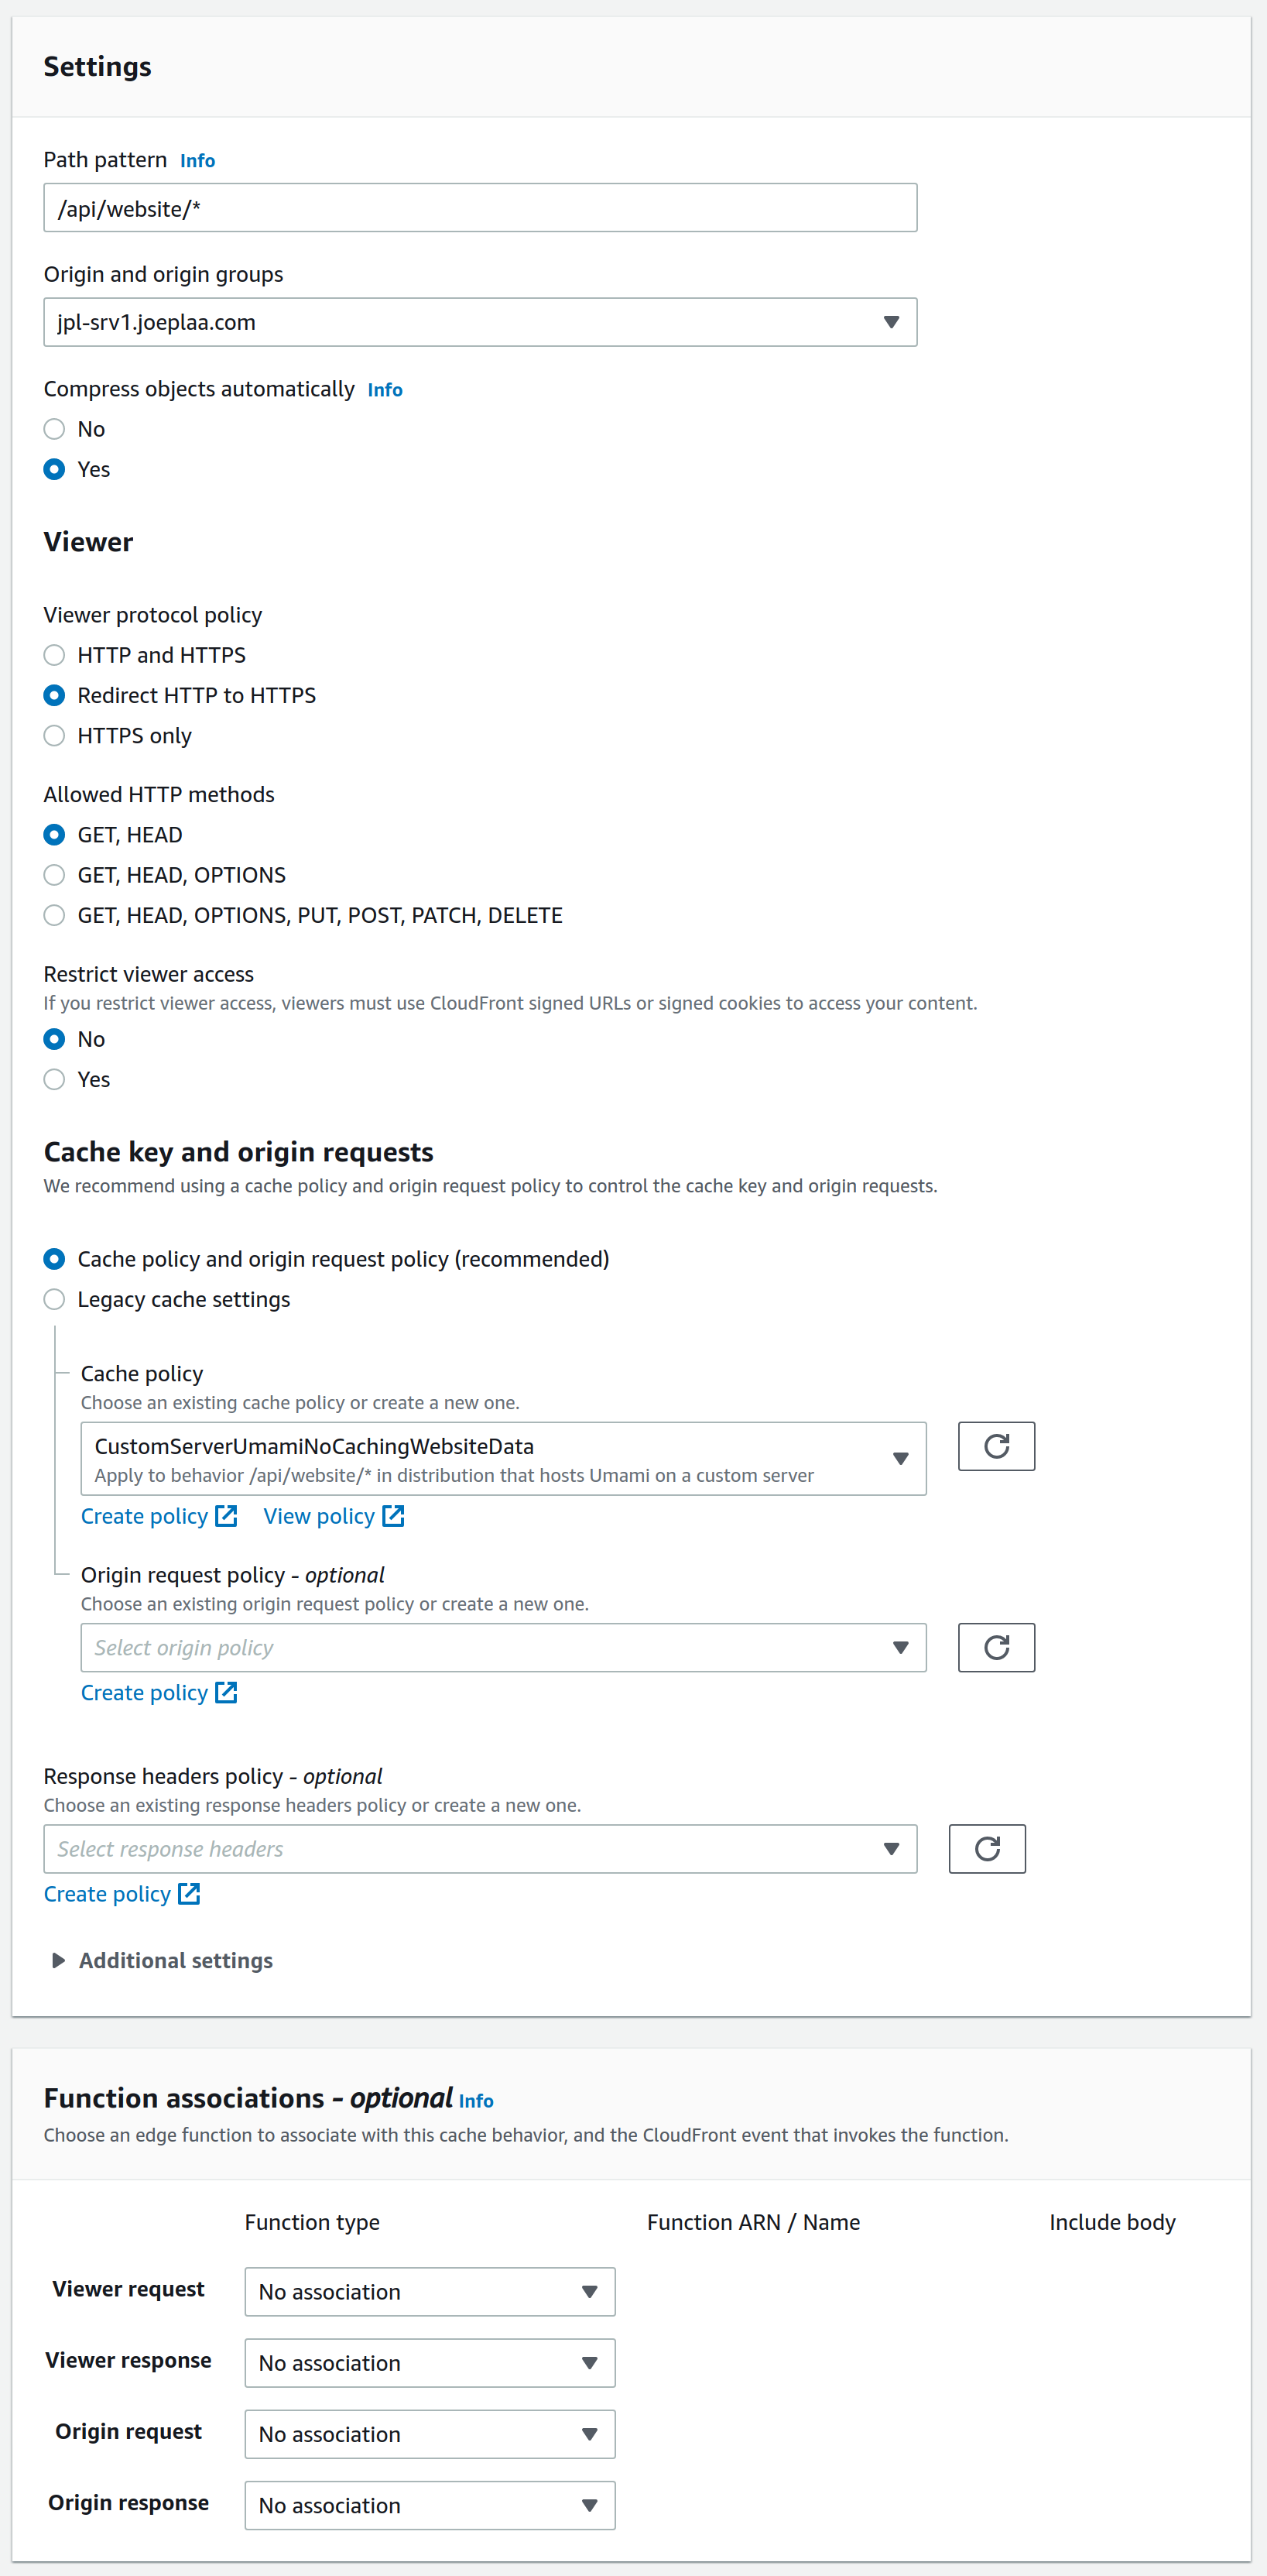
Almost done. Create another behavior. As Path pattern set /api/website/*, choose the existing origin, redirect HTTP to HTTPS and allow GET, HEAD methods. As Cache policy choose CustomServerUmamiNoCachingWebsiteData. Ignore the other policies for now.
Configure settings
Last thing to do is tell the distribution "who he is and where people can find him". I assume my audience is mainly in Europe and maybe US, so I choose to limit the edge locations. It saves me a few cents.
More importantly, this is where you add the Alternate domains names you are hosting through this distribution and the SSL certificate you want to use. This can be created with the AWS Certificate Manager (it's free).
I know I don't need to support legacy browsers, so I always choose the highset Security policy and enable HTTP/2.
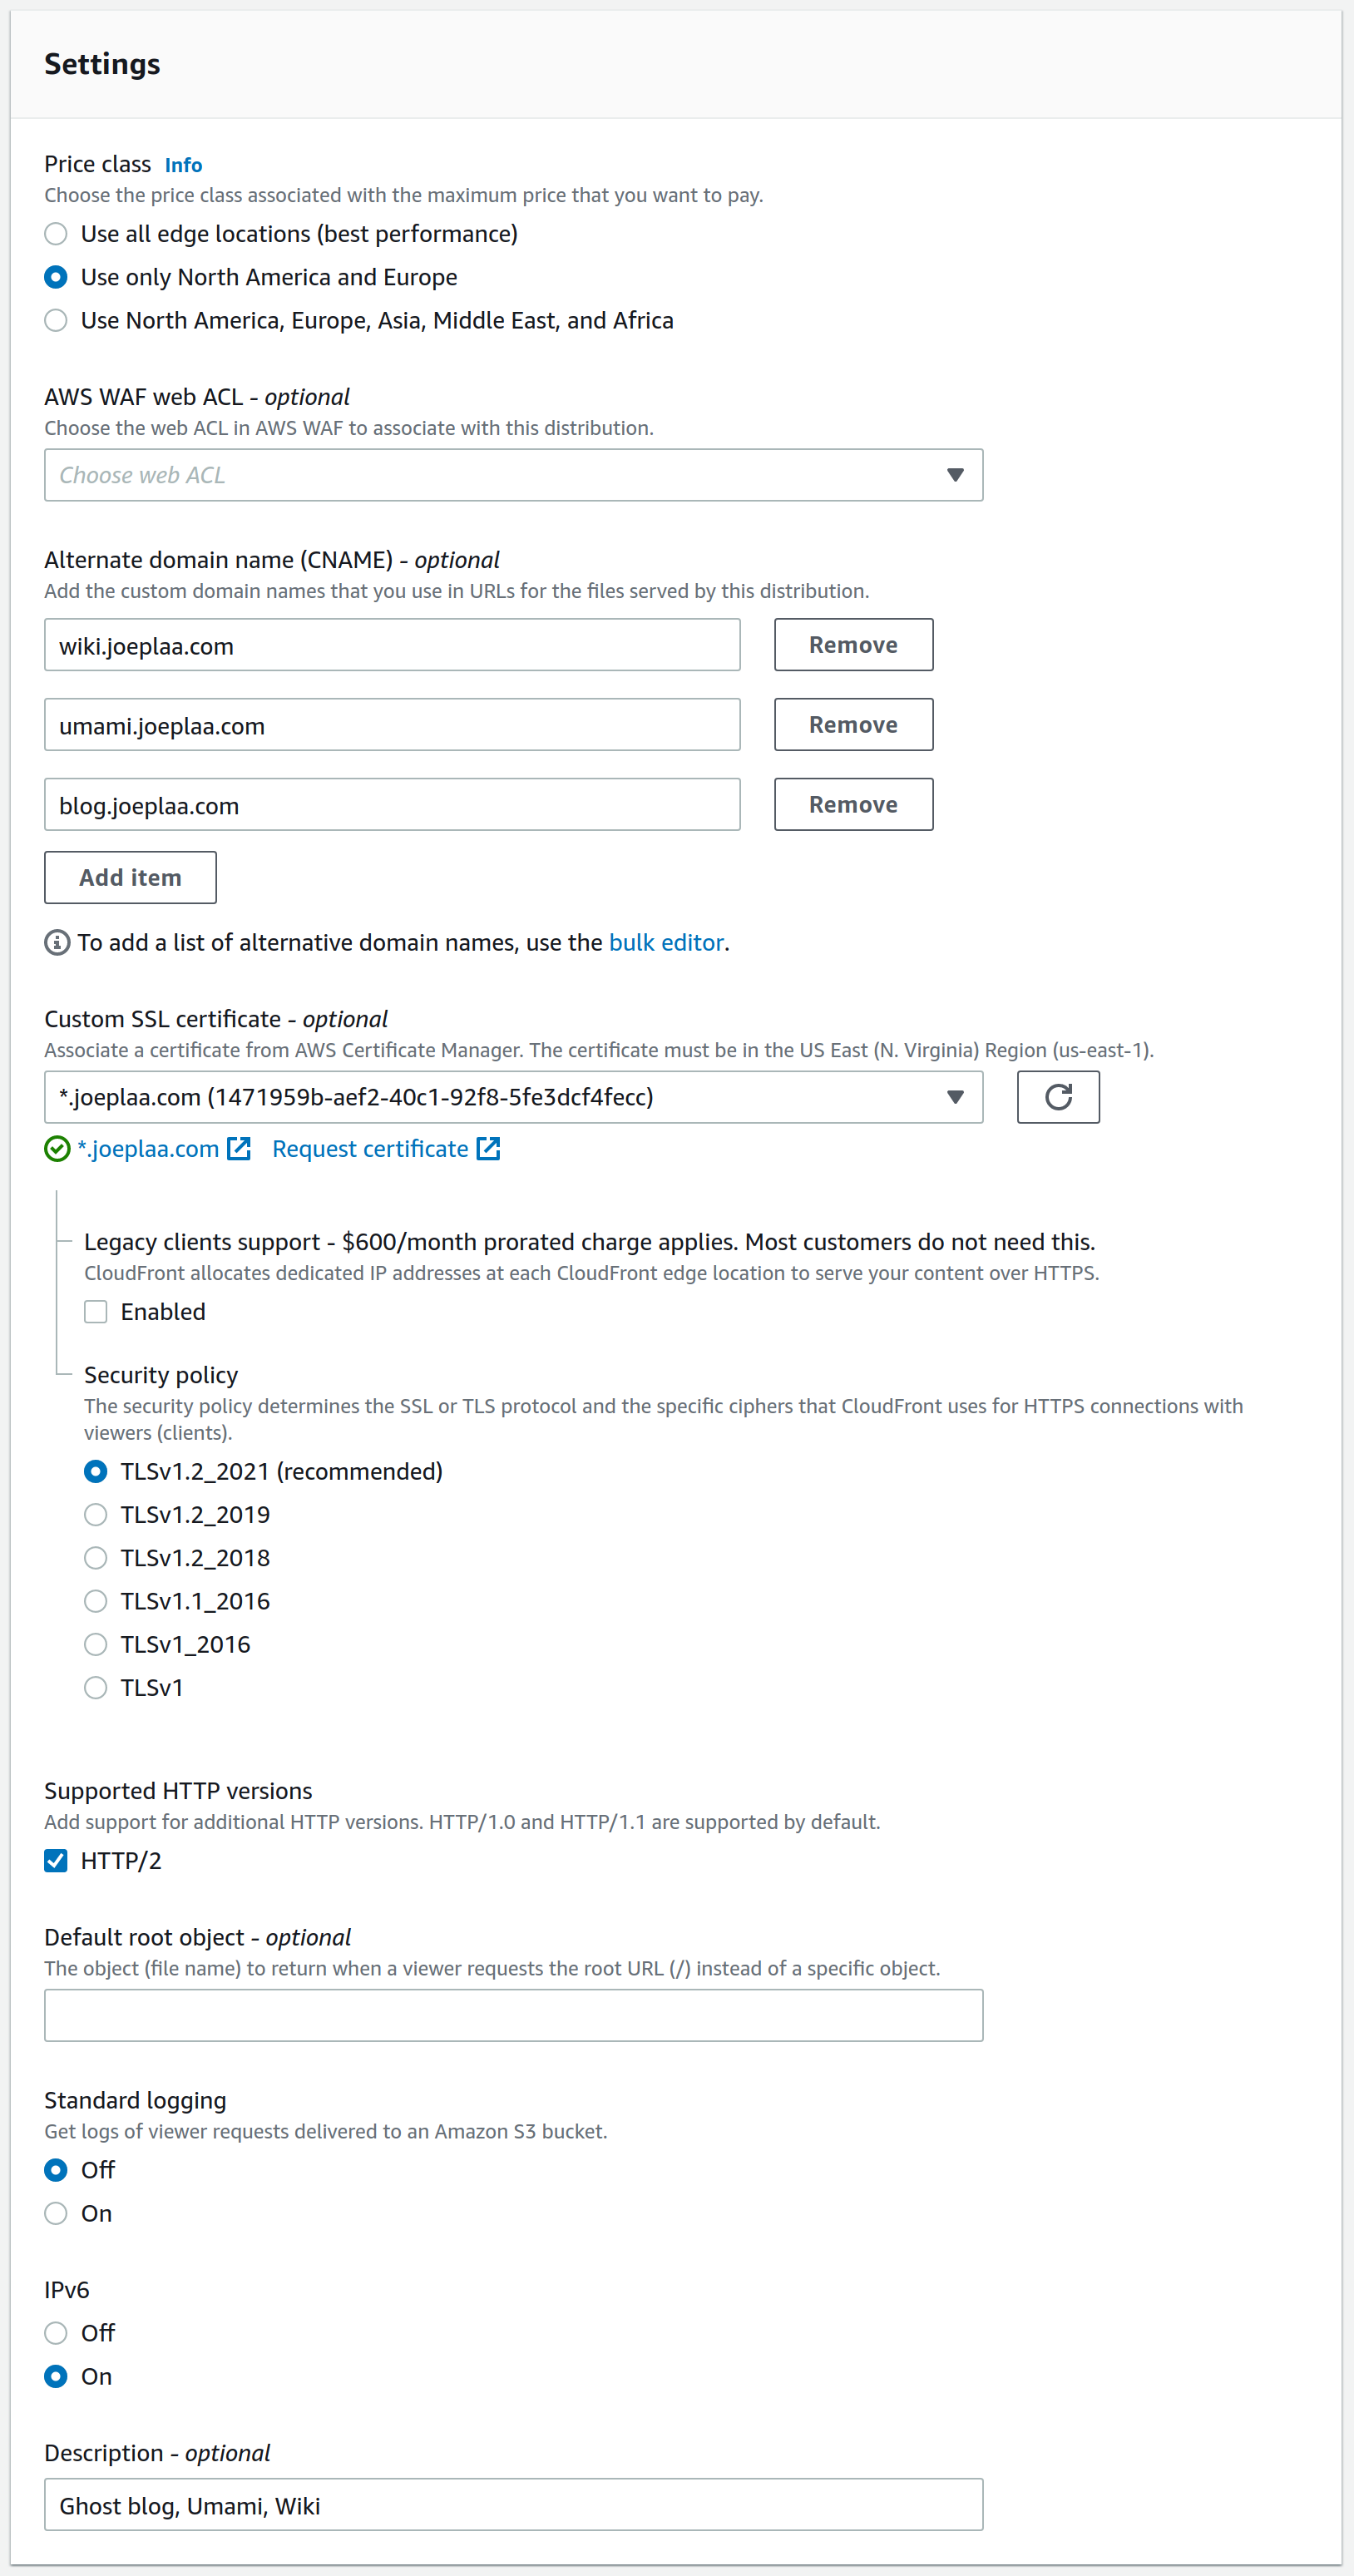
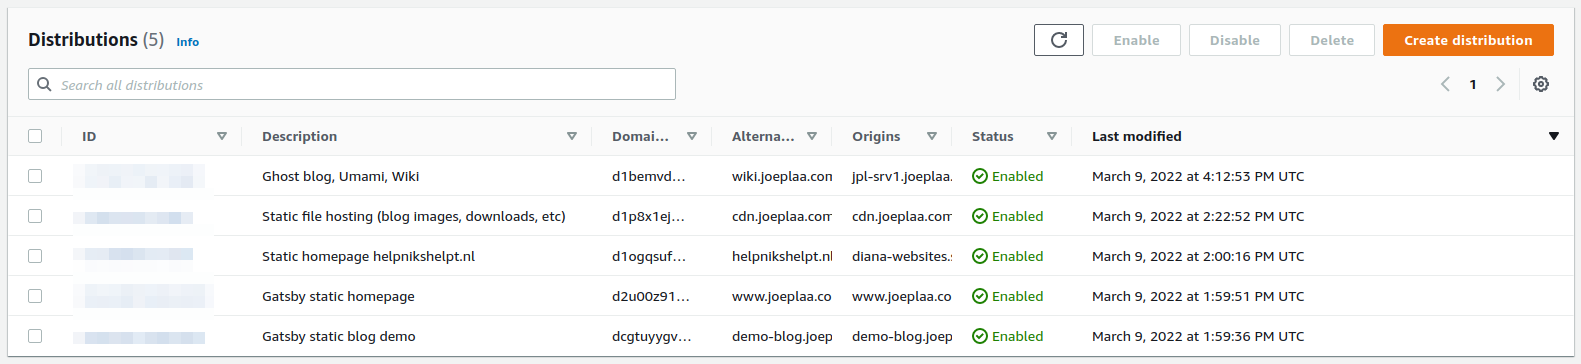
You can also add a description here. It comes in handy when you have multiple distributions and multiple domain names in a single distribution. The description is the only part that is easily readable in the overview (see below). Now create the distribution and wait for it to initialize. This can take some time (I think AWS says 20 minutes), but in my experience this is generally just a few minutes.
2. Setup pfSense: Port forward to HAProxy
I used this guide by nguvu to do the initial configuration of pfSense. In this guide one of the steps is to "Select 'Manual outbound NAT rule generation'". I'm not completely sure what this does (I still have to figure that out), but I think the implication (disadvantage?) is that you have to configure port forwarding in two steps and you cannot hook up HAProxy to your WAN interface directly. Maybe I'm wrong, a lot of HAProxy guides do this, but it didn't work for me.
Virtual IP address
So first go to Firewall → Virtual IPs and create a virtual IP address. This can be anything you like, but I chose one inside my 10.33.0.0/16 range that had no overlap with any VLANs.
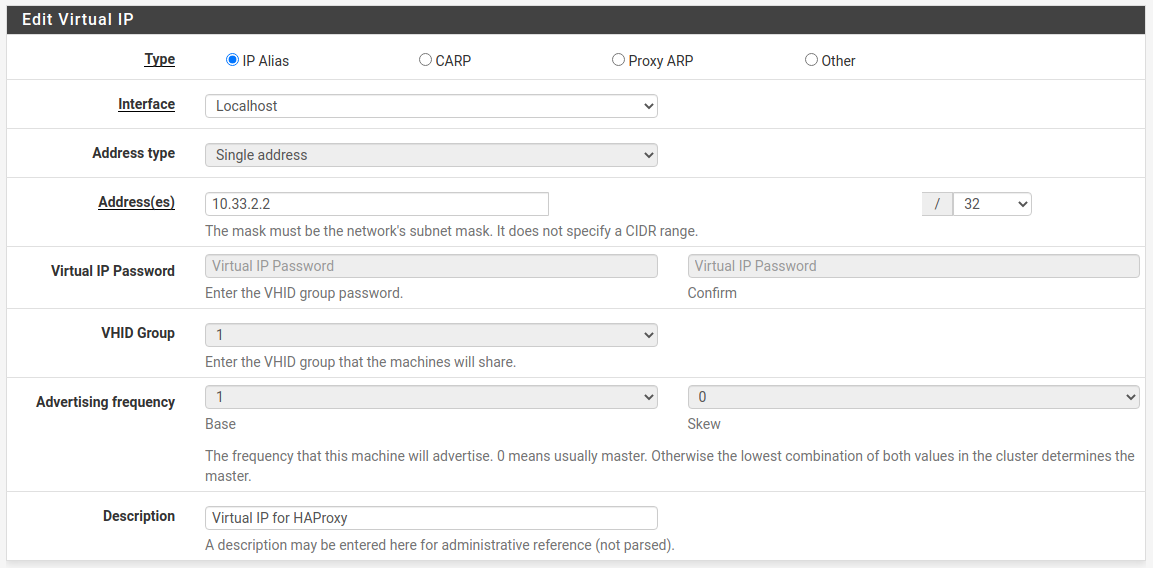
Hit save and apply changes.
Alias
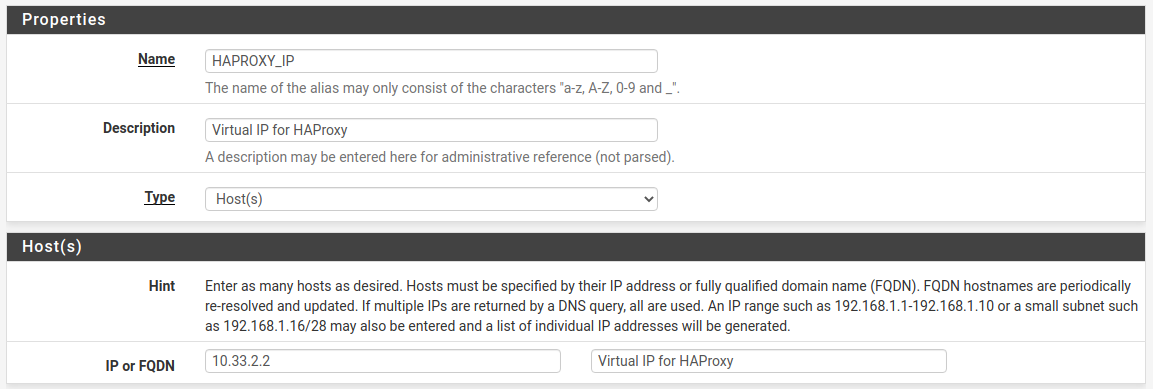
Next go to Firewall → Aliases and on the IP tab Add a new one. Name it HAPROXY_IP (or whatever you like) and add the virtual IP address as host.
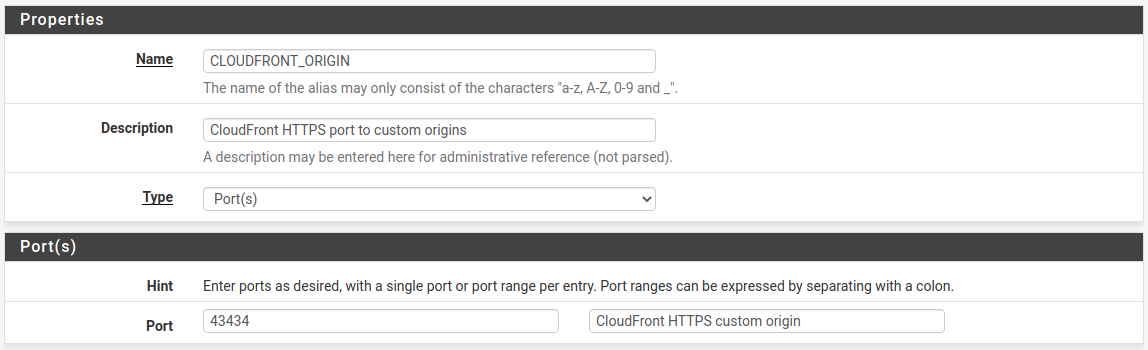
Create another alias. This time go to the Ports tab. Name it CLOUDFRONT_ORIGIN (or whatever you like) and add the port you selected when creating the CloudFront distribution.
Hit save and apply changes.
NAT Port Forward
Next go to Firewall → NAT and select the Outbound tab. For me the "Outbound NAT Mode" is set to Manual Outbound NAT rule generation. If yours is set to something else, the next steps might differ.

Still in the Firewall → NAT screen go to tab Port Forward and Add a new rule.
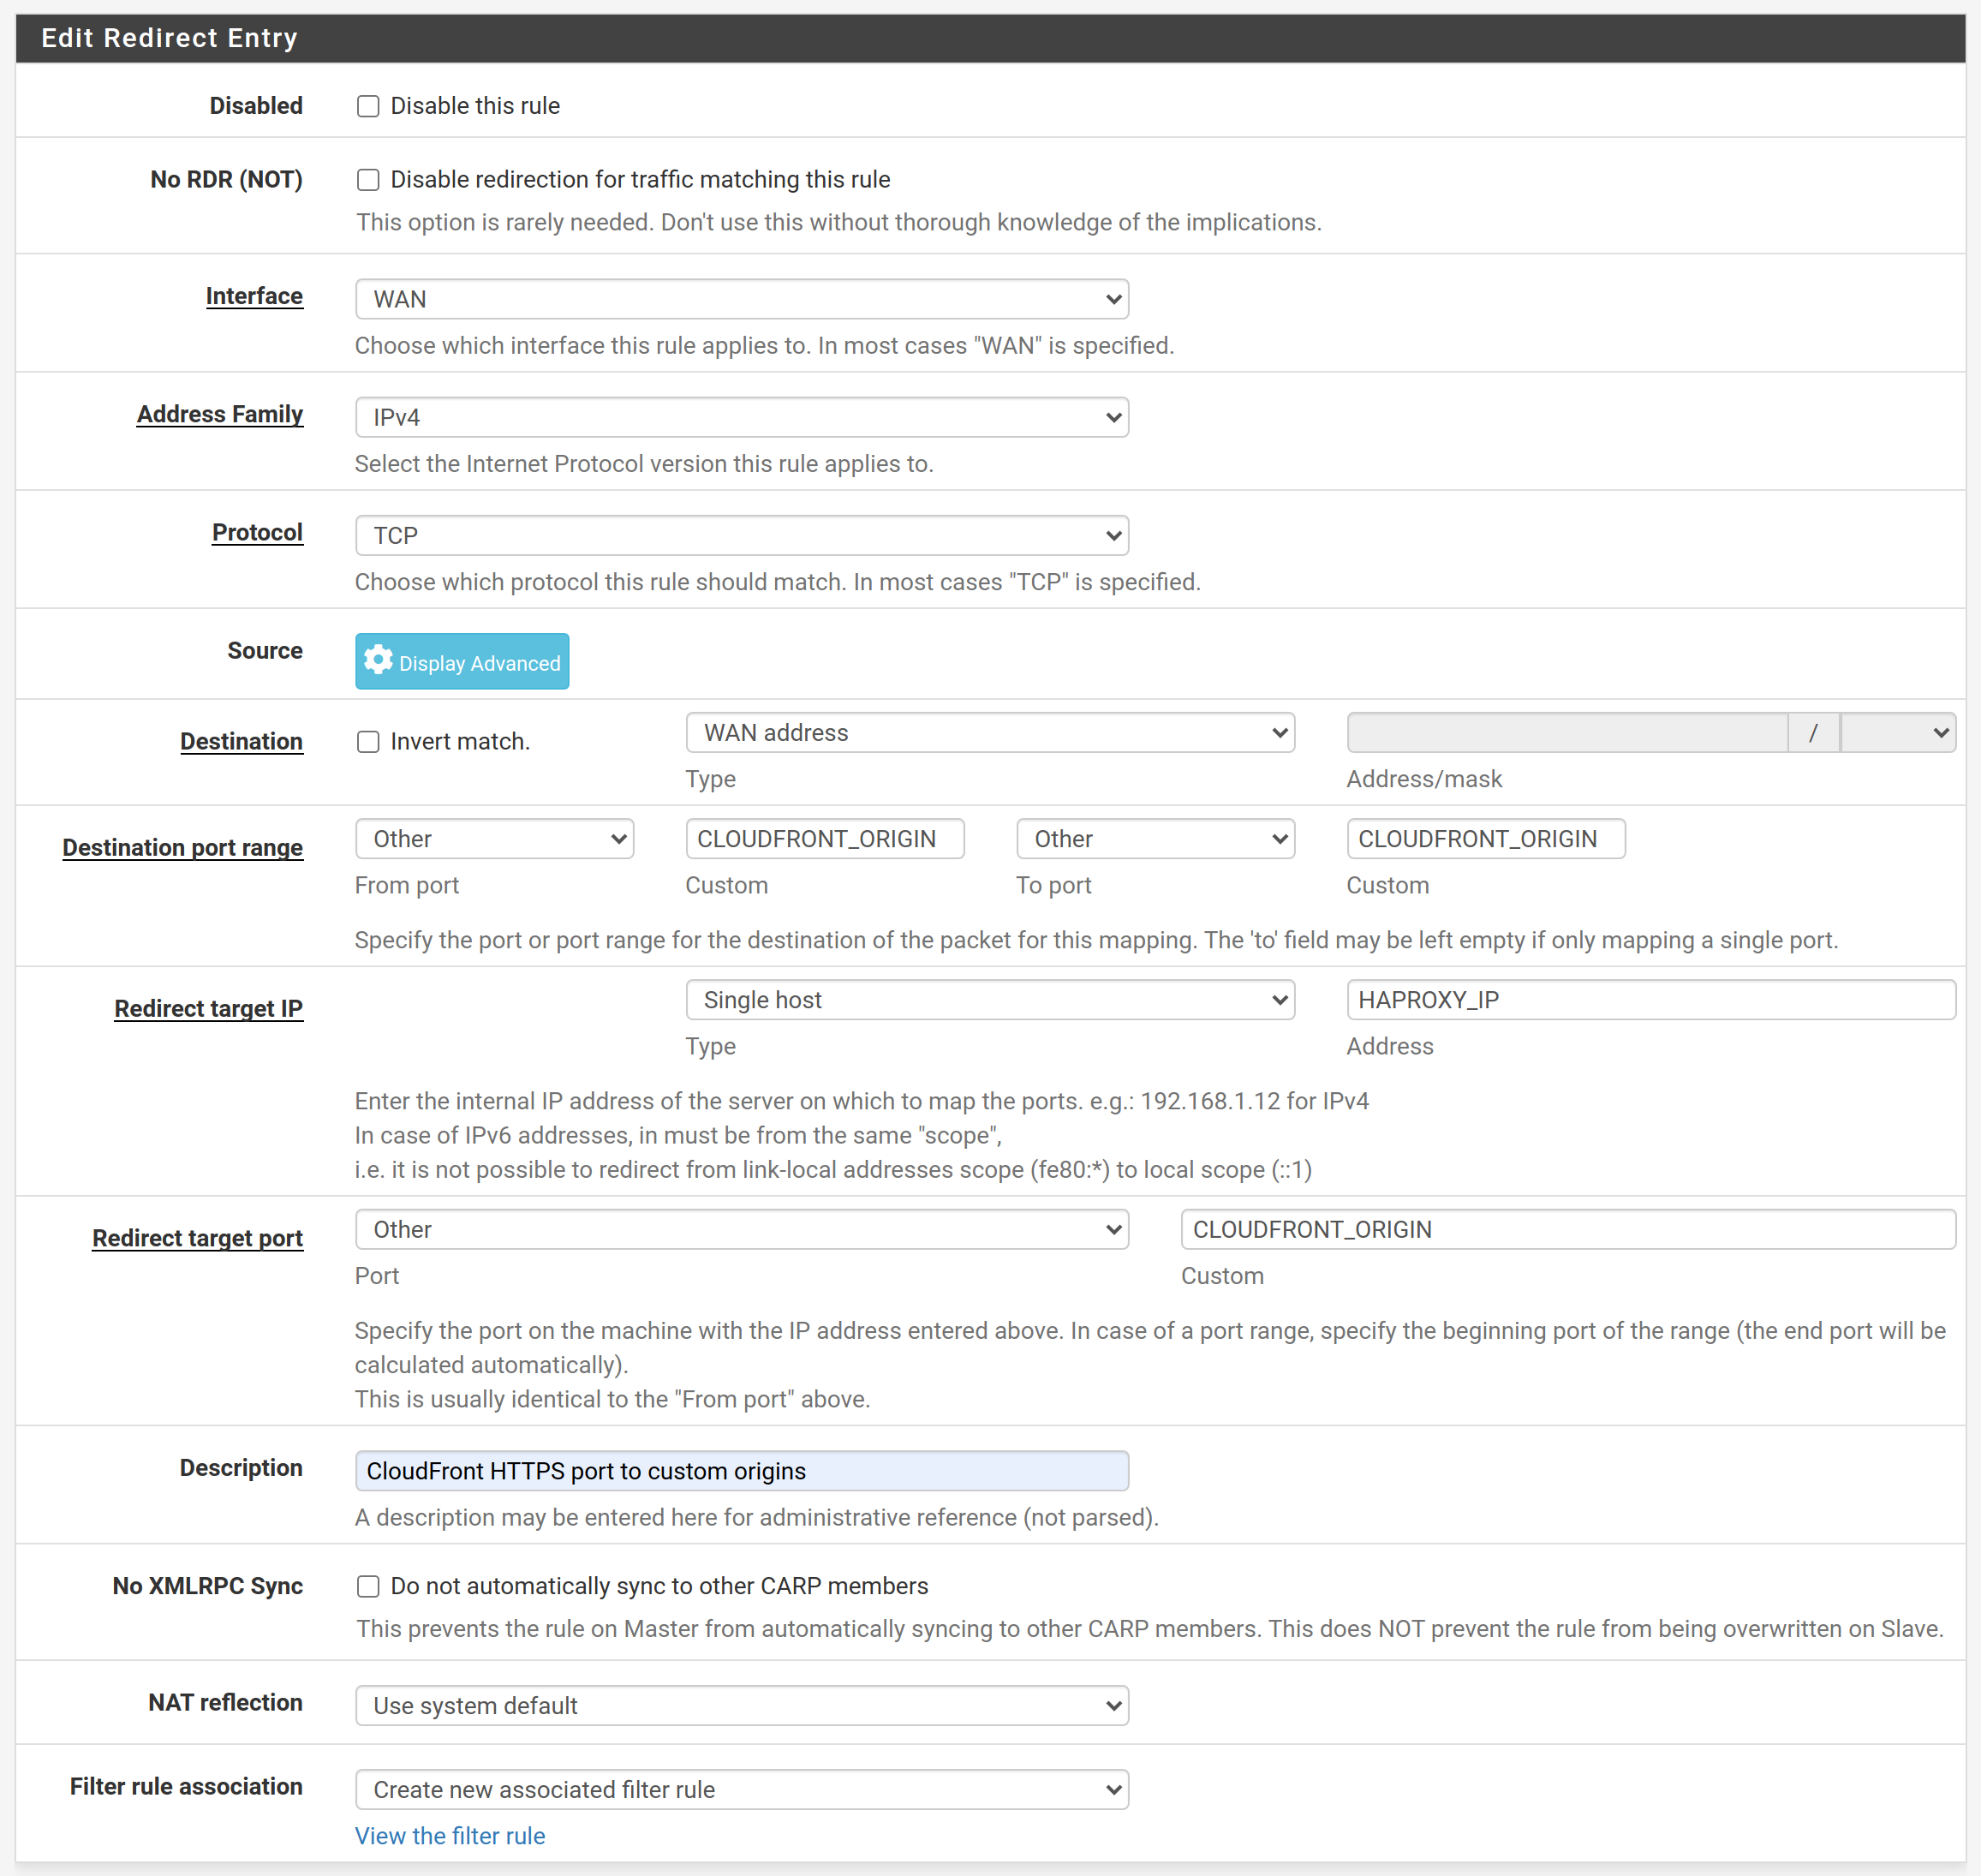
Hit save and apply changes.
Firewall rule
Lastly go to Firewall → Rules and drag the auto-generated WAN rule above any "block" rules. Mine look like this.
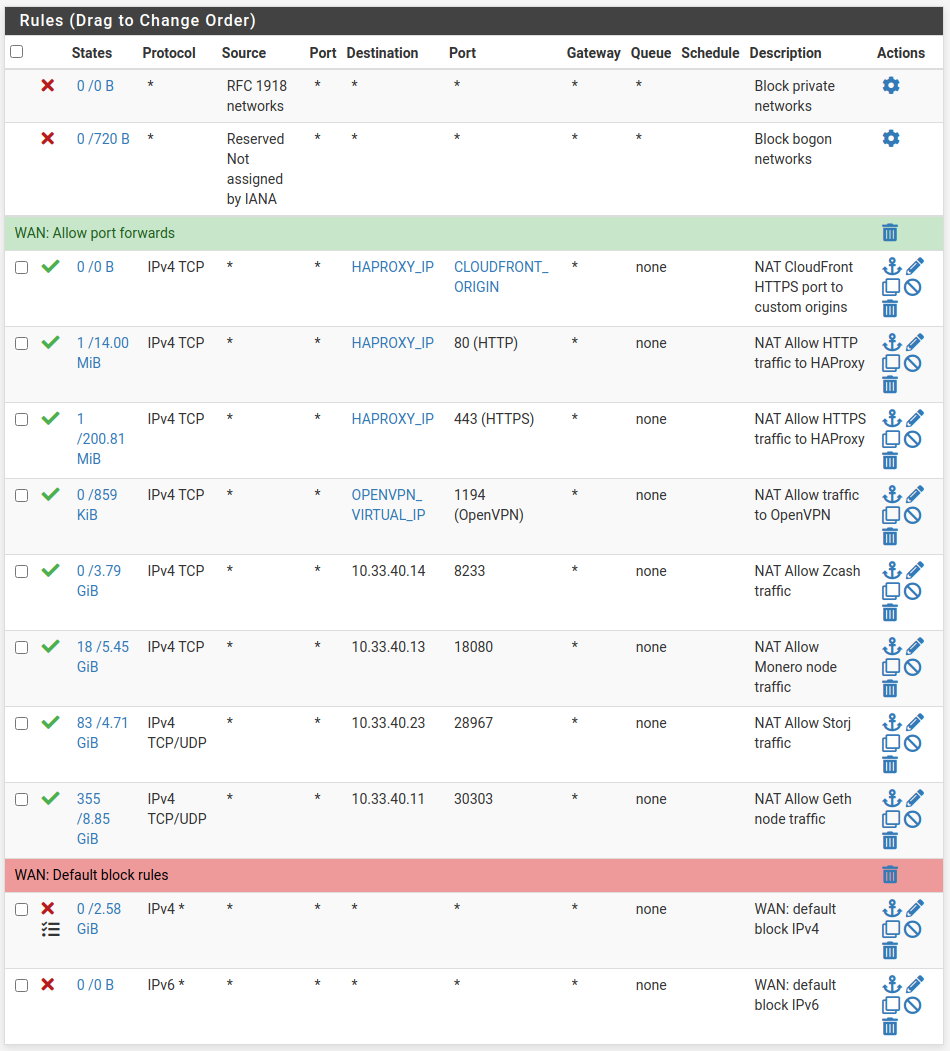
Hit save and apply changes.
3. Setup HAProxy: Backend + Frontend
Install HAProxy package and ACME
Use for example this guide: DuckDNS, Acme and HAProxy configuration in pfSense – Complete Walkthrough. You can skip the DuckDNS part if you have a static IP address.
Create a Backend
Go to Services → HAProxy, select the Backend tab and hit the Add button. Give the backend a name and add the server running your application (Ghost, Umami, Wiki). Scroll down a bit and set Health check method to none.
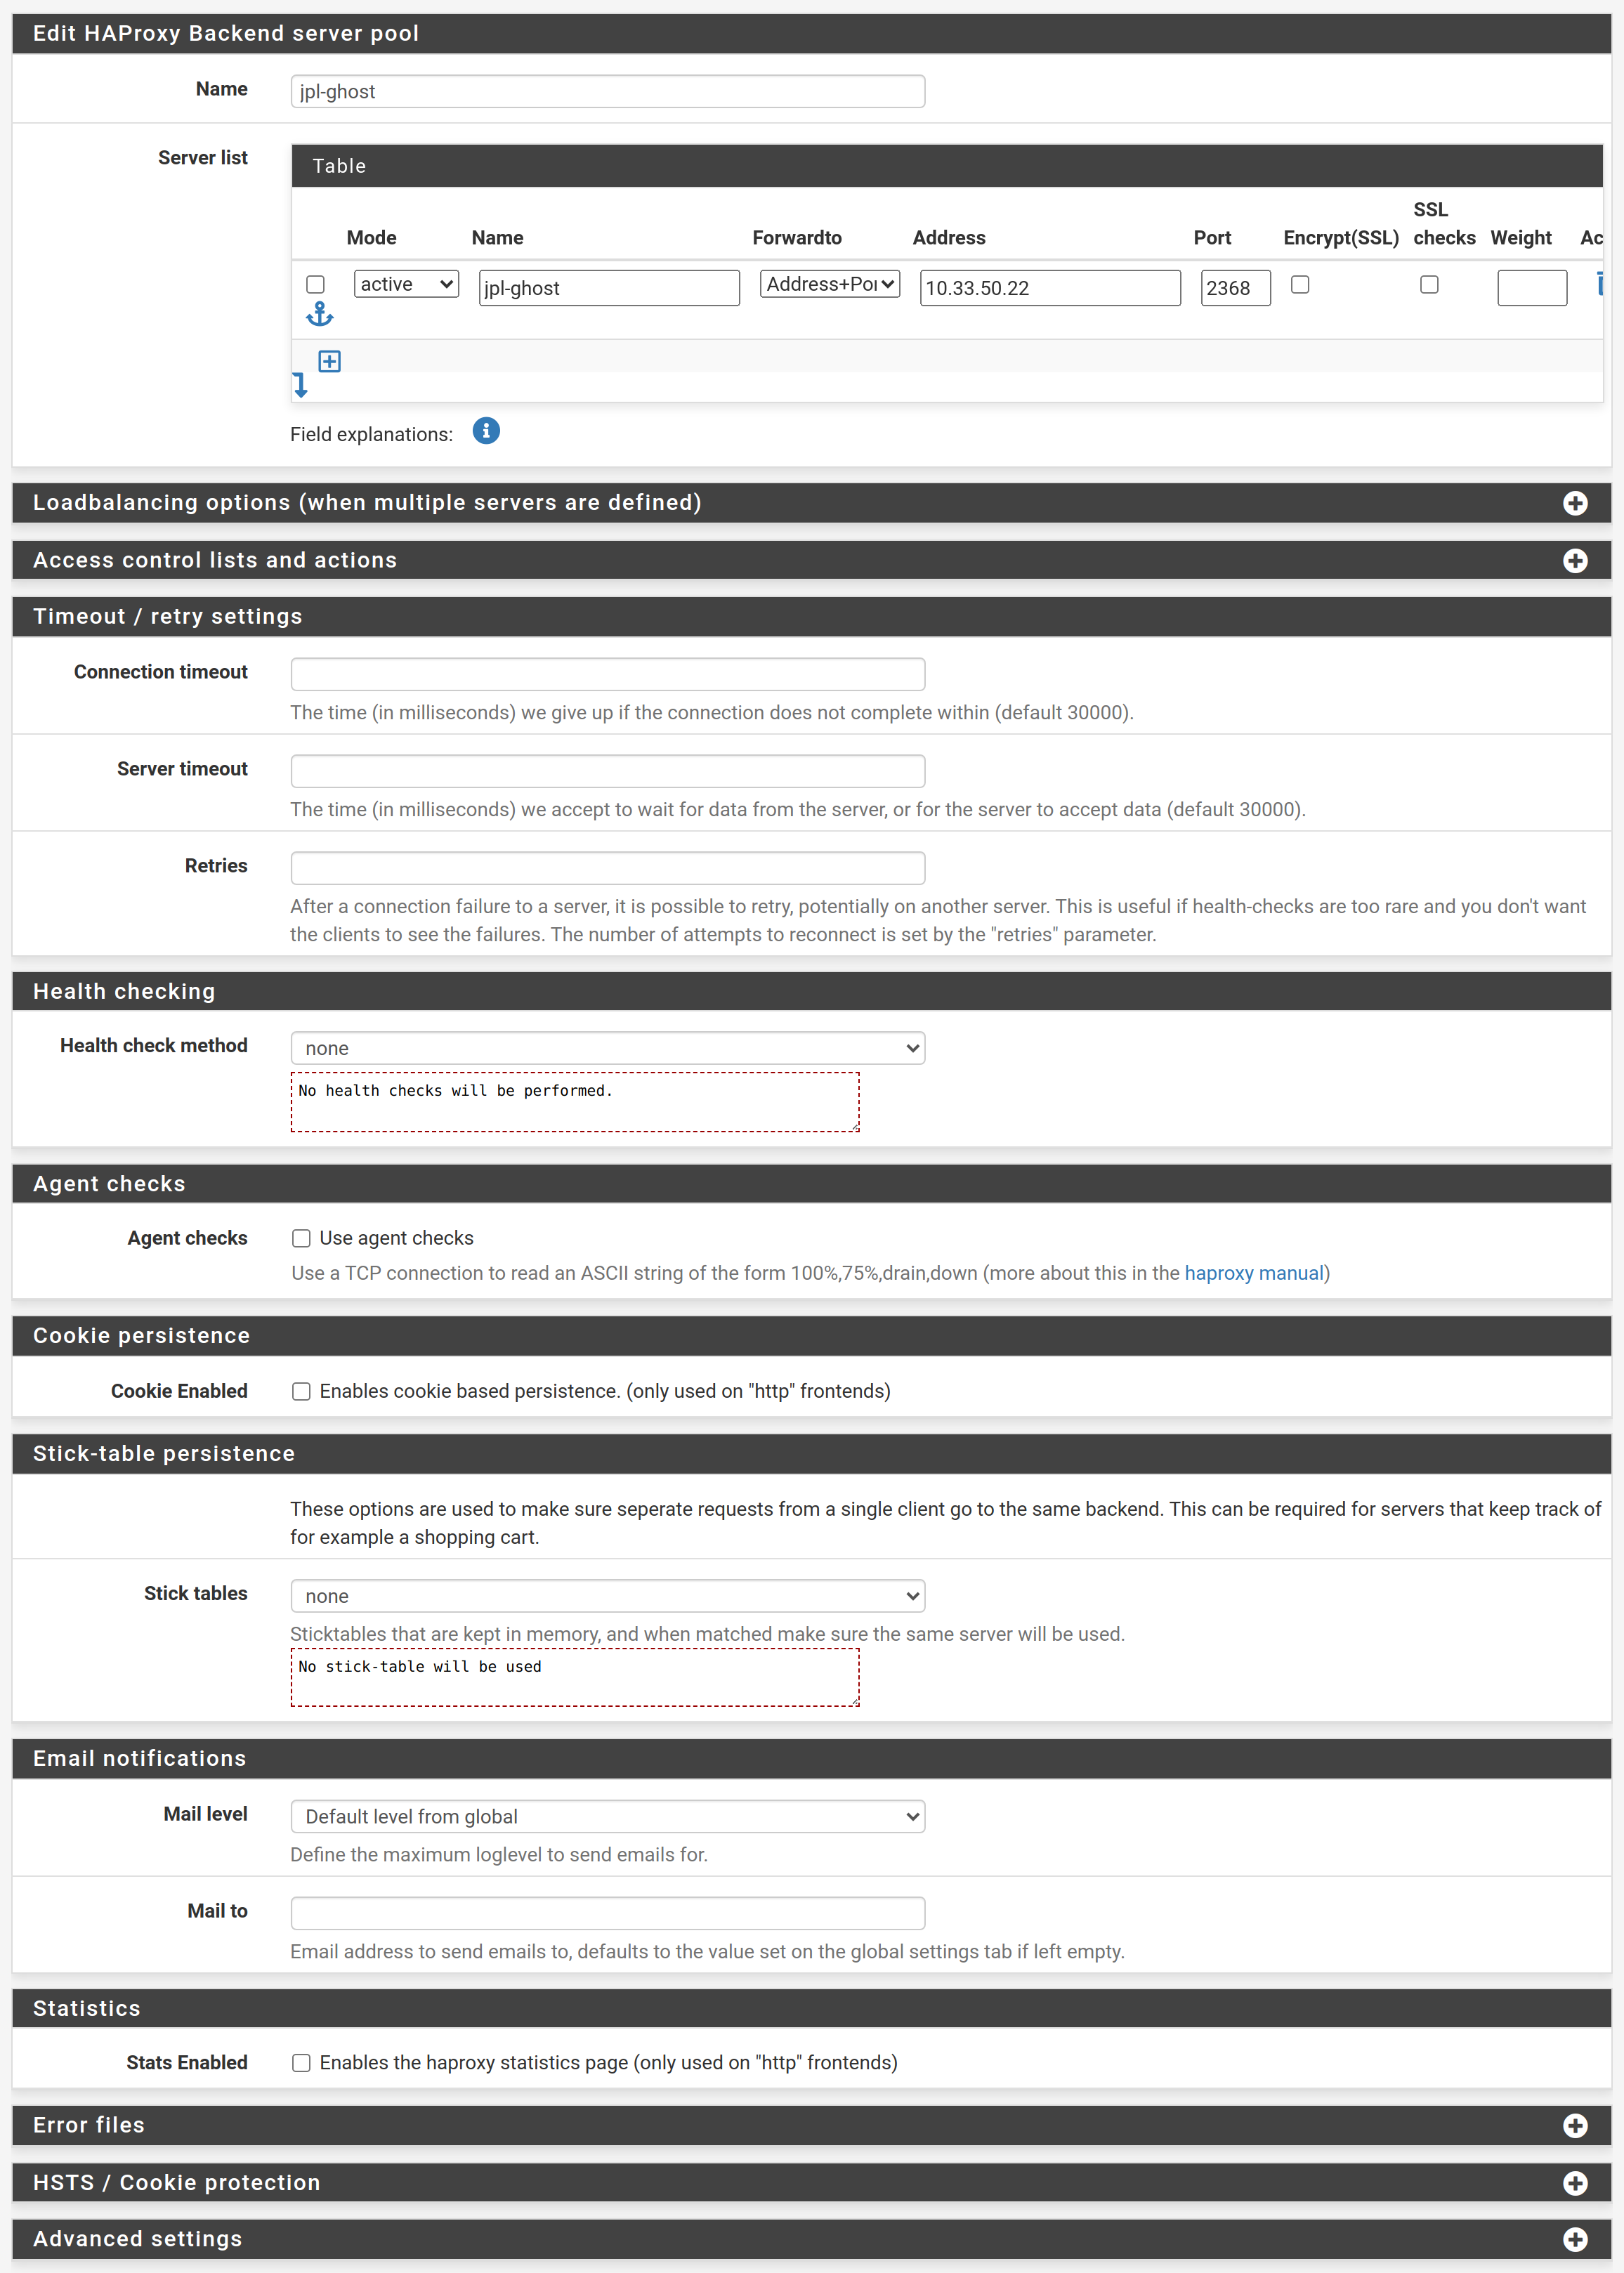
Hit save and apply changes.
Create a Frontend
First create the "main" frontend. With that I mean the "empty" frontend that listens to the port and links the SSL certificate. Because we can only create one frontend per listening port, we will next create a single "shared" frontend per application or like me per domain.
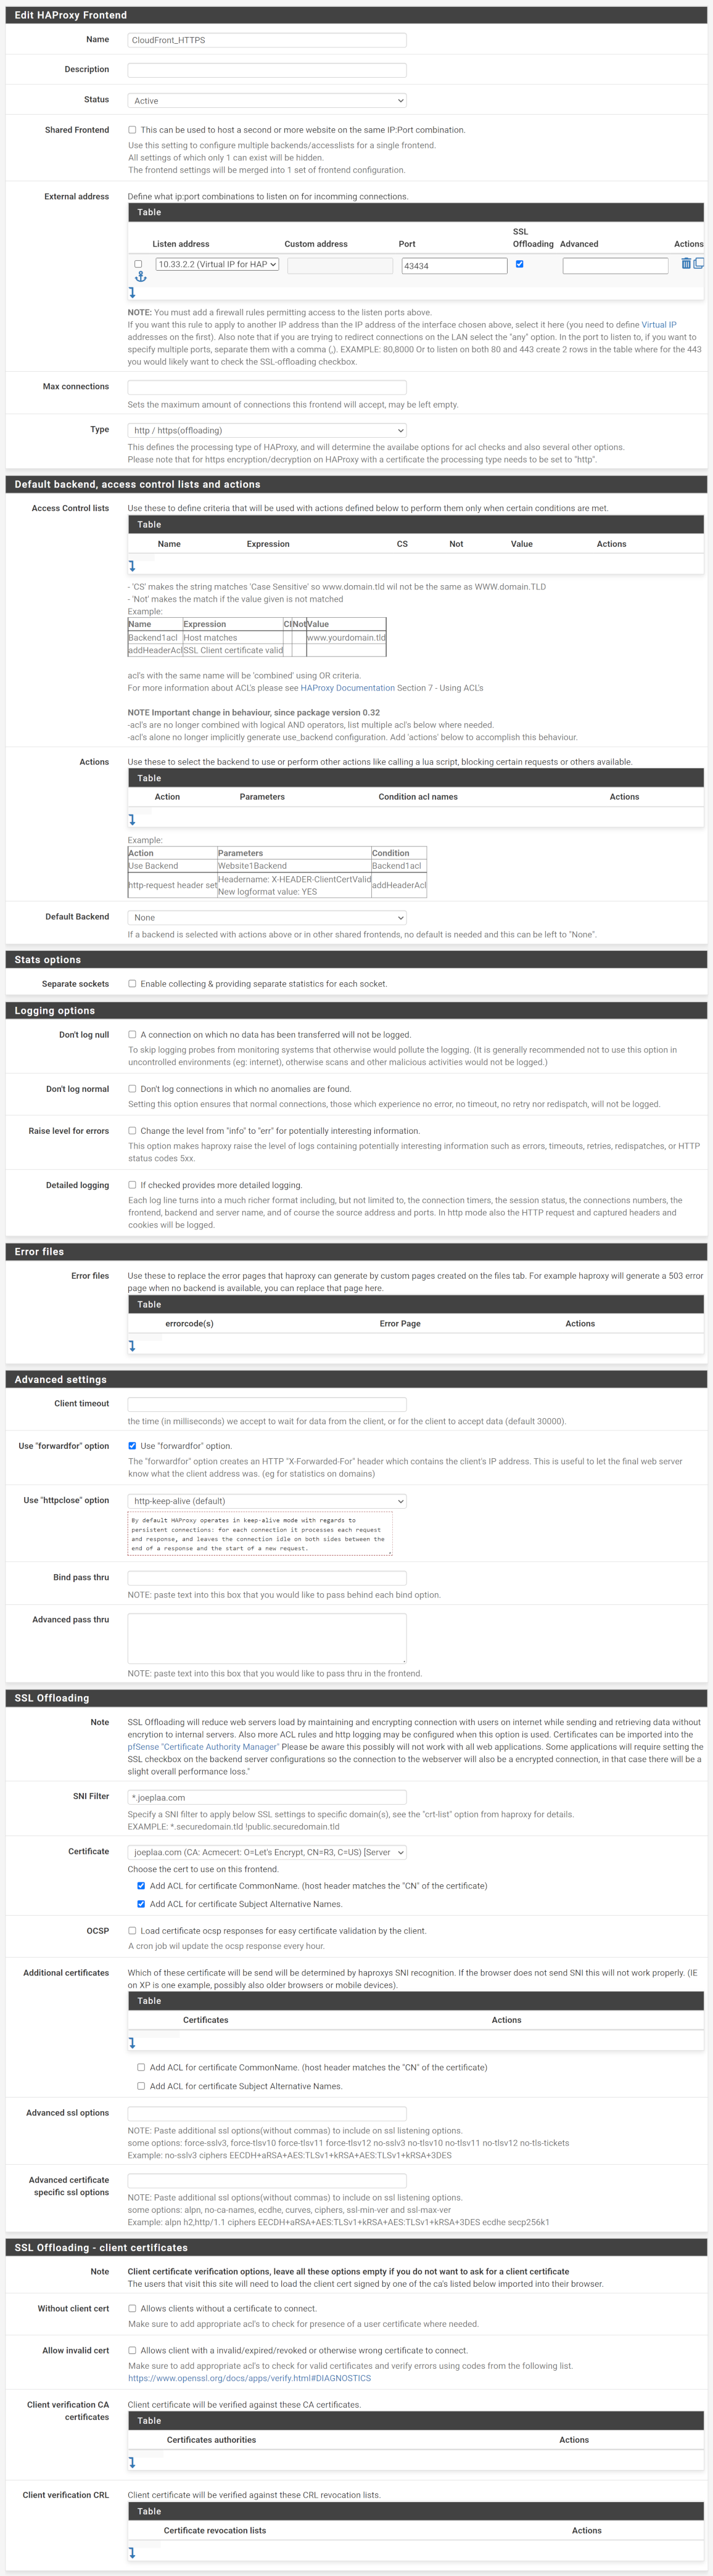
Save the main frontend and create a shared frontend. In my case one for my joeplaa.com applications. Later I will add a single frontend for our jodibooks.com and another for jodibeauty.com applications. This particular one is for our Ghost, Umami and Wiki applications. We start by linking it to primary frontend we just created.
Now we create one ACL (Access Control list) per backend. For example ACL with name Ghost will apply if the expression Host ends with (this is the Host header we forwarded in the CloudFront cache behavior) value blog.joeplaa.com.
Then we define the actions to trigger when an ACL applies. We need to do two things here:
- Forward traffic to the correct backend: ACL
Ghostto the server running Ghost. - Add the
X-Forwarded-Protoheader: I'm not sure if this only applies to Ghost, so I added it to all backends.
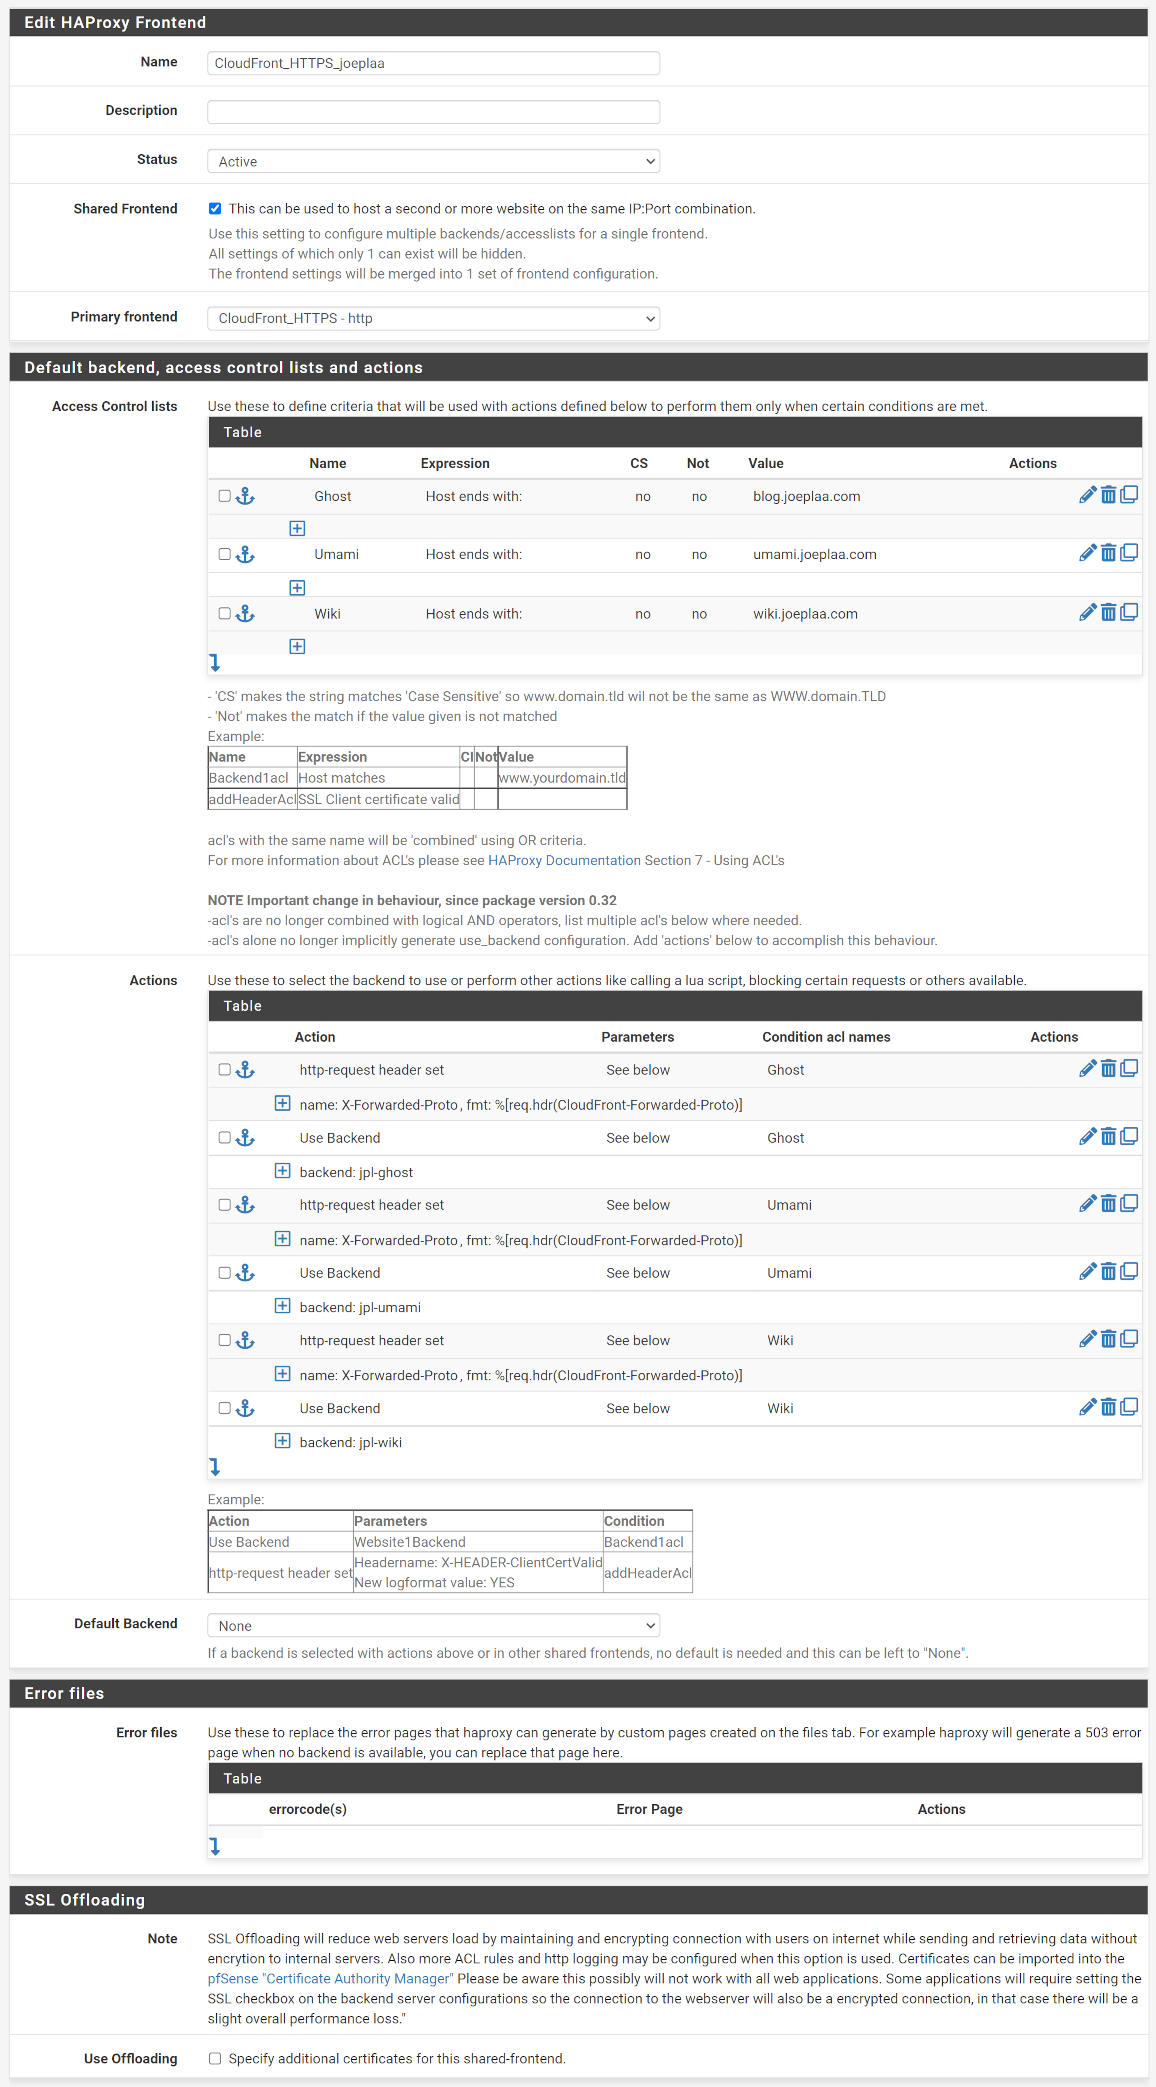
Hit save and apply changes.
4. Route53
In Route53 point the origin domain jpl-srv1.joeplaa.com to the public IP address of your server with an A record. Then point the domain name of your website joeplaa.com to the CloudFront distribution. This can be done with an A record using an alias. Lastly create a CNAME record for domain www.joeplaa.com to joeplaa.com.
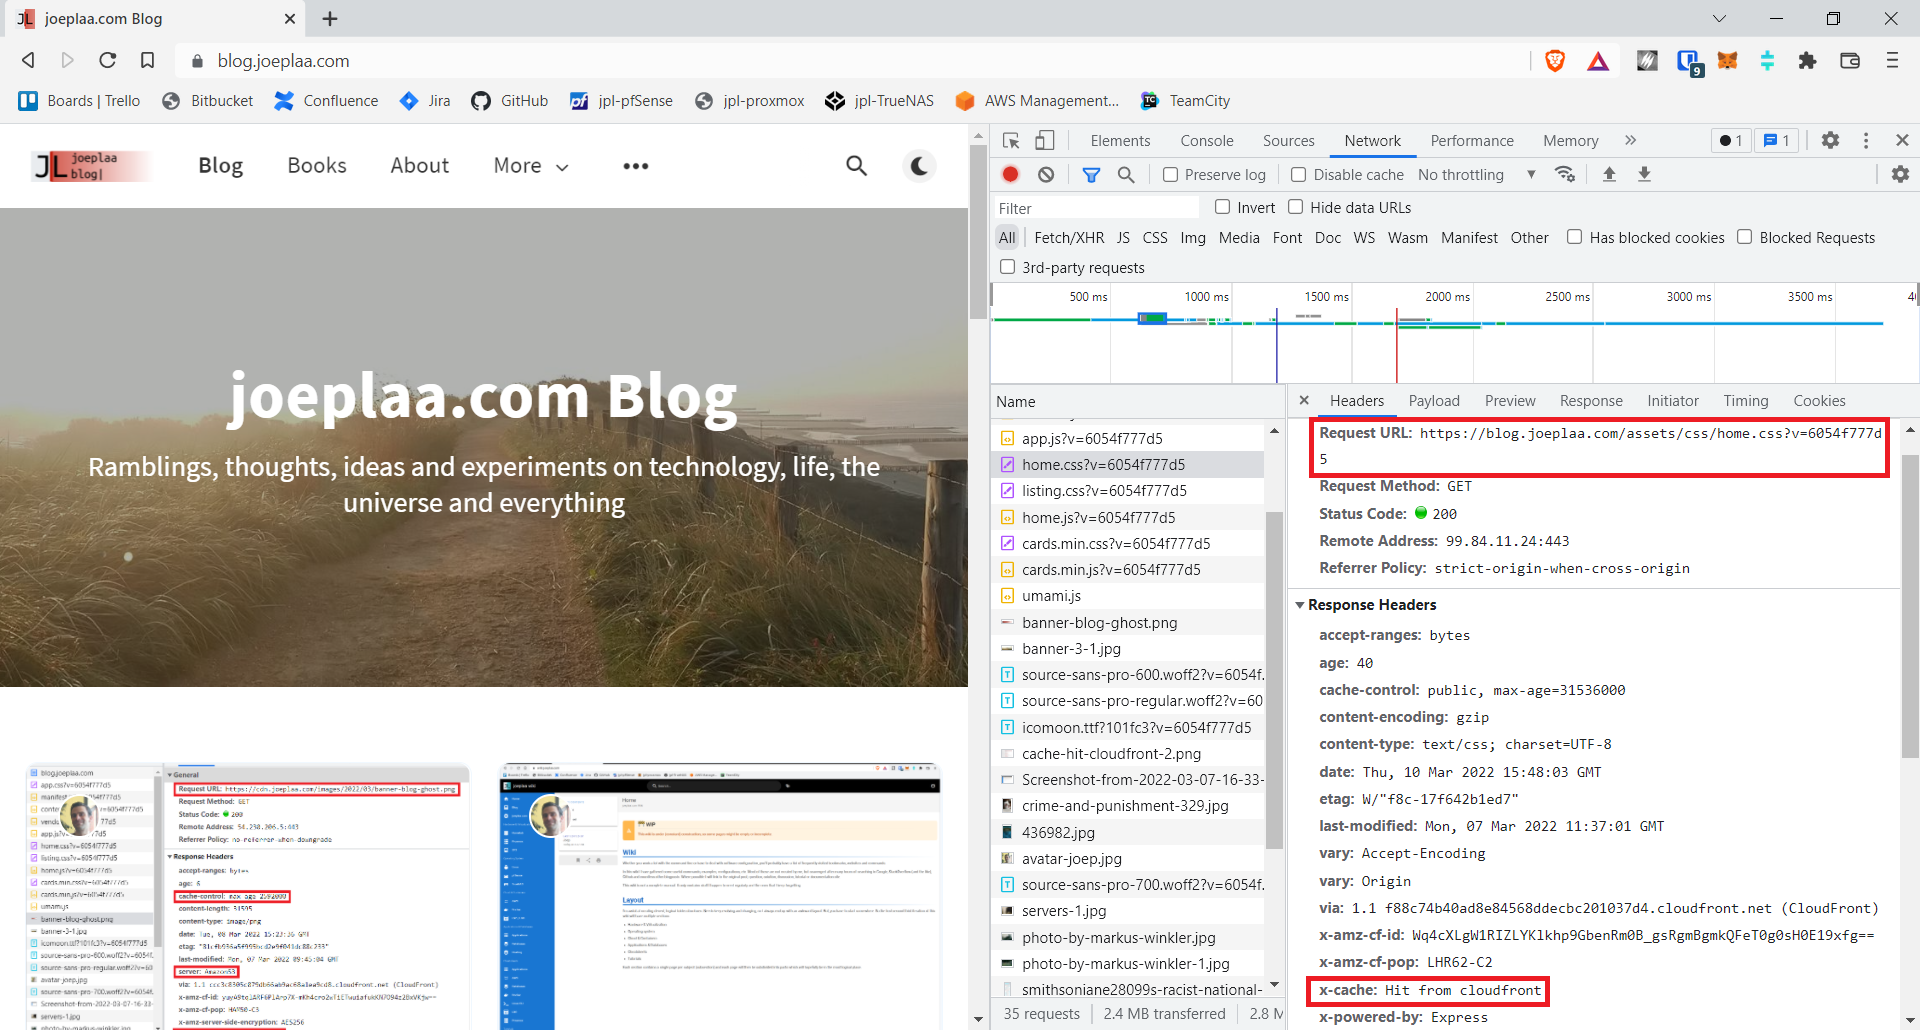
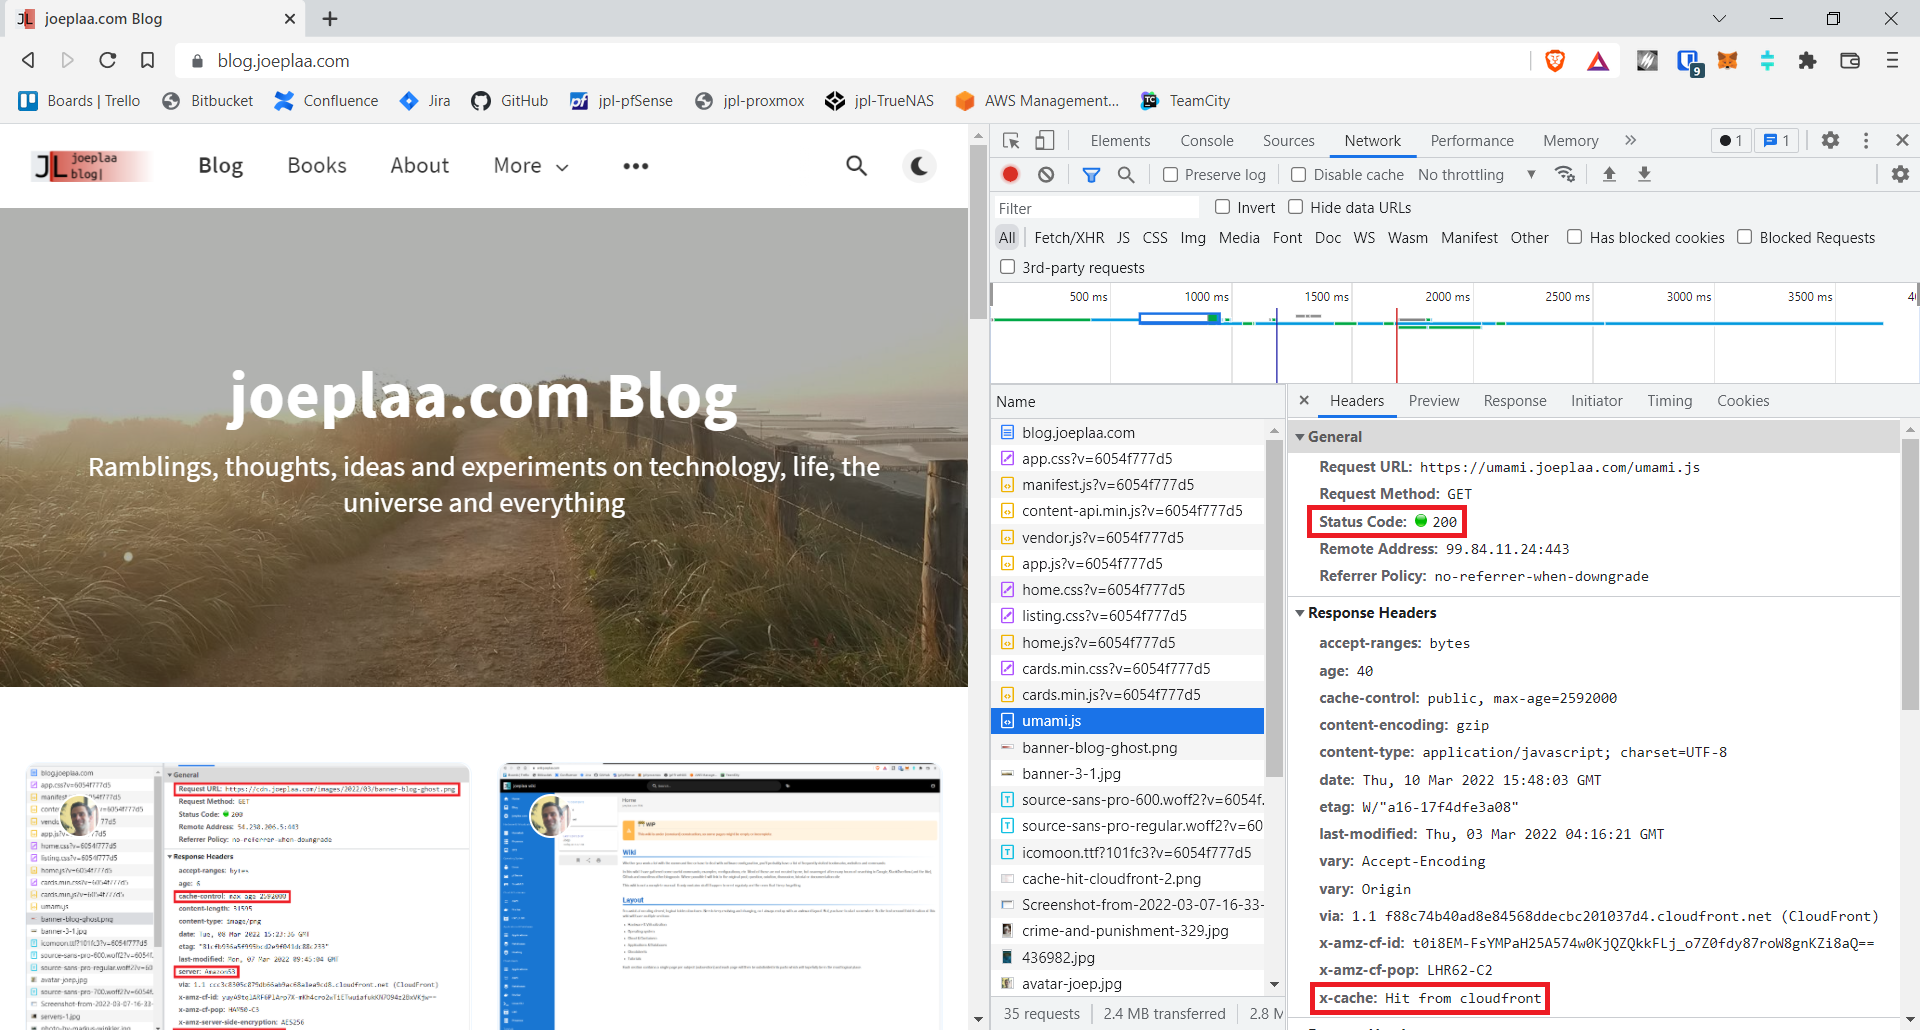
5. Test connection
Open a browser and enter the domain for your application. The website should now be displayed. Press F12 and open the network tab. Click a file and the x-cache header should say Miss from cloudfront. At least we know the file is served through CloudFront. Press ctrl + f5 to force-reload the page and click the file again. Now it should show Hit from cloudfront: succes!
6. Configure CORS
If you only have a single application or they are all independent, you're done. In my case I'm running Umami analytics which is keeping track of how many page views my blog and wiki have. It uses a small javascript file umami.js which is downloaded from umami.joeplaa.com and will POST results back to umami.joeplaa.com/api/send/. So we have a cross-origin POST request that is blocked of you do nothing.
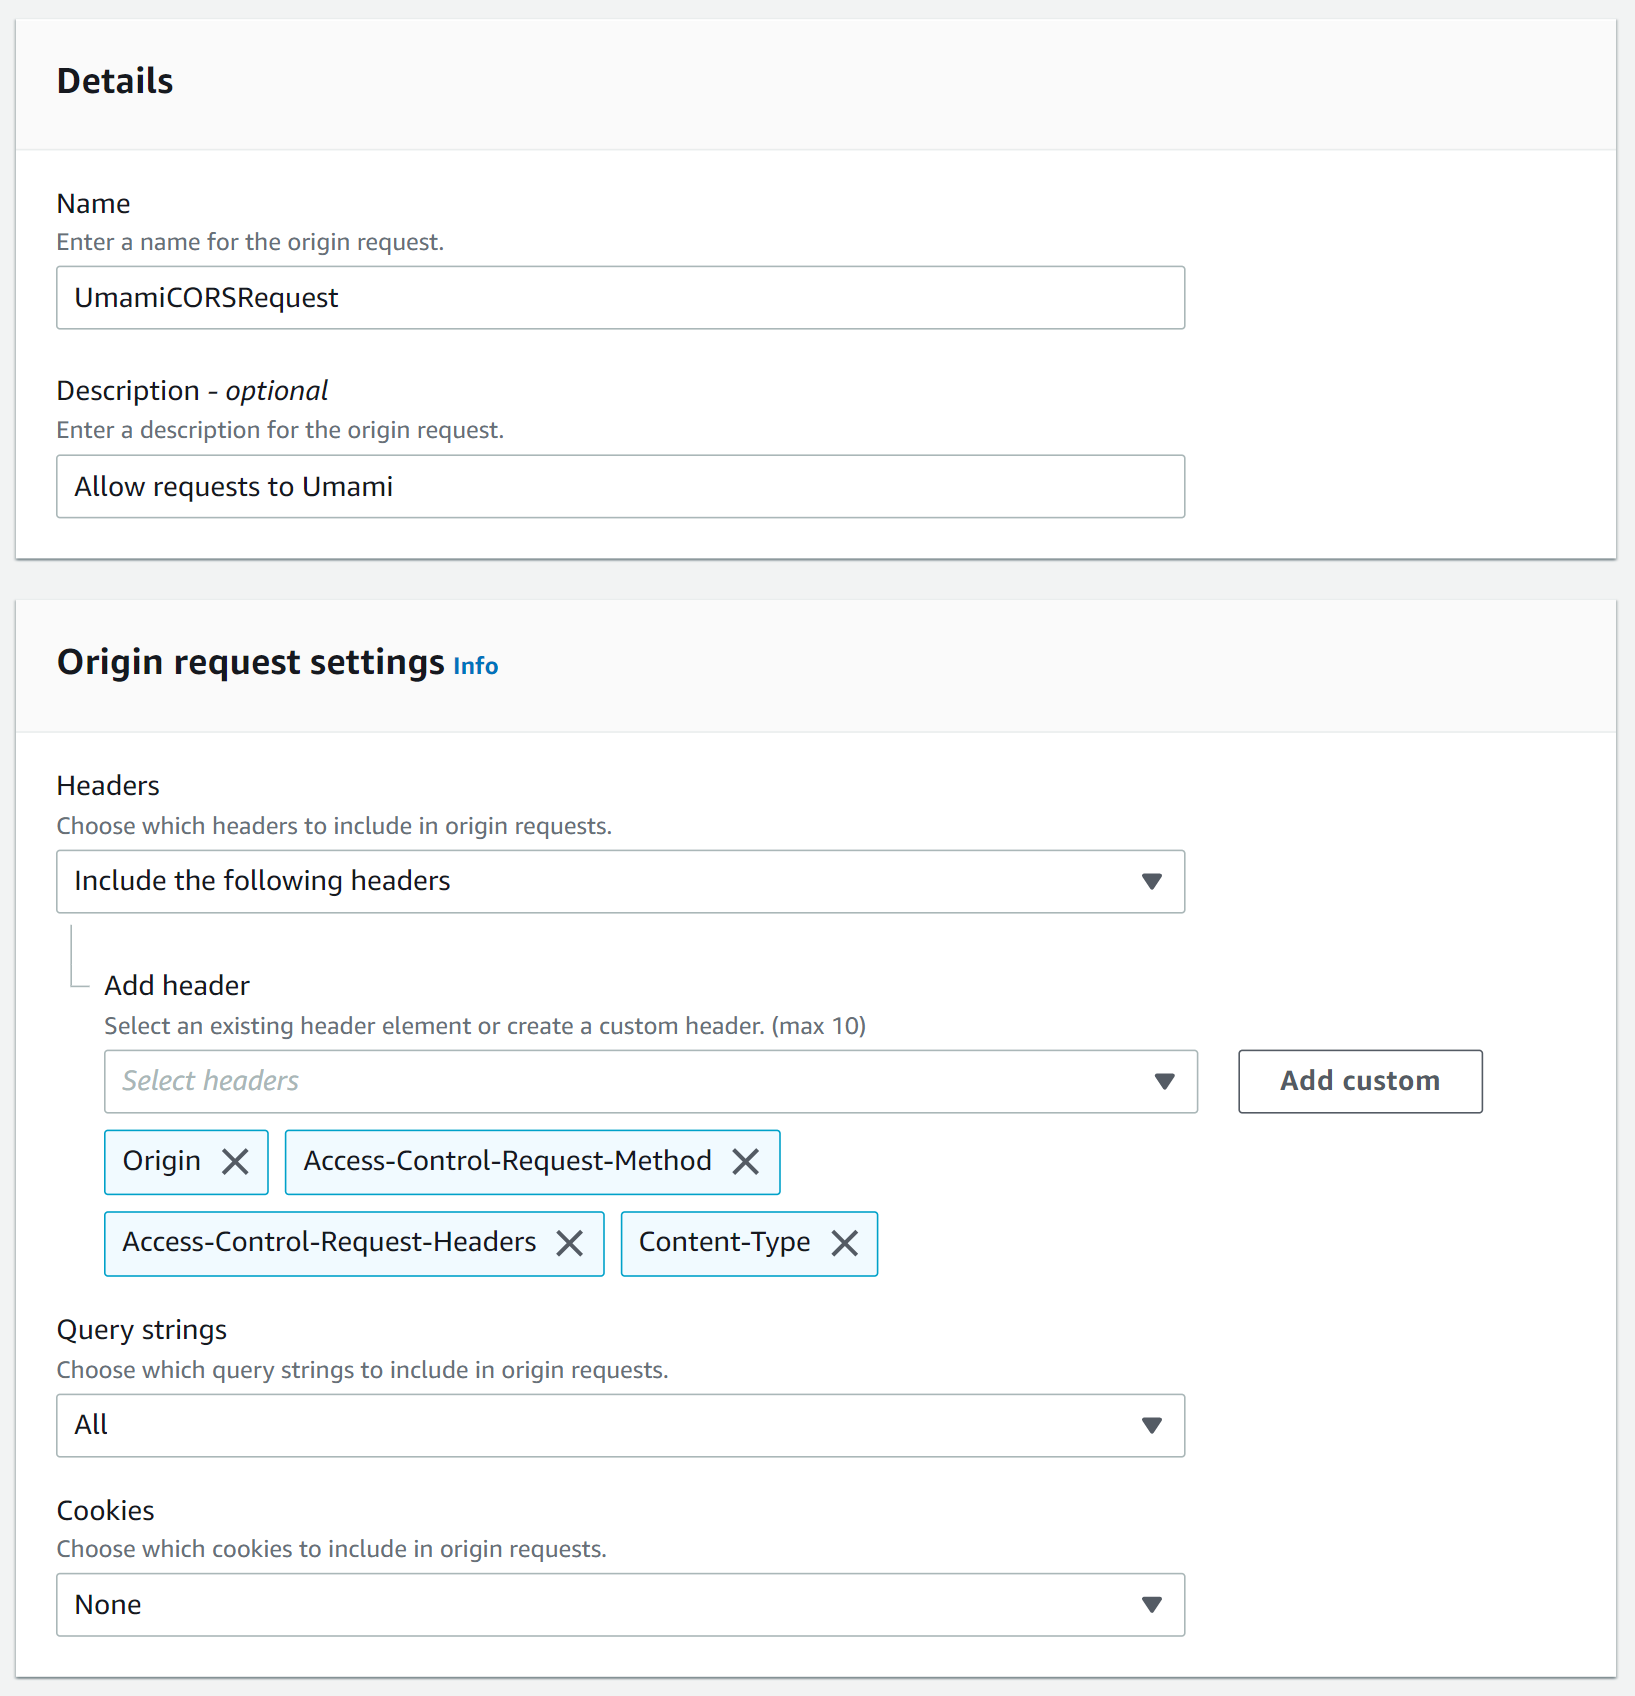
To allow cross-origin resource sharing (CORS) we go back to the CloudFront distribution and on to the behaviors tab. Select it and click Edit. Under Cache key and origin requests → Origin request policy click Create policy.
Select "Include the following headers" and add headers: Origin, Access-Control-Request-Headers, Access-Control-Request-Method and Content-Type. Use the "Add custom" button if the header is not listed in the dropdown. For "Query strings" select All, leave "Cookies" at None.
Save the policy and go back to the tab with the cache behavior. Refresh the policy list and select the newly created policy. This policy has to be used whenever you create a behavior that requests access to another domain (Ghost and Wiki) and somehow Umami itself (I don't understand that).
Now Umami has to allow access. It thus needs to send a response. Under "Response headers policy" click Create policy. I added all the specific domains that I want to allow, meaning I have to update this policy every time I add a website. You can also select "All origins", but you lose a part of the CORS protection.
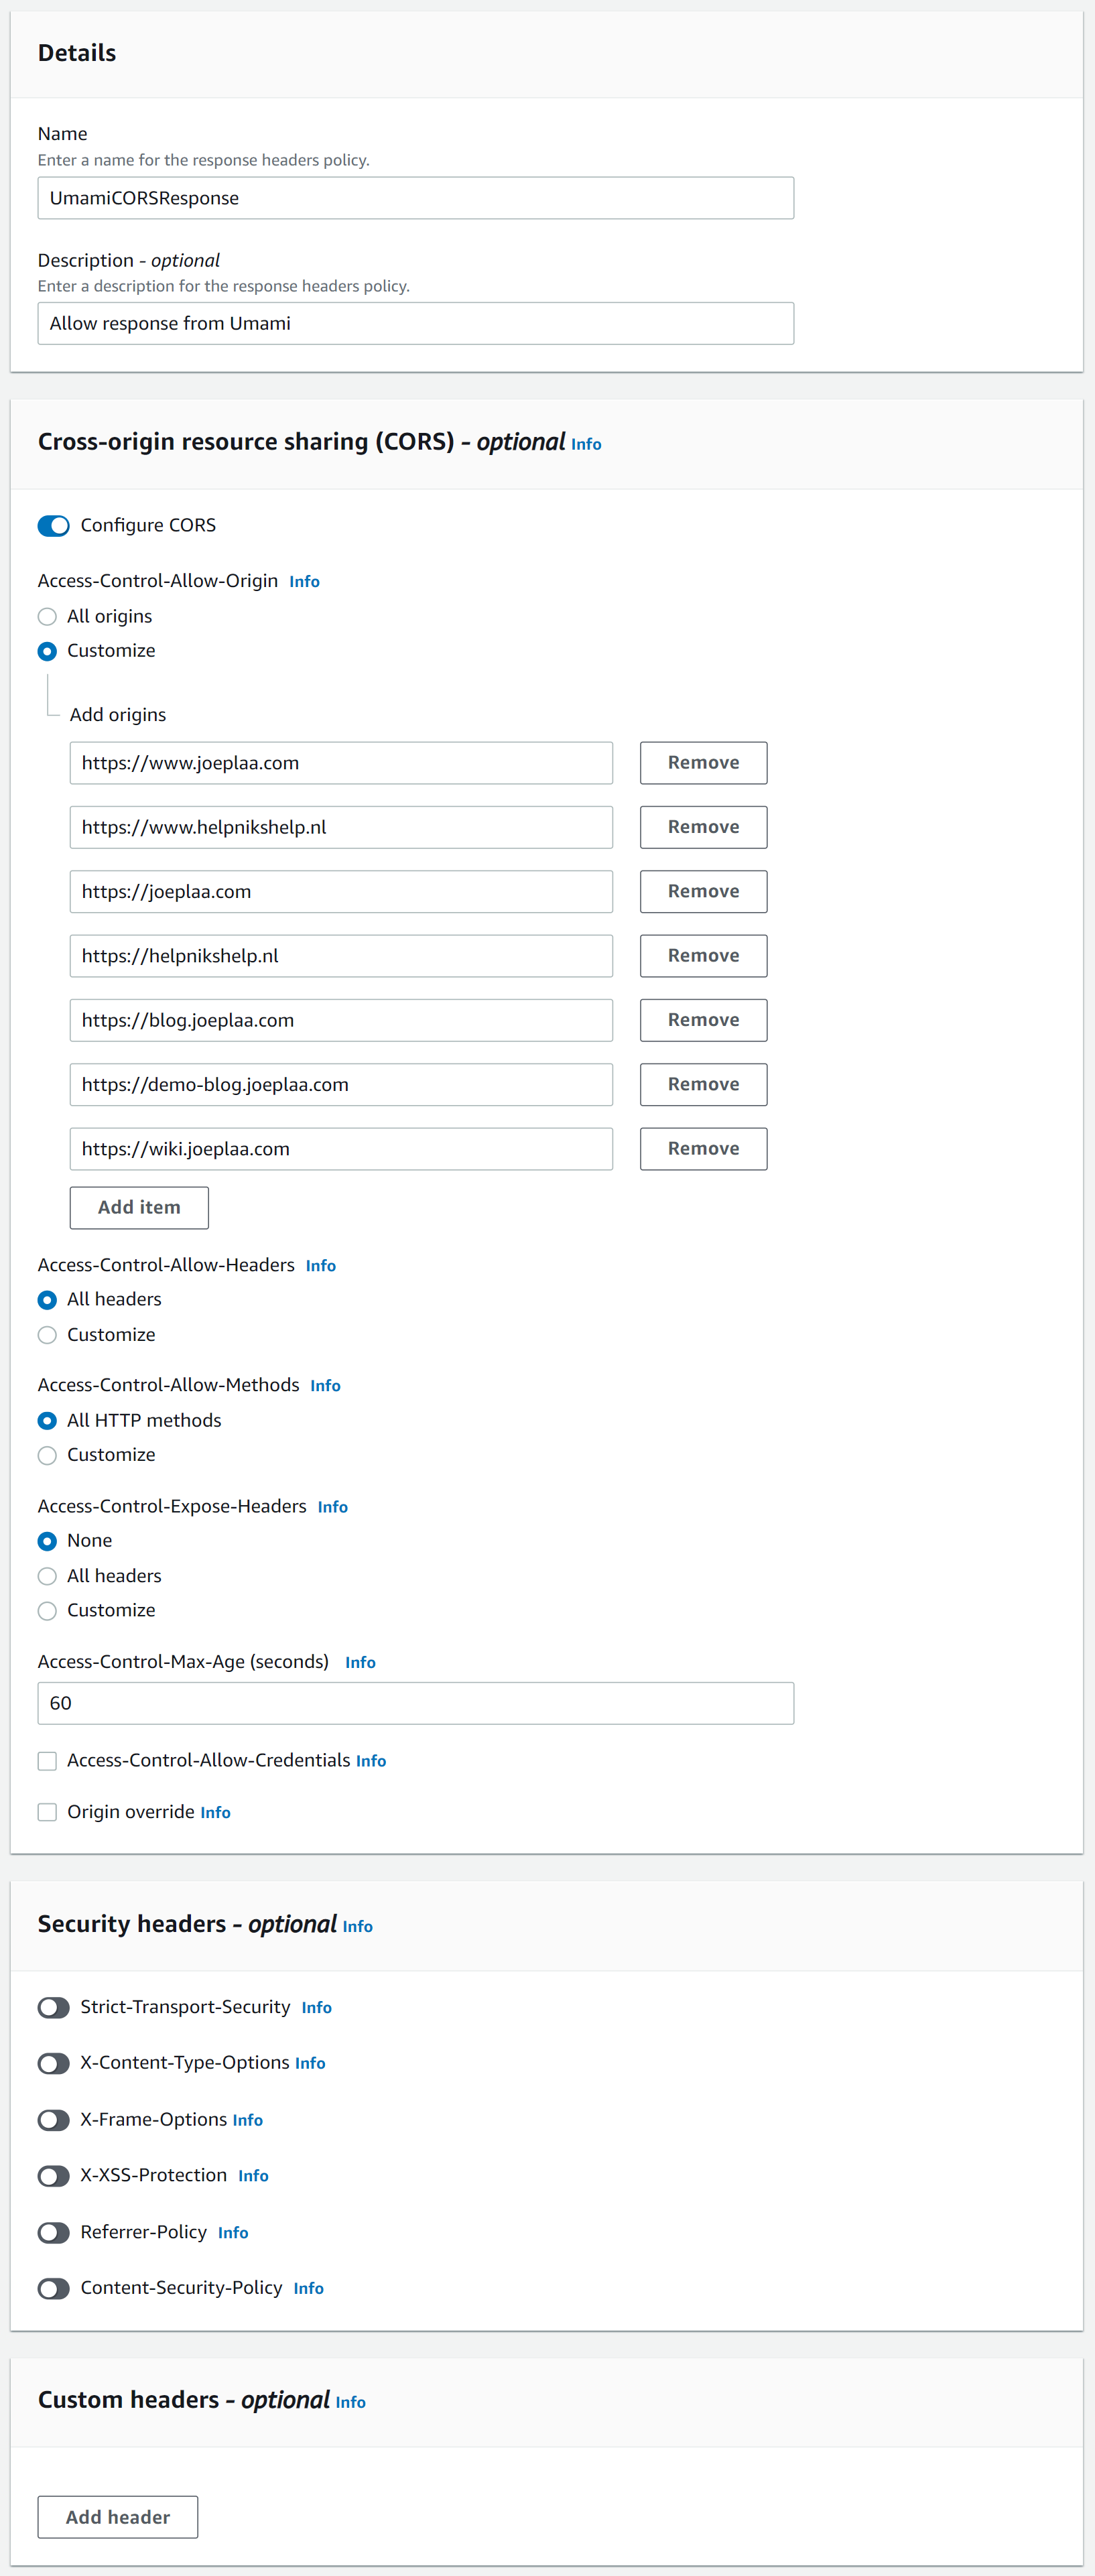
Access-Control-Max-Age to 60 seconds for testing. The default is 600.Save the policy and go back to the tab with the cache behavior. Refresh the policy list and select the newly created policy. This policy has to be used whenever you create a behavior that responds to an access request from another domain (i.e. Umami).
Now open the /api/send behavior and here too add the Origin request policy and Response headers policy.
Let's check if it works. Open a browser and enter the domain for your application and press F12 to open the developer tools where you go to the network tab. Press ctrl + f5 to force refresh your website, just to make sure. Scroll to the umami.js file. This should be loaded with a Status code 200.
In the list with files (requests) scroll down and look for collect. You will find two instances:
- A CORS pre-flight
OPTIONScall, which is the request to check if the actual request is allowed. - The
POSTcall that sends the data.
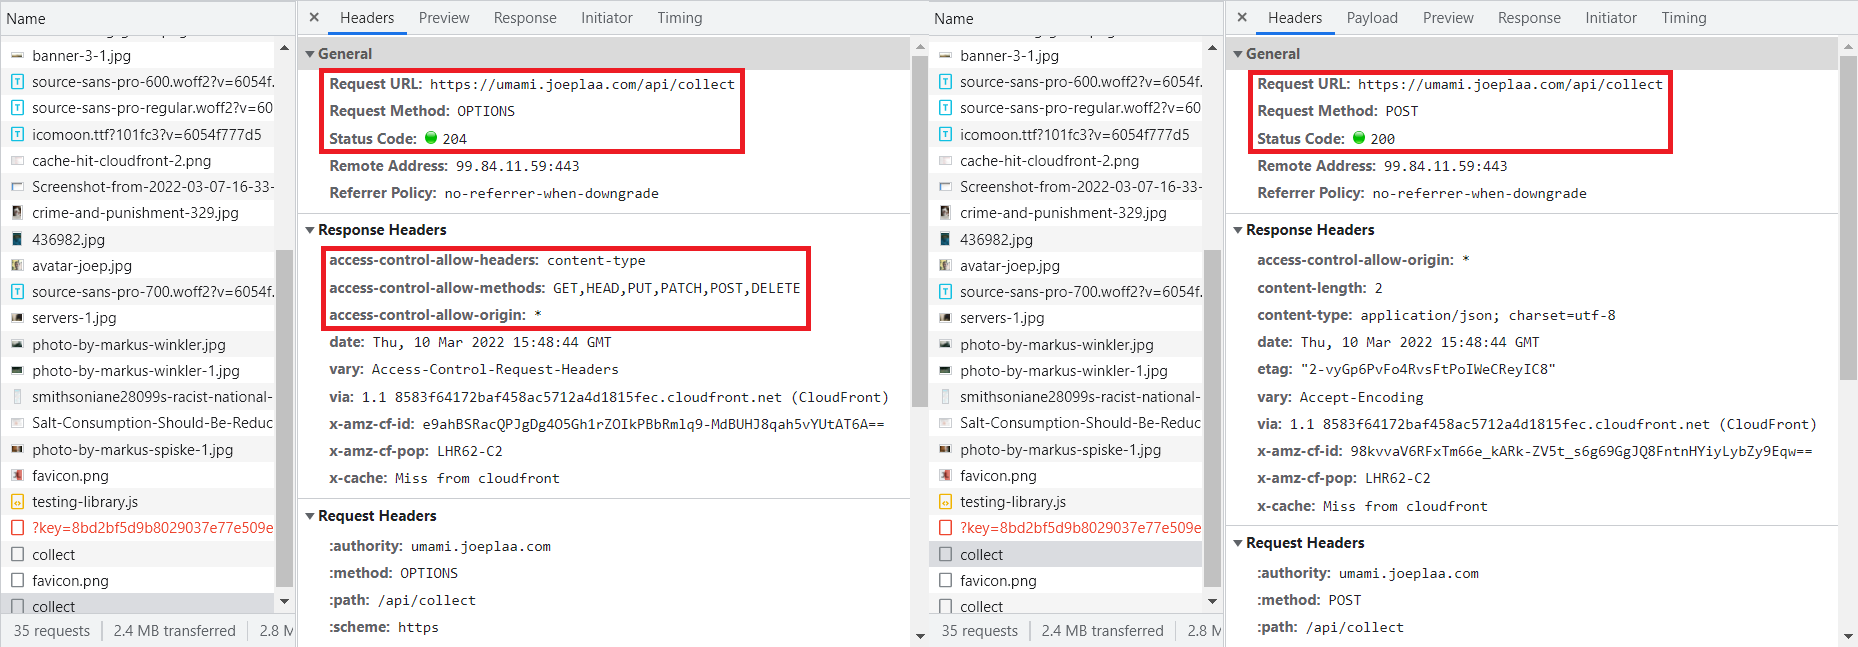
access-control-allow-origin header has value *...Further reading
If you would like to know more about CORS, headers and CloudFront or where I found (some) of my answers, here are some sources.
- Request Capturing using NGINX and Lua
- How do I resolve the "No 'Access-Control-Allow-Origin' header is present on the requested resource" error from CloudFront?
- CORS issue on Vercel · Issue #100 · mikecao/umami · GitHub
- Access-Control-Allow-Origin header not being sent by the api? · Issue #648 · mikecao/umami · GitHub
- reverse proxy - HAproxy within Pfsense, how to set header like in NGINX (Host, X-Real, X-Forwarded...) - Stack Overflow
- Geeking out with HAproxy on pfSense | Julian Pawlowski
- AWS Stack Cloudfront ELB EC2 https setup - 504 Gateway Time-out & 502 Bad Gateway
- Request and response behavior for custom origins
- pfSense baseline guide with VPN, Guest and VLAN support
- DuckDNS, Acme and HAProxy configuration in pfSense – Complete Walkthrough
- Ghost behind AWS CloudFront