Ghost + AWS S3 + CloudFront
Disclaimer: this guide is written in March of 2022 and confirmed to work with Ghost version 4.37.0.
So for the jodiBooks blog I didn't use the integration at all. All the files are stored on the Ghost server only. There is no copy send to S3 (except for an explicit daily backup). The configured CloudFront distribution retrieves all the files from this origin only.
I can only think of two disadvantages. One, initially there will be more requests to your server. But that is a one time issue when configured correctly. And two, with S3 as a image repository, you basically create an automatic/implicit backup of your images. That is lost when you don't use S3. But alas, you have to make backups of your config data and database anyway.
I recently migrated this blog from a self build Gatsby website to a self-hosted Ghost blog. One of the reasons I initially build my own website was that it could be statically hosted using AWS S3 and CloudFront. This made my site load super fast and the costs were negligible.
However, maintaining the code and writing posts was becoming more of a chore than a fun thing to do. It was just a little too laborious.
Now, I recently also started a Wiki, which needed a server to run on. So I thought, why not use that server for my blog too? That way I can use Ghost which makes maintaining it a breeze and hopefully I start posting again. Well, here I am, writing a post.
The issue
Ok, so I have a server in my house running Ghost in a Docker container. So far so good. But I love thinkering and optimizing, so I wanted to use a CDN to host the images on my blog. This should have been straight-forward to implement with S3 and CloudFront and a plugin (called an integration in Ghost terminology), but it was a bitch. Having Ghost run in a docker container complicated matters a bit, but in the end I got it to work.
The solution
Now, I assume you have Ghost running in a Docker container and you can login to the admin panel at "<your-domain/ghost>". You also can access the docker container using a shell.
Part 1: Configure AWS
1. Create a Ghost IAM user
First create a policy: "S3-blog.joeplaa.com". I like to begin with the service the policy is for, followed by the specific reason. In this case Ghost is going to store and manipulate data in S3 bucket blog.joeplaa.com. So this policy only allows S3 in this particular bucket.
{
    "Version": "2012-10-17",
    "Statement": [
        {
            "Sid": "VisualEditor0",
            "Effect": "Allow",
            "Action": "s3:ListBucket",
            "Resource": "arn:aws:s3:::blog.joeplaa.com"
        },
        {
            "Sid": "VisualEditor1",
            "Effect": "Allow",
            "Action": [
                "s3:PutObject",
                "s3:GetObject",
                "s3:PutObjectVersionAcl",
                "s3:DeleteObject",
                "s3:PutObjectAcl"
            ],
            "Resource": "arn:aws:s3:::blog.joeplaa.com/*"
        }
    ]
}
Now create the user that is going to use this policy: "ghost". Obviously attach this policy to that user.
2. Create an S3 bucket
As I will be be using CloudFront later, I could have named my bucket anything. For example "joeplaa-ghost" or "joeplaa-blog", but for some reason I chose "blog.joeplaa.com". It doesn't really matter, however the latter might be confusing as it suggest it is reachable on that domain, which isn't completely false, but we'll prevent that and only allow CloudFront to retrieve files from this bucket.
So while creating this bucket make sure "Block all public access" is turned on or turn it on later. You can find it on tab "Permissions".
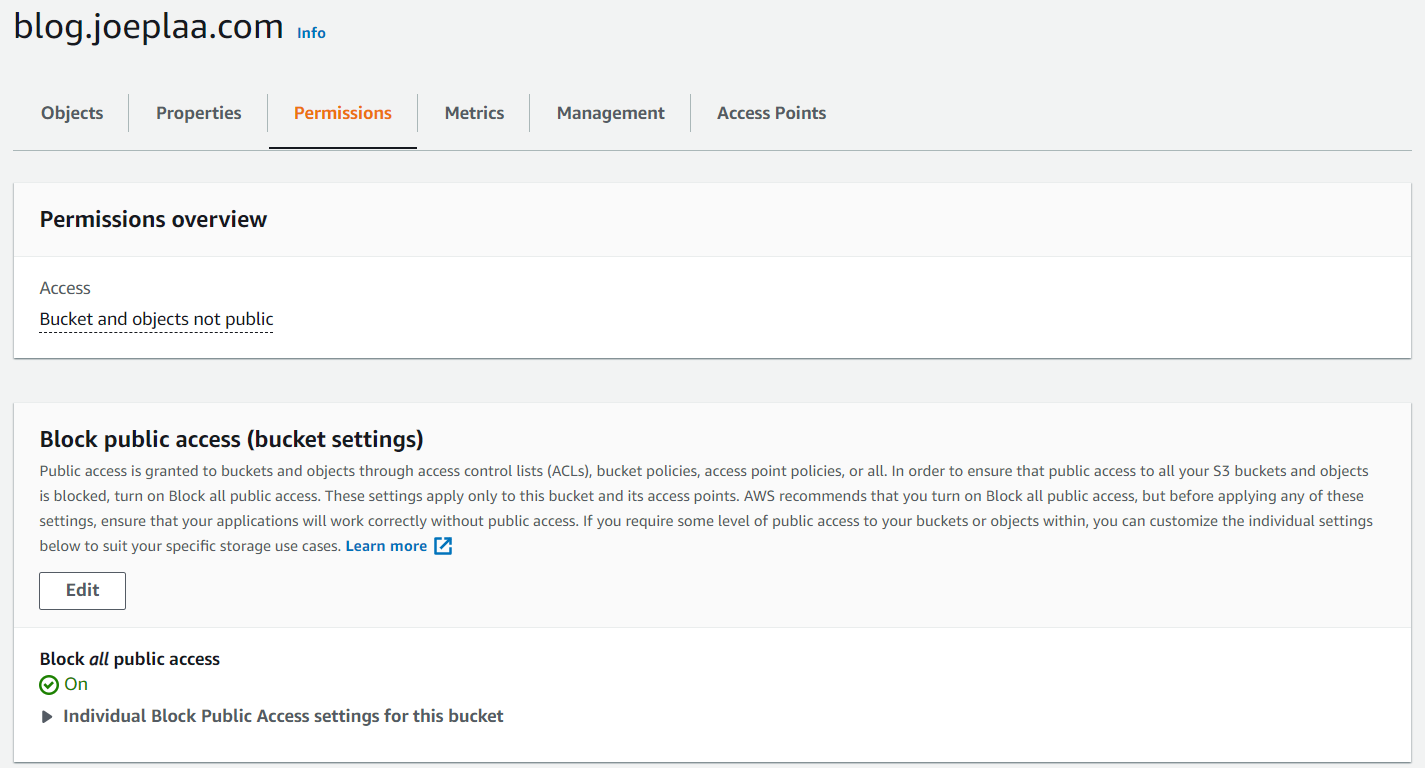
Also make sure "Static website hosting" is disabled. You can find it on tab "Properties".

3. Create SSL certificate
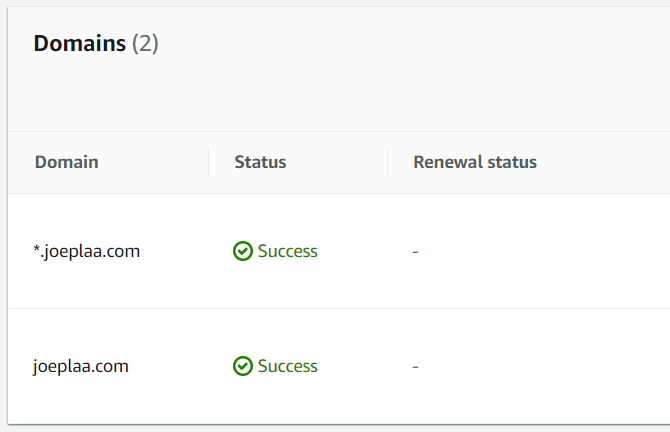
In the AWS Certificate Manager make sure you are in the "us-east-1" region. Now request a certificate. This can be one specific to your CloudFront distribution domain "cdn.joeplaa.com" or a wildcard certificate "*.joeplaa.com". I like the latter as I can use the certificate on multiple services and I won't run into the 10 certicate per account limit (this can be increased through AWS support).
If you opt for a wildcard certificate, make sure it also contains your main domain. In my case that's "joeplaa.com".
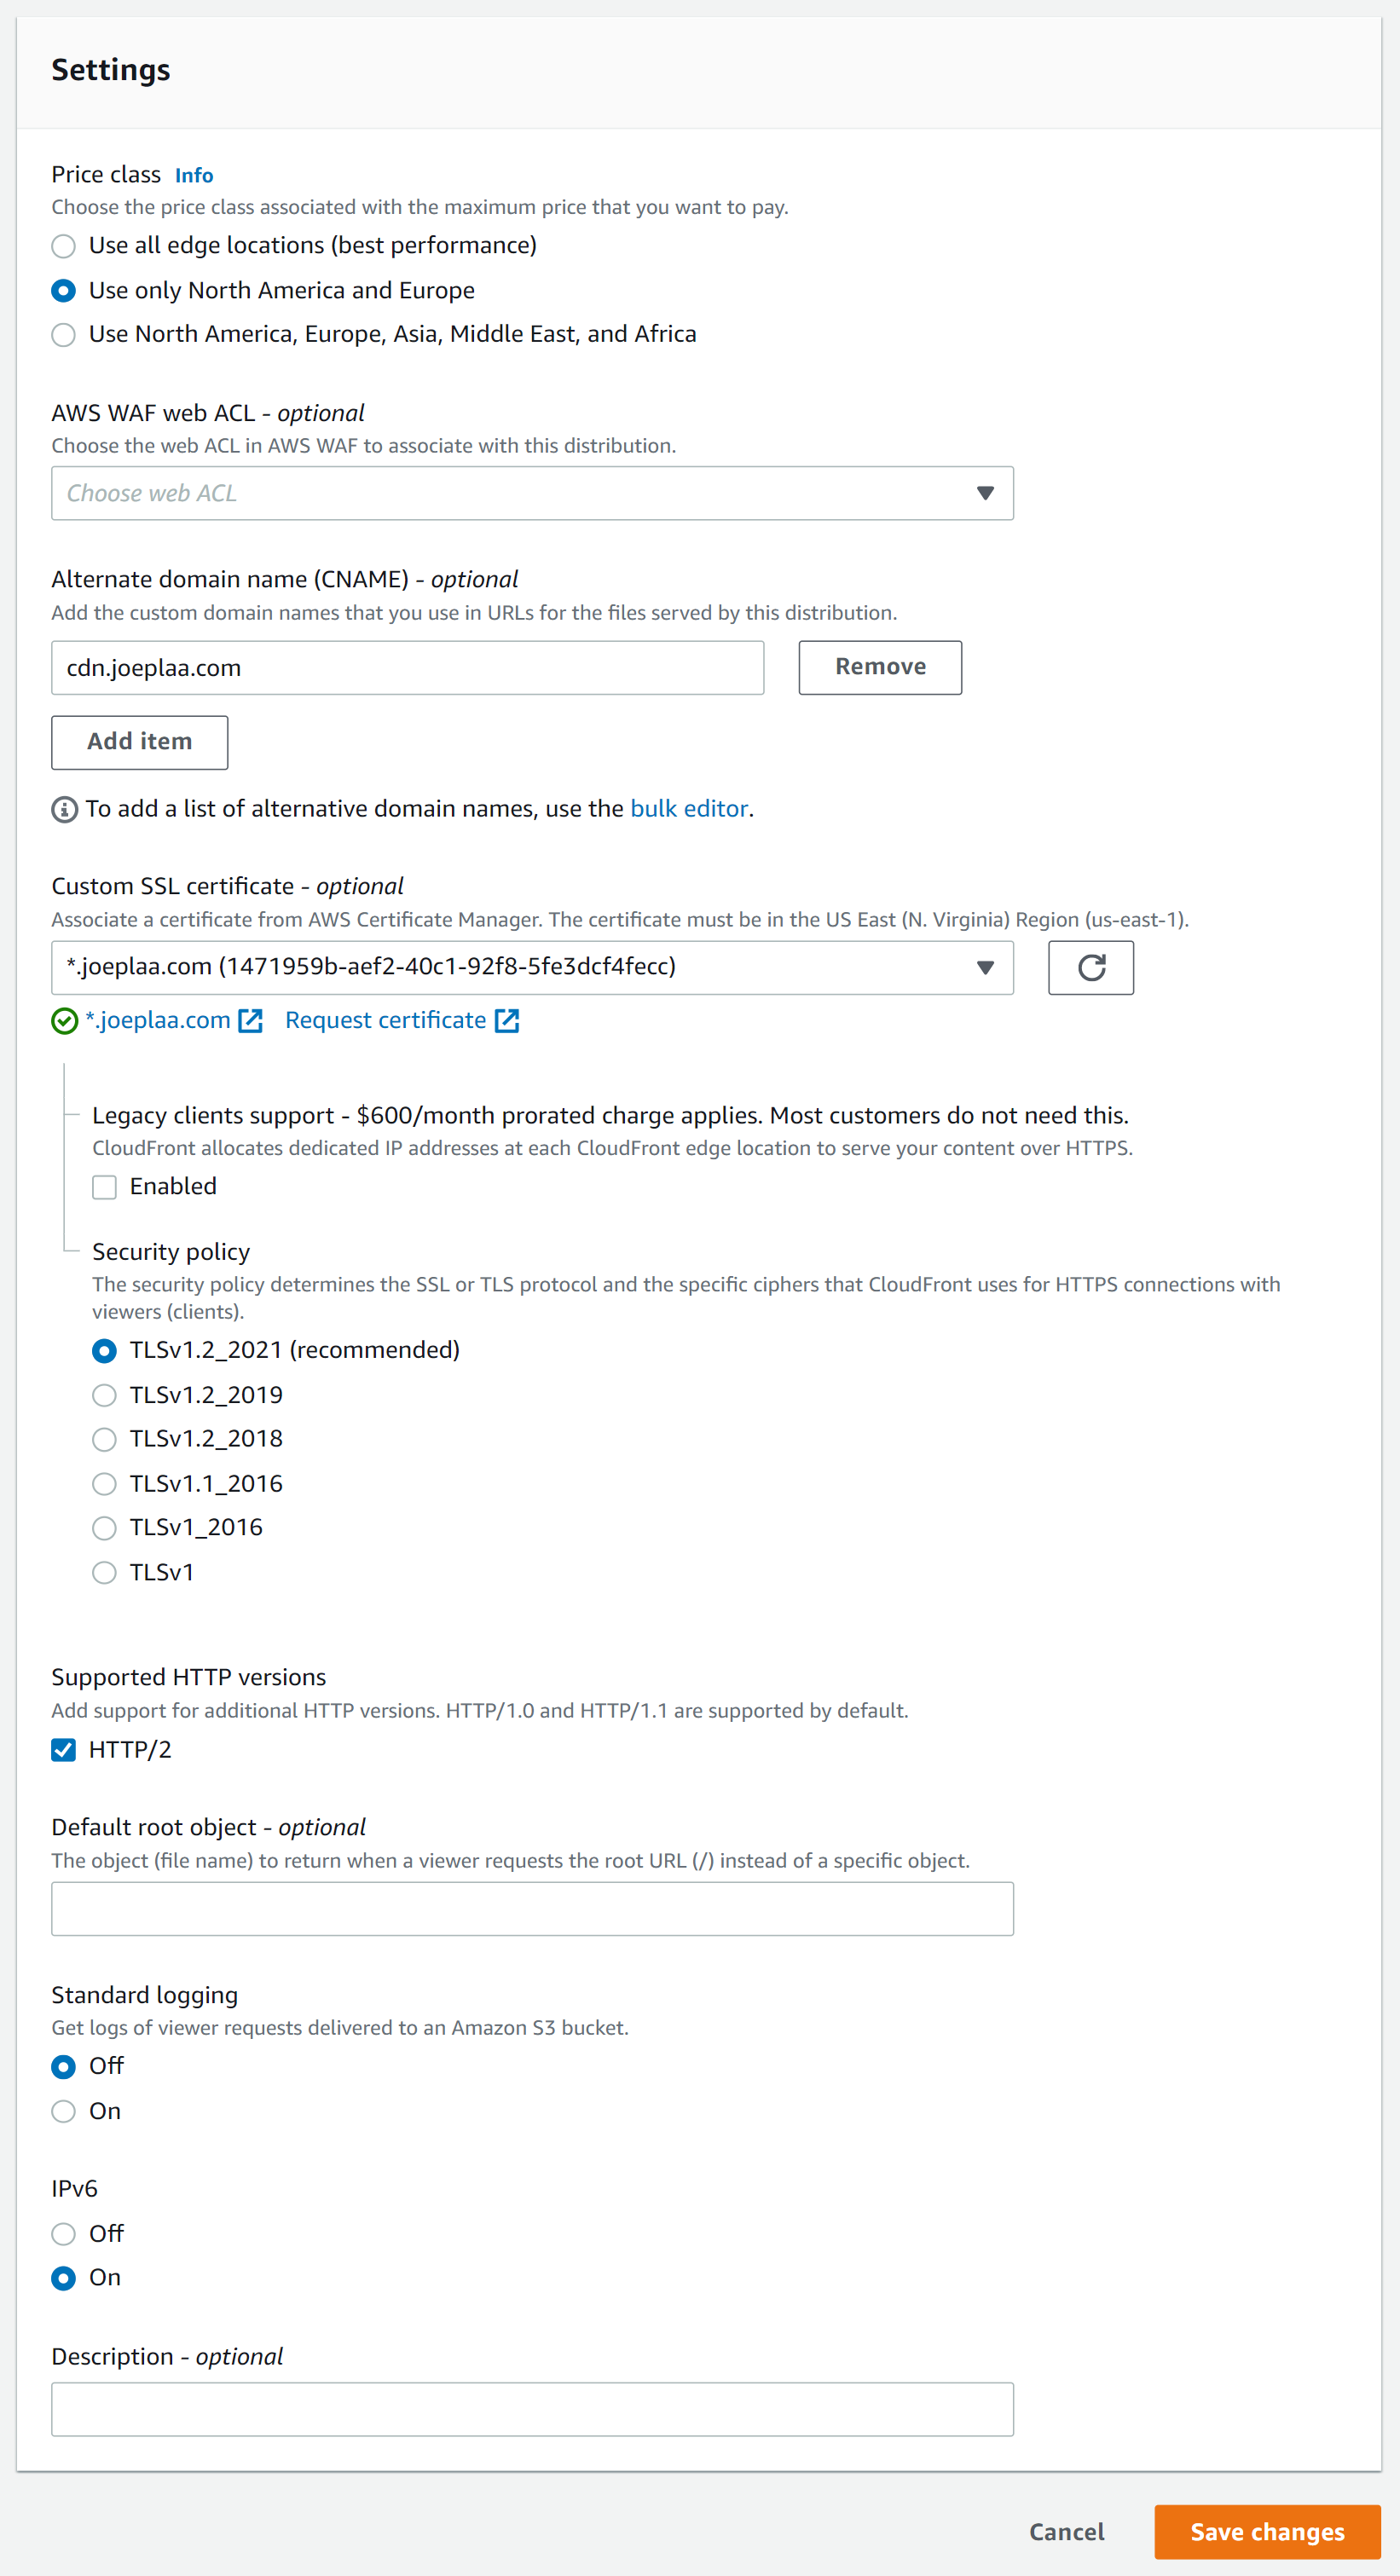
4. Create a CloudFront distribution
In Amazon CloudFront create a distribution. The screenshots below are from my existing distribution, but it should be very similar to how it looks when creating a new one.
First define the origin: the S3 bucket. Then choose to create a new OAI (or use an existing one) and don't forget to "Yes, update the bucket policy".

Now set the cache behavior: how do you want files to be cached? Ghost already adds a max-age header to the image files, so we can use that to determine how long CloudFront should keep the file in its cache.
My cdn has multiple origins, so to determine which files are from Ghost I set the "Path pattern" to the image folder.
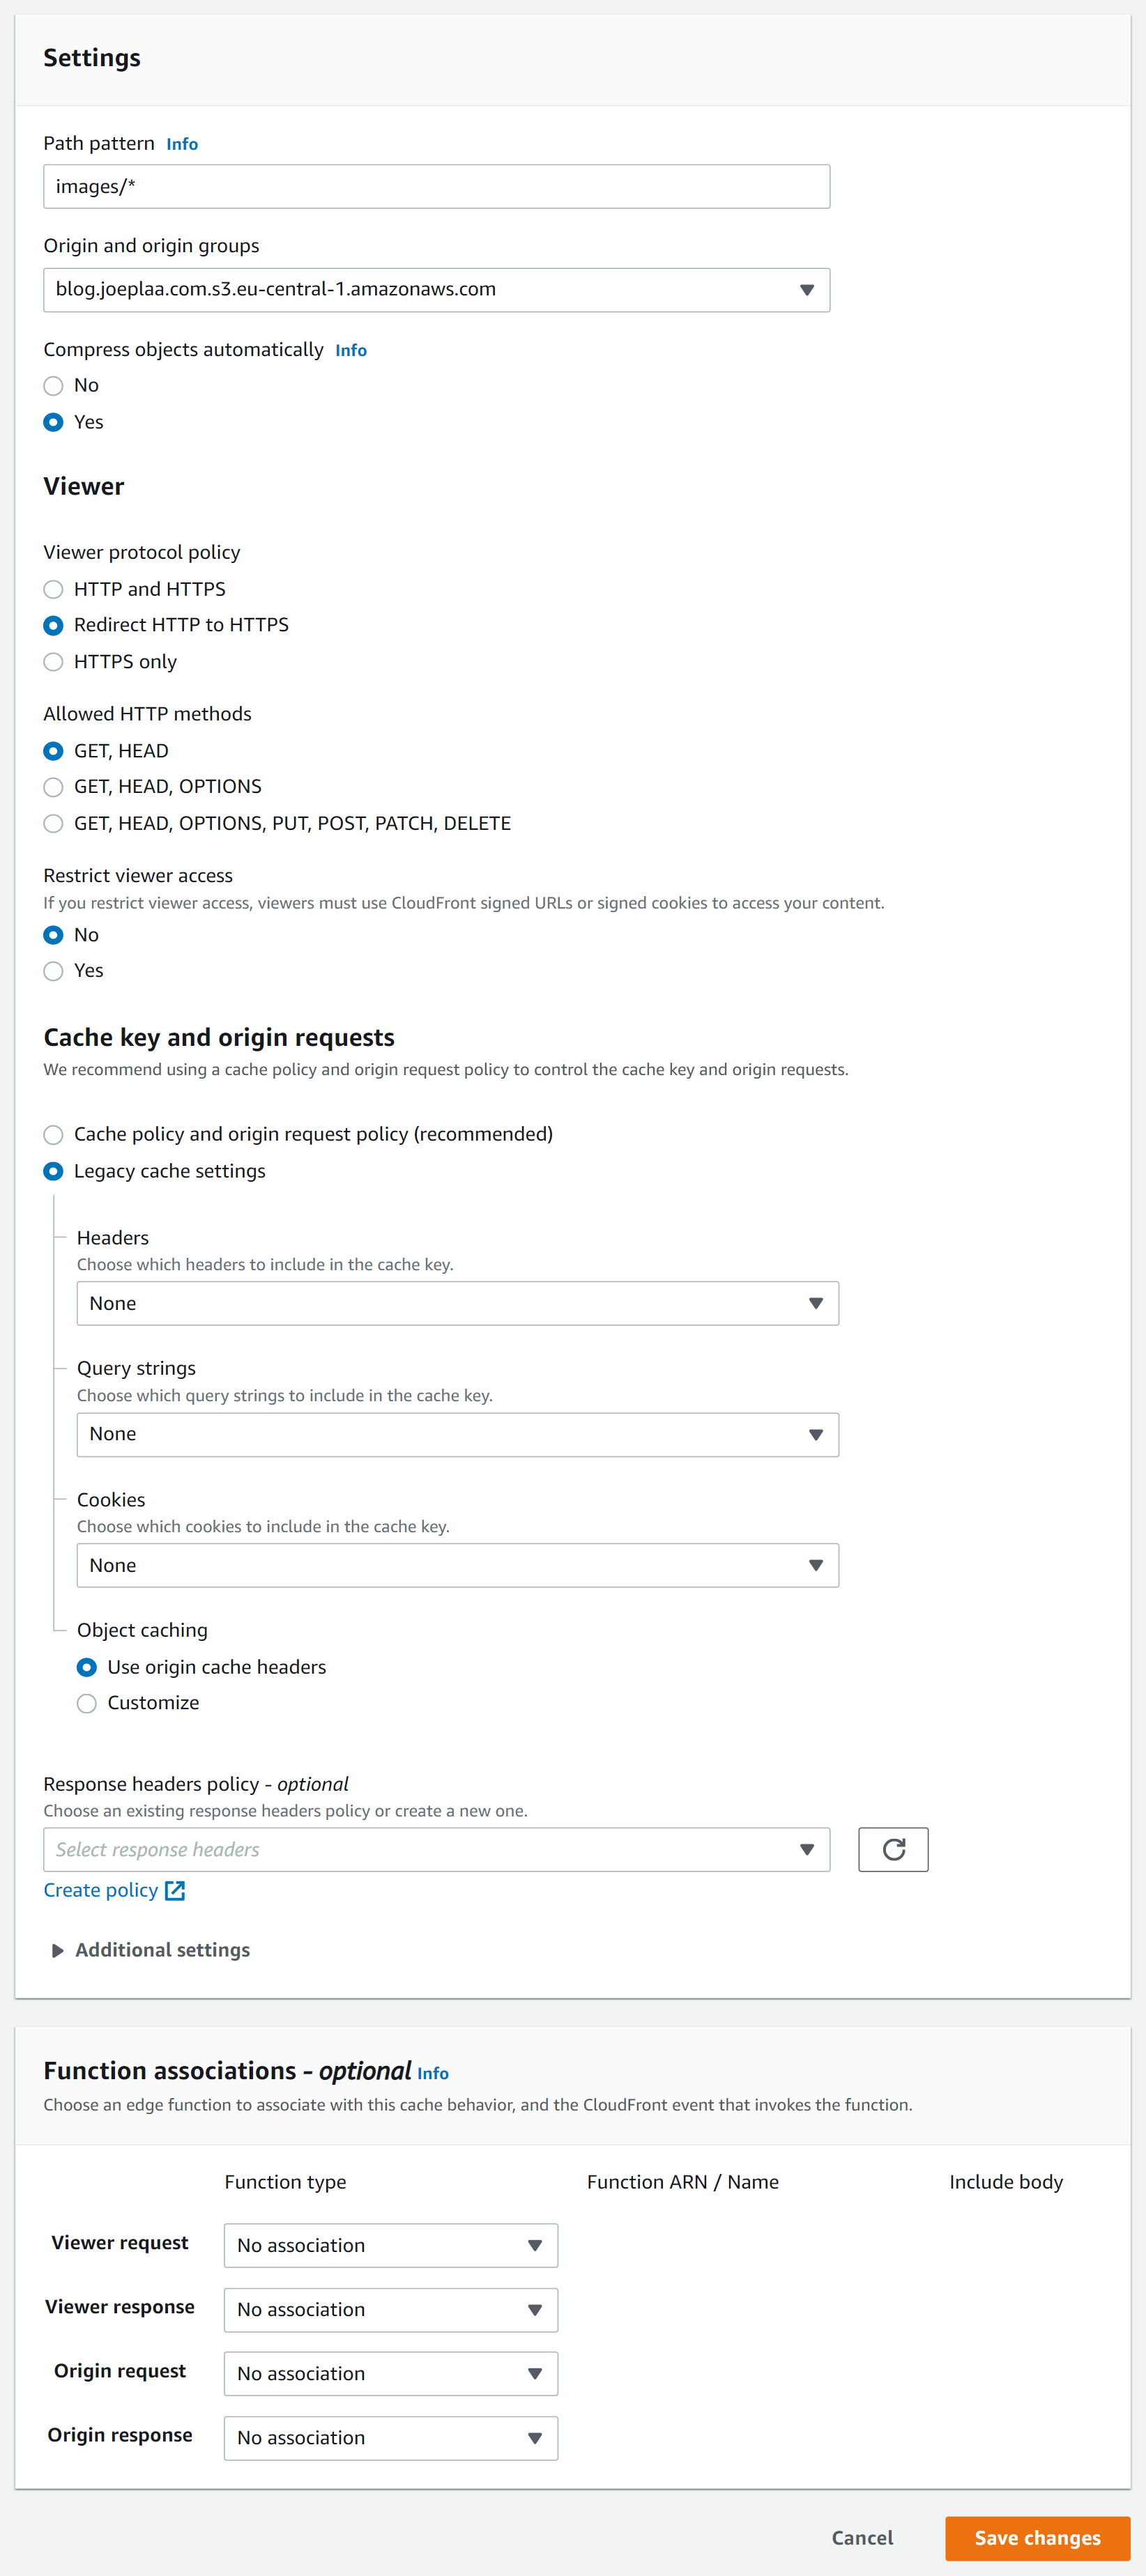
Last things to do: set the domain name to something different than your blog domain. And add the SSL certificate.
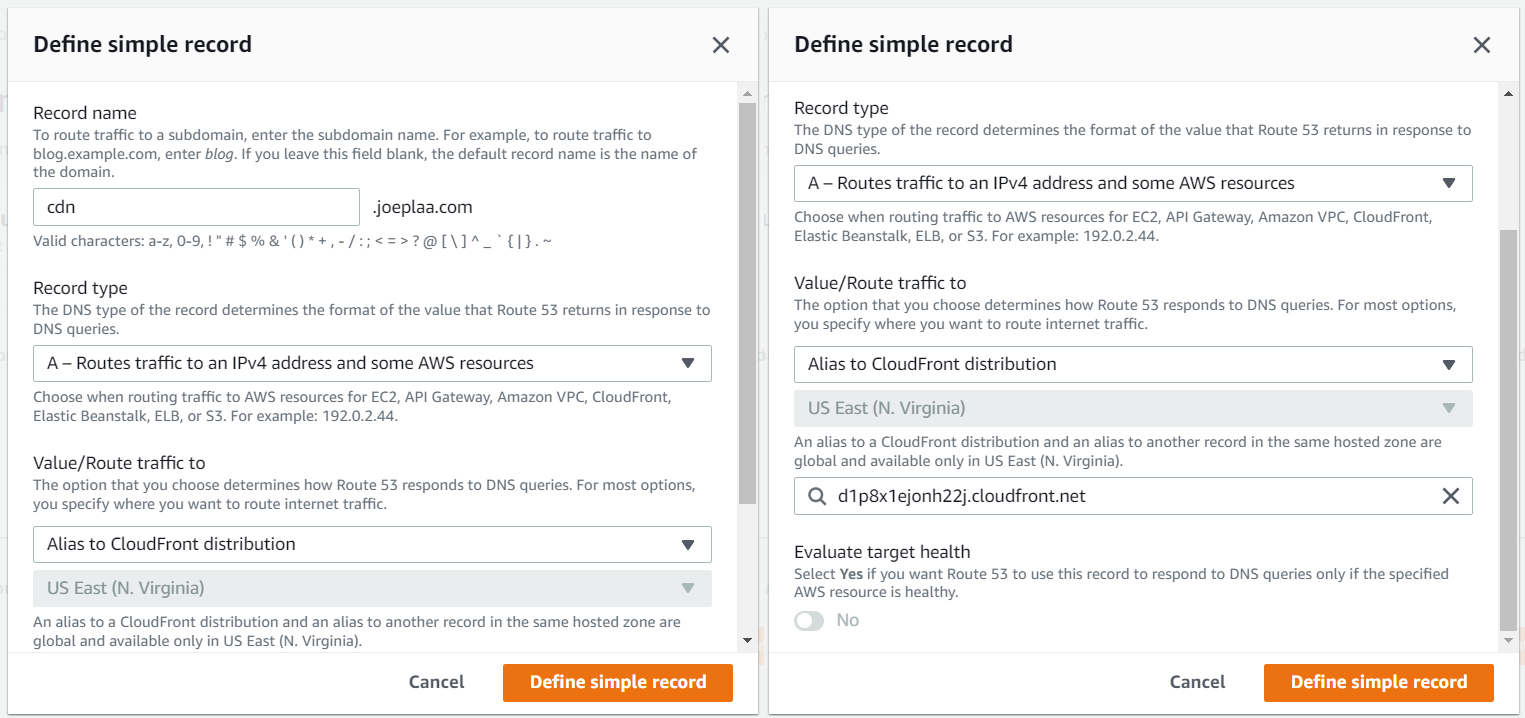
5. Point your domain name to CloudFront
If you use a hosted zone in Route53 you can simply create an A-record with an alias to your distribution. If you use another DNS solution, you have to figure out how to link a domain to multiple IP addresses. I wouldn't recommend it.
Part 2: Configure Ghost
1. SSH into the container
First check the name of your Ghost container:
docker psMine is called "ghost", so I enter the shell (Bash) of the ghost container:
docker exec -it ghost bash2. Download the S3 integration
First use npm to download the necessary plugin files and dependencies. Then create a folder and copy the plugin files and dependencies.
npm install ghost-storage-adapter-s3
mkdir -p ./content/adapters/storage
cp -r ./node_modules/ghost-storage-adapter-s3 ./content/adapters/storage/s3
cp -r ./node_modules/* ./content/adapters/storage/s3/node_modules/.
I have tried so many things that I don't know if the last step is necessary. It shouldn't be needed according to the official instructions, but I found this issue that states it solves the problem if no files are uploaded to S3.
3. Update Ghost config
I like docker-compose as it allows me to more easily link containers together and add environment variables. So, open your compose file "docker-compose.yml" and add the storage variables directly or with an environment file as I did below.
# docker-compose.yml
version: "3"
services:
  db_ghost:
    image: mariadb:10.6-focal
    container_name: db_ghost
    restart: unless-stopped
    volumes:
      - ./mariadb:/var/lib/mysql
    env_file:
      - .ghost.env
    networks:
      - joeplaa.com

  ghost:
    image: ghost:4-alpine
    container_name: ghost
    restart: unless-stopped
    ports:
      - 2368:2368
    volumes:
      - ./ghost/content:/var/lib/ghost/content
    env_file:
      - .ghost.env
    links:
      - db_ghost
    networks:
      - joeplaa.com

networks:
  joeplaa.com:
    driver: bridge
Create an environment file ".ghost.env" or append your existing file. Enter the IAM Ghost user credentials from step 1, the S3 bucket from step 2 and the CloudFront distribution from step 3. Your config file should look something like this:
# .ghost.env
# set either production or development, then it will load the respective config
NODE_ENV=production

# set blog url
url=https://blog.joeplaa.com

# set ghost database
database__client=mysql
database__connection__host=db_ghost
database__connection__user=<jpl-ghost MariaDB>
database__connection__password=<jpl-ghost MariaDB>
database__connection__database=joeplaaghost
MYSQL_ROOT_PASSWORD=<jpl-ghost MariaDB>
MYSQL_DATABASE=joeplaaghost
MYSQL_USER=<jpl-ghost MariaDB>
MYSQL_PASSWORD=<jpl-ghost MariaDB>

# set ghost mail (SES)
mail__from='Blog' <blog@joeplaa.com>
mail__transport=SMTP
mail__logger=true
mail__options__host=email-smtp.eu-central-1.amazonaws.com
mail__options__port=465
mail__options__service=SES
mail__options__secureConnection=true
mail__options__auth__user=<AWS ghost smtp user>
mail__options__auth__pass=<AWS ghost smtp user>

# set ghost storage adapter (S3)
storage__active=s3
storage__s3__accessKeyId=<AWS ghost user>
storage__s3__secretAccessKey=<AWS ghost user>
storage__s3__region=eu-central-1
storage__s3__bucket=blog.joeplaa.com
storage__s3__assetHost=https://cdn.joeplaa.com
storage__s3__pathPrefix=images
storage__s3__forcePathStyle=true
storage__s3__acl=private
Result
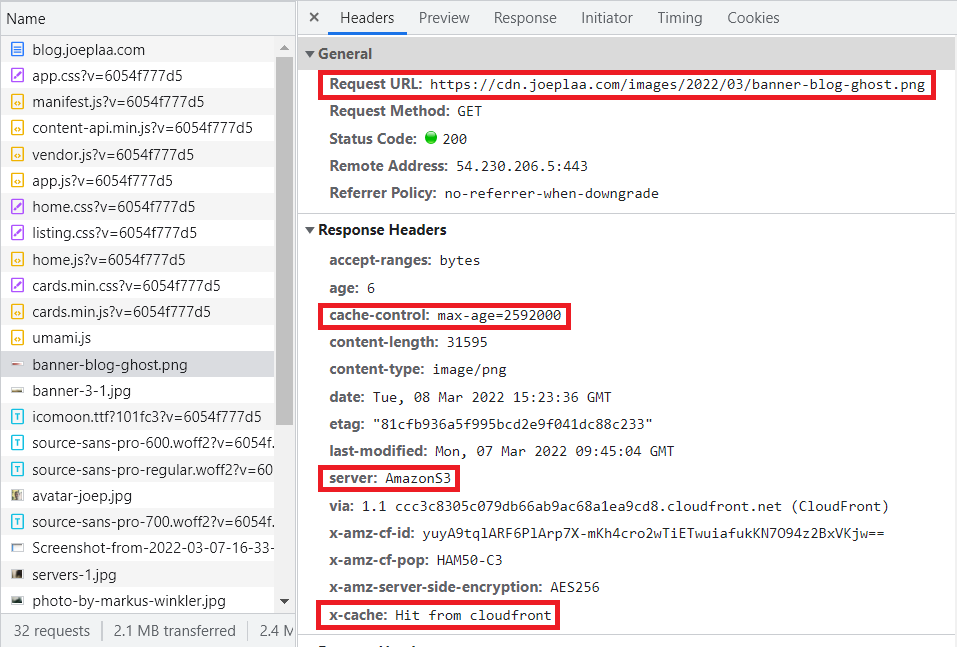
As you can see from the configuration above Ghost will store images in the bucket I named "blog.joeplaa.com" and create links to the CloudFront distibution (asset host) "https://cdn.joeplaa.com". I like to keep things tidy so I added the path prefix "images". This means all my images are stored in the "folder" images inside the bucket.
For example, my banner will get the S3 key: "blog.joeplaa.com/images/2022/03/banner-blog-ghost.png".
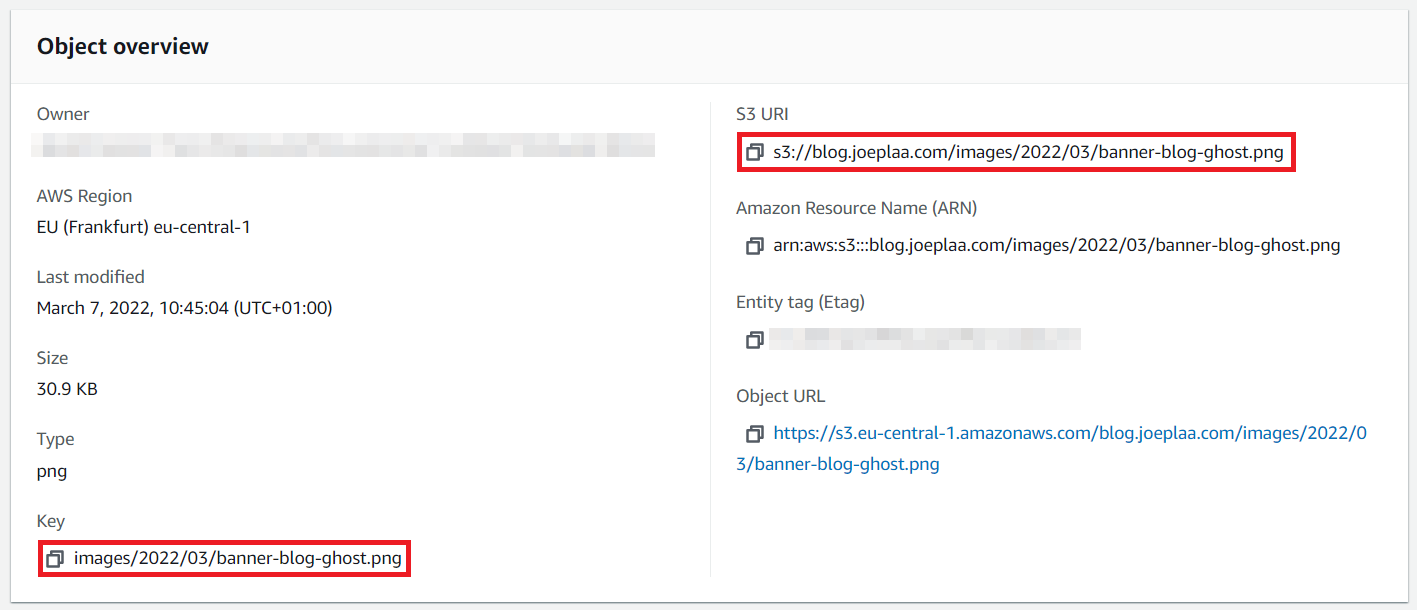
And will be served from "https://cdn.joeplaa.com/images/2022/03/banner-blog-ghost.png".